Pages

Monday, October 28, 2013

Mushroom and Brussels Sprouts Hash... with Bacon


What defines a great hash? Several years ago I posted (link) my view that any really good hash would:
  • be crisp with some browned, caramelized  bits, 
  • offer soft textures along with the crunch,
  • incorporate cooked meat, potatoes, onions  and roasted vegetables, and
  • include a seasoning tang or some serious chile heat. 
Hash typically begins with potatoes, but not today. Oh no, the rules changed for a hash based on mushrooms instead of potatoes. There would be no crispy, browned potatoes here, but who could resist caramelized 'shrooms and onions with bacon?! Add some Brussels sprouts because... well, just because they're a favorite Fall vegetable, they are bursting with healthy attributes, and I have some left after Saturday's Potato and Brussels Sprouts hash (link). 

I was not kidding earlier this week (link) when I said I really, really craved a skillet of hash, and that the next batch would have bacon. This second skillet of hash was inspired by JoytheBaker's post with it's meltingly delicious mushroom base. I didn't change much, just added some fresh thyme plus the all-important bacon and its rendered fat, used small white onions instead of shallots and finally, omitted her recommended cooked egg topping. Swap the 'shrooms out for potatoes and you have the base ingredients for my Oven-Roasted Sprouts! No wonder I was so ready to try this mushroom version of hash.


The hash was not a fast-prep dish. It takes a while for the mushrooms to release their liquid, cook down and brown nicely, but you don't want to rush through this step. Steamed 'shrooms are not as tasty or pretty as their slow-cooked, caramelized kin. Most of my time was spent working with the onions and Brussels sprouts, not a difficult chore but I was slowed down by trying to use my left hand for chopping/slicing those little round globes. (No blood was spilled during this event.) 


The result? we enjoyed this vegetable combination at lunch, thinking it more of a side dish than breakfast fare. Perhaps serving an egg on top would have made the difference there. The rich, mellow taste of the bacon-flavored mushrooms shone in this recipe, and that alone was enough to win me over. The sprouts came along for the ride, a pleasant sidekick to the spotlight-grabbing 'shrooms. Crisp bacon crumbles provided a fine topping to each serving, but a tiny internal voice queried, "Where's the crunch of crispy potato that makes this hash?" 


Photo: These large cremini were chopped into 8 wedges each.

Photo: Sprout pinwheels will separate a bit when cooked
.
Photo: Sizzling crisp bacon left a scattering of browned bits in the pan.

Photo: Cremini fill the skillet, ready to cook in bacon fat... yum!

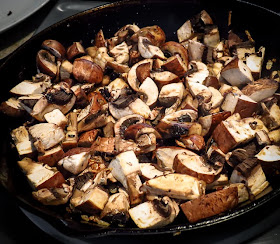
Photo: Cremini turn golden brown as they release their juices and caramelize.

Photo: Lid the pan briefly to heat the Brussels sprouts.


Photo: The seasoned Mushroom and Brussels Sprouts Hash is almost ready to serve.


Mushroom and Brussels Sprout Hash... with Bacon
Serves 2

2 strips thick-sliced smoked bacon (NOT maple-glazed)
1 tablespoon olive oil (if needed)
1 dozen tiny onions, small dice (or several small shallots)
6 large cremini mushrooms, rough chopped
1 large clove garlic, minced
3 to 4 cups shredded Brussels sprouts
1 teaspoon fresh thyme, chopped (or 1/4 tsp dried thyme)
juice of a small lemon (2 to 3 tablespoons), zest optional
salt and pepper to taste


Prep the vegetables:
  1. Peel and chop the onions, discarding any papery skin.
  2. Clean the mushrooms with a damp paper towel (do not rinse them under running water).Quarter or cut them into bite-sized chunks. 
  3. Clean each sprout, slice off the dried-out stem end and discard any discolored outer leaves. Slice into thin rounds horizontally. 
  4. Mince or use a garlic press on the garlic clove and rough chop the thyme.
To Prepare:
  1. Use a medium cast iron skillet to cook the bacon until it renders its fat and crisps up. Remove the bacon and set aside but leave the drippings and crispy bits in the pan.
  2. Add the diced onion to the pan and cook over medium heat until softened and beginning to brown. Add the mushrooms with a generous sprinkle of salt and cook until they release their liquid and begin to brown. Stir or flip with a spatula occasionally to insure most 'shrooms contact the pan. Add the garlic and fresh thyme, stir in and cook until fragrant (about one minute). 
  3. If the pan looks dry at this point, add a bit of olive oil. Add the sprouts and fold in or toss to combine with the mushrooms. Cover and cook for 2 or 3 minutes to warm the mixture. Remove the lid, increase the heat to medium high and cook until the sprouts just begin to crisp and the mushrooms are browned. 
  4. Remove from the heat. Sprinkle the lemon juice over the top and fold or toss to mix. Plate and scatter crisp bacon bits over each serving. 
Notes:
  • The hash is best served warm and enjoyed immediately, though I would be tempted to reheat and eat some the next day if there were any left over.
  • I ate my serving without any extra condiments. As usual, RL topped his with some additional seasoning, this time he chose Heinz 57 Sauce. 
  • The dish rated two thumbs up, but it may be a while before Brussels sprouts make another appearance at the table. (Two days in a row was too much for one of us.)

Saturday, October 26, 2013

Potato Hash with Brussels Sprouts and Fennel


I am easily influenced by the many tempting recipes and photos I find online. This week is a perfect example, and the reason I am making hash for breakfast... again. I should stay out of the kitchen for a couple of weeks, the 30 stitches in my right arm need time to heal, but left-handed chopping works if I'm very slow and careful. 

This post for potato and Brussels sprouts hash (by J. Kenji Lopez-Alt at Serious Eats) launched my renewed interest in hash, and then Joy the Baker's mushroom and sprouts recipe and photos finished me off completely. I really, really craved a skillet of crispy, savory hash. All that left was the question of potatoes or mushrooms. I already knew there should be bacon involved. "Mushroom and Maybe Potato Hash with Bacon, Kale, Brussels Sprouts, Onions and of course, Bacon and Topped With Eggs", might be a bit too long for a catchy blog post title, but it sounded heavenly to me. 


Reality set in. There were w-a-y too many ingredients to incorporate into just one skillet of hash, and my favorite cast iron skillet is only 8 inches wide. Those delicious individual flavors would be lost in the scrum. An obvious solution was to cook different combinations and play with the ingredients over several days. No problem there, I can make hash day after day after day. Several of my hash recipes are already posted here and here, though I usually create each new skilletful off the cuff.


Skillet One began with a riff off Kenji's vegetarian recipe. It combined potatoes, Brussels sprouts, onion, fennel with some non-vegetarian chicken andouille sausage. Then salt and pepper, fresh basil and parsley, lemon zest and smoked salt joined the mix. What? no bacon? No, I thought the smoked salt might handle that flavor component. I topped my serving with an oven-baked egg and, as usual, RL went with hash, no egg, and an overly generous dollop of salsa on top.


Photo: Cooked Yukon Gold potatoes drain and cool

Photo:Fennel, andouille, parsley, Brussels sprouts and onion; missing are the basil, lemon and smoked salt

Photo: Vegetables join the skillet of browned potatoes

Photo: The hash is ready for eggs and a finish in the oven
The result: The hash was pleasant enough, and we cheerfully ate every bit of it. Though filling and fine for a family breakfast, it was not special enough for a company meal. It was just... hash. I love fennel, but could not locate it as a separate, licoricey taste. Even the sprouts were quite mildly well behaved. Smoked salt was a major flavor hit as a finish, but that's no surprise. I'm tempted to drop the smoked salt and the andouille next time, and substitute smoked bacon instead for the delicious salty/smokey/fat combination that I missed. Or maybe I'll just move on to a mushroom and sprouts hash, ignoring the potatoes a la Joy the Baker. Next time I guarantee, there will be bacon.


Potato Hash with Brussels Sprouts and Fennel

2 generous servings

4 medium Yukon Gold potatoes, unpeeled, 3/4-inch dice

3 tablespoons canola oil, divided
6-8 large Brussels sprouts, sliced thin vertically or shredded
1 link spicy chicken Andouille sausage, diced (optional)
1 small fennel bulb, sliced thin vertically
1 small white onion, diced
1/4 cup flat leaf parsley, rough chopped
1/8 cup basil, julienned
salt and pepper to taste
zest and juice of 1 lemon
2 eggs (optional)
smoked salt to finish

Preheat the oven to 425 f. Slice and dice the vegetables, sausage, and herbs. Zest and juice the lemon. Combine the parsley, basil and lemon zest; place in a small bowl and set aside. Now you're ready to cook.


Put the diced potatoes into a small pan, cover with generously salted water and bring to a boil. Reduce the heat to a rolling simmer and cook until barely tender (about 3 minutes). Drain and set aside.


Add 2 tablespoons of the oil to a cast iron skillet and heat over medium-high heat until the oil shimmers, but don't let it smoke. Add the drained potatoes and spread into a single layer. Add salt and pepper to your liking and let the potatoes cook undisturbed for several minutes until their bottoms begin to brown. Turn and cook until browned on most surfaces (this will take roughly 5 minutes). Be gentle when you turn the taters, you don't want to mash them.


Add the remaining 1 tablespoon of oil, the sausage (if you're using it), shredded sprouts and fennel to the skillet and cook for 2 or 3 minutes to warm and soften the leaves. (If you did not use spicy sausage, this is the time to add a dash or two of your favorite hot sauce.) Add the onion and cook, turning over occasionally until the vegetables just begin to get crispy. 


Remove  from the heat, stir in half of the lemon zest, parsley and basil mix. Use a large tablespoon or ladle to press 2 depressions in the hash and gently break an egg into each spot. Place the skillet in the preheated 425 f oven  and bake until the eggs are done to your preference (whites are set sufficiently after 4 minutes in my oven).


Remove from the oven and sprinkle with lemon juice and the remaining lemon zest, parsley and basil mix. Serve and top each serving with a sprinkle of smoked salt. Have bowls of hot sauce, salsa and/or sour cream available.


Wednesday, October 23, 2013

One Lonely Rutabaga


I have managed to avoid tasting rutabagas until now, purposefully bypassing this turnipy-looking root vegetable at the market if I recognized it or even knew what it was. Some root vegetables are old, familiar friends, things like carrots, potatoes  beets, radishes, and onions. Garlic, horseradish and ginger might slide onto the favored root vegetable list too, if you consider them vegetables. Many other root vegetables are just occasional acquaintances; that would be yams and sweet potatoes, jicama, daikon and the like. But turnips, parsnips and rutabagas - no, thank you very much. Not until this week, when I decided to try a rutabaga.

This is not an attractive vegetable, its mottled two-toned and hairy skin won't win any prizes for beauty. I rummaged around the produce display, seeking the least ugly, smallest rutabaga of the lot. Now what? I might have cut the globe into large chunks for oven-roasting, but it seemed a waste of electricity for one small rutabaga. Instead I settled for dicing the thing and cooking it with a bit of water in the microwave until barely tender. Step Two: drain, add salt, pepper and a pat of butter. Step Three: taste. Hmmmm, not bad. RL and I nibbled one bite after another and decided it resembled a potato in texture and taste. There wasn't a strong, distinctive rutabaga flavor, instead we tasted salt, pepper and butter on an almost sweet white potato. 


So what was the big deal about avoidance?! For starters, they are unfamiliar and ugly. Rutabagas, a cross between the turnip and wild cabbage, have a reputation for being bitter when cooked. One article (1) reported they are prized as animal fodder. Okay, nothing like a bitter taste and value as cattle feed to draw culinary interest in an ugly vegetable! Rutabagas are, however, high in vitamin C and low in carbohydrates, lower than potatoes, which gives them a few high marks health wise. 


Having sampled one rutabaga and found it palatable, I'm willing to work with this root vegetable again. My first project might be potato rolls, replacing 20-30% of the potatoes with mashed rutabagas. I do love my bread, and this would fit the #TwelveLoaves theme for October. Several of the recipes below sound almost tempting as well. 


Rutabaga Oven Fries 
Carrots and Rutabagas with Lemon and Honey
Mashed Root Vegetables with Bacon Vinaigrette
Roasted Rutabaga Beer Cheese Soup
Rutabaga Gratin

Sunday, October 20, 2013

Sourdough Ginger Pear Quick Bread

Sourdough Surprises - October 2013


When I was a youngster, banana bread was the number one choice for quick breads. As a young adult, more than a few years ago, zucchini loaves led the quick bread parade in everyone's kitchen. Lately it seems there has been a quick bread recipe explosion with both sweet and savory offerings. Or have I just noticed? What a surprise to discover that quick breads have been around forever, well for a long time anyway. 
"Quick bread" most probably originated in the United States of America at the end of the eighteenth century. Before the creation of quick bread, baked goods were leavened with either yeast or by mixing dough with eggs. During the American Civil War (1861-1865), the demand for food was high. Thus, bread was rapidly made and leavened with baking soda, instead of yeast. Hence the name "quick bread". Wikipedia
For a more in-depth quick bread primer, go to King Arthur Flour's informative page

When Sourdough Surprises announced quick breads and muffins as the October theme, it was an invitation to explore some new possibilities. No banana bread or zucchini muffins for me this month, oh no. 


Piles of beautiful Bartlett pears at an Island market were irresistible, prompting a search for some fresh pear quick bread recipes to adapt to sourdough. Omigosh, too many choices, too similar in ingredients to differentiate, too much fun wasting time and browsing online sources! I went back to paging through the many cookbooks I carry onboard and settled on an Alaskan innkeeper's recipe for pear bread. I chose Annie Unrein's cookbook, From Halibut to JalapeƱos, a favorite read for it's history of homesteading the land and opening an inn in Gustavus, Alaska, at the edge of Glacier Bay National Park. I love the book but don't cook from it often enough.  


I added some grated ginger to Annie's original recipe, thinking pear and ginger would play well together. Hmmmm, that was a start and then a sprinkle of nutmeg and cardamom joined the party. That was better, even the raw dough tasted good. My only mistake was in baking just half a recipe the first time. Those two mini loaves disappeared almost before the aroma left the galley! That tantalizing scent wafted out of the boat, stopped passing foot traffic on the pier, and garnered a few offers to taste test.     


Photo: Uneven loaf height may be due to uneven oven heat, or the boat not quite sitting level on that particular day.
RL is not usually fond of pears, noting they are typically either too hard and unripe or are over-the-hill, soft and mushy. This Ginger Pear Quick Bread may have made him a pear fan at last - he certainly ate enough to let me know the recipe is a winner.


Sourdough Ginger Pear Quick Bread 
inspired by a recipe found in From Halibut to JalapeƱos

1/2 cup (1 stick) butter, at room temperature
1 cup granulated sugar (or substitute a heaping 3/4 cup honey)
2 eggs
1 tablespoon (or more) freshly grated ginger
1 3/4 cups all-purpose flour
1 teaspoon baking powder
1/2 teaspoon baking soda
1/2 teaspoon salt
Dash of nutmeg and cardamom
1/4 cup sourdough starter, well-fed and rested
1/8 cup buttermilk
1 generous cup firm pears; peeled, cored, coarsely chopped
1 teaspoon vanilla
1/2 cup nuts (optional, I didn't use any)
Sugar to sprinkle on top after baking (optional)
  1. Preheat the oven to 350 degrees F. Cream the butter and sugar together, then beat in the eggs one at a time. Stir in the grated ginger.
  2. Combine the flour, baking powder, baking soda, salt, nutmeg and cardamom in a medium bowl. Set aside.
  3.  Combine the sourdough starter and the buttermilk. Set aside.
  4. Add the dry ingredients and the sourdough/buttermilk mix alternately in several additions to the egg mixture.
  5. Using a rubber spatula, gently stir in the pears and the vanilla (plus nuts if you are using any).
  6. Pour the batter into 4 greased and floured mini loaf pans or one prepared 9x5x3 loaf pan. Bake until a cake tester inserted into the center of the loaf comes out clean - about 40 minutes for the mini loaves and 1 hour for the larger loaf (in my galley oven). (10/30/13 - four small loaves took 50 minutes in the house oven)
  7. Let the loaves cool in the pan for a few minutes, sprinkle with sugar if using, then turn out on a rack to cool.
Notes: 
  • Almost ripe or ripe-but-still-firm pears are a necessity for this bread. Soft pears will go mushy; their texture will make the bread unappealing to eat. I can recommend Bartlett and Bosc pears, but have not tried other varieties this week. 
  • The flavor is reported to intensify and the texture firm up if the loaves are wrapped and chilled for a day... but who can wait that long? We thought the first loaf was delicious when we enjoyed a few slices still warm from the oven. A second loaf was equally tasty served cold at breakfast two days later. No difference noted in texture or flavor.
  • Play around with the spices and flavorings. I'm thinking almond extract or perhaps anise, citrus zest, a hint of rosemary, or ....
Now check out the other recipes from Sourdough Surprises bakers.

Sunday, October 13, 2013

Kale Gratin

SRC October 2013


My assigned blog for this month's Secret Recipe Club was Grandma Loy's Kitchen. It proved to be a treasure chest of tempting recipes, greeting readers with this message: "Hi and welcome to my kitchen. Have a cup of tea or coffee or a glass of milk and some cookies. There are always cookies." Oh my, yes, there were cookies, and many other sweet things. I found recipes fo42 bar cookies and brownies, 9 cakes, 10 candies, 47 cookies, 28 desserts and 16 holiday cookie mix listings. I'm not overly fond of sweets, but Loy's Waffle cookies did sound interesting, unusual but interesting. The Bacon Cheese Dogs and BLT Salad with Kale and Leeks grabbed my attention too; mmmmmmm, bacon. But the Serbian Cabbage was a standout choice to match the current cool weather. 

I took a few liberties with the original recipe, substituting kale for head cabbage and using fresh dairy instead of canned. Kale Gratin sounds fancy but it is still just baked cabbage. Baked cabbage, yes, but this delicious gratin was more versatile than that. It began as a satisfying side dish at dinner. It worked well for breakfast, topped with a runny poached egg. Then I absolutely fell in love with a scoop of Kale Gratin served on top of garlic-rubbed crostini as an appetizer. How's that for versatile?


RL was less enthusiastic about any of the versions, but he doesn't love kale anything, and rarely eats eggs at breakfast. His main complaint comment was that baked Parmesan made the whole boat smell funky. (Yes, but only briefly.) One more caution: too much Parmesan is not a good thing when it bakes into a hard shell, so don't overdo the cheese. This recipe is really all about the kale.


Kale Gratin 
1 medium bunch kale
2 green onions, sliced in thin rounds
1 cup heavy cream (or substitute coconut milk) 
Dash of nutmeg
Dash of white pepper
Dash of hot sauce to taste (optional)
1/4 cup bread crumbs
1/4 cup fresh shredded Parmesan
melted butter to drizzle over the top (optional)
  1. Wash and chop 1 bunch of kale into bite-sized pieces, discarding the stems. Blanch briefly in boiling water OR microwave for 1 minute with a few tablespoons of water, covered with plastic wrap. Drain thoroughly.
  2. Scatter the kale evenly in a baking dish. Distribute the onion bits over the top.
  3. Mix together the cream, nutmeg, white pepper and hot sauce. Pour over the kale.
  4. Sprinkle with the bread crumbs and Parmesan. 
  5. Drizzle melted butter over the top. (optional step)
  6. Bake uncovered in a 350 degree oven until the top begins to brown.

Here is the original recipe for
 Grandma Loy's Serbian Cabbage

1 medium-head cabbage (about 3 lbs.) finely shredded
1 can (13 oz.) evaporated milk (regular, 2 %, or fat-free)
2/3 to 1 c. dry bread crumbs (enough to evenly cover top of casserole)
1/2 c. butter or margarine, melted

Place cabbage in shallow 4-quart casserole.  (I use a 9x13-inch glass baking dish.)  Pour milk over; sprinkle with bread crumbs.  Evenly pour melted butter or margarine over the top.  Cover and bake at 350 degrees for 30 minutes.  Uncover; bake 30 minutes more or until crumbs are lightly browned and cabbage is tender.  Makes 6-8 servings.


Friday, October 11, 2013

Breakfast Tacos


Doesn't that taco look like it's smiling? Really, a huge grin? I did need a smile this morning, even if was my breakfast giving me attitude. Some days are like that, and it's the little things that help. Forget the less-than-healthy aspect of smoky bacon, sriracha-flavored eggs, fried onions and peppers, pepper jack cheese and full-fat sour cream tucked into a flour tortilla. Instead, imagine the combined flavors of those ingredients bringing joy to your taste buds. Oh yes, I'll bet you're smiling too. 

I just wanted to share this morning's smile with you. Now I'm ready to attack the gigantic To Do List before the weekend. I hope your day goes well.     


Friday, October 4, 2013

Mostly Minestrone Soup


A bowl of Italian restaurant minestrone was a disappointment earlier this week and I was left craving a good bowl of minestrone soup. I wanted something hearty but not too heavy, robust without any one flavor note dominating the taste. Generations of Italian families have created countless versions of this soup, so how difficult could it be? Hah! more difficult than it seems when you begin with an ideal taste in your mind, no family recipe to fall back on, and w-a-y too many variations available online. 

Today's kitchen experiment was one step closer to a really good bowl of soup, with no claim to it being authentic Italian. This was a spur of the moment creation and I didn't bother to take any notes on ingredients or procedure as I went along. The result was surprisingly good, so here is a close approximation of what went into today's Mostly Minestrone Soup. This may not be the ultimate recipe I've been searching for (link), but today it was just fine, thank you.


Do you have a minestrone soup recipe to recommend?


Mostly Minestrone

2 tablespoons bacon grease, or canola oil
   (I cooked 2 bacon strips and added the bacon to the soup along with the beans) 
2 links Italian or Andouille sausage, in thin coins or crumbled
½ medium onion, diced
½ red bell pepper, diced
1 large stalk celery, diced
1 large carrot, diced
1 heaping teaspoon mixed Italian herbs
4 cups tomatoes, chopped
   (I used cherry tomatoes that needed to be used immediately)
3 cups low-sodium chicken broth
1 cup beef broth
1 bay leaf
several chunks of Parmesan rind
juice & zest of 1 small lemon
1 can cannellini beans, or any white bean
1 cup green beans cut into short lengths
2 cups (packed) fresh baby spinach leaves
Salt and freshly ground black pepper, to taste

Add per each bowl, to serve:
handful of cooked short tube pasta
1 tablespoon balsamic vinegar
Shredded parmesan cheese
  1. Heat the oil in a heavy bottomed pot over medium; add sausage coins and cook until browned on both sides but not crisp. Use a slotted spoon to remove the sausage and set aside.
  2. Add the onion, red pepper, celery and carrots to the sausage-flavored oil in the same pan and cook to soften but not brown. Add the Italian herbs and stir to mix. 
  3. Add the tomato chunks and any juices; cook until the tomatoes break down (maybe 10 minutes), stirring occasionally. Add the broths, parmesan rind and bay leaf; simmer uncovered over medium-low heat for 20 minutes.
  4. Add the lemon, green beans and spinach and gently simmer for another 5 minutes to heat through.
  5. Taste and adjust seasonings.
  6. To serve: Add a handful of cooked pasta to each bowl. Ladle in some broth to warm the pasta; add some solids and more broth. Top with a splash of balsamic vinegar and a sprinkle of parmesan.
Notes: 
1. The soup needed a bit more liquid so I added a ladle of the pasta cooking water to the pot when I added the beans and spinach. It didn't seem to affect the flavor, but next time I might add more broth earlier.
2. Top each bowl with fresh basil or Italian parsley for a fresh flavor pop.

Wednesday, October 2, 2013

A Hit and a Miss at Pizzeria Pulcinella


The continuing search for a terrific minestrone soup...

We are now approaching classic soup weather in the Pacific Northwest. You know the signs; it's a season of cool temperature, dark clouds, drizzly rain, plus wind-gusts-to-rattle-the-windows kind of a weather all mixed with glorious days of cool sunshine.  Mmmmm, minestrone soup kind of weather. Lunch at a favorite Italian joint, Pizzeria Pulcinella, should have been the perfect antidote for any dreary weather blues. Well, it almost worked. 

Pulcinella's Neopolitan pizzas and delicious salads have become our go-to favorites, but the daily lunch sheet looked way too tempting to pass up. I'll admit I arrived primed to enjoy a steaming bowl of minestrone, anticipating a tomato-based broth loaded with seasonal vegetables, beans and a handful of pasta.Then again, the panini did sound amazing. The plan was to order a two different items and share both. So I ordered the panini and RL went for the bowl of minestrone with foccaccia. 


We did share my panini, a crisped focaccia thickly layered with various meats and cheeses that was a full-flavored delight. The large serving was more than enough for the two of us.


The much anticipated house minestrone should have been the real treat, but didn't deliver. It looked unappealingly murky with no evidence of any tomatoes, winter greens or pasta. Moving past the visual I dove into RL's bowl for a taste test.  The first spoonful of broth lacked flavor, and a second spoonful confirmed the bland taste. It was an okay chicken-broth based cabbagey soup, but it wasn't the minestrone I was after. so I graciously let RL enjoy the rest of the bowl.  The attentive waitress offered soup refills, but we politely declined. 


Pulcinella remains on the list of good local pizzerias, and we will return again and again for pizza and salad. However, the minestrone soup search goes on. It might be time to try another recipe at home.