Pages

Monday, May 29, 2017

Root Beer Floats... surprise!


"Why the surprise notation in the title?" you ask. Ah, there's a long history behind this all-American classic, and a short tale behind my root beer float today. 

Some sources claim that root beer was first manufactured, bottled and sold in 1880 and the first root beer float followed some thirteen years later. Frank Wisner of Cripple Creek, Colorado noticed that the snowy peaks on Cow Mountain looked like ice cream floating in soda. The following day he floated a scoop of vanilla ice cream to the top of his glass of root beer and invented the "black cow."

OR, on a particularly hot day in Philadelphia in 1874, Robert McCay Green ran out of ice as he served soda to his customers. He substituted ice cream instead to chill the drinks. However, many others claim to have made this creation, including one of Green's employees. No matter who first served this fizzy, foamy concoction, it has been a favorite treat for many generations. 


Today it was an unplanned surprise in my kitchen. I frequently order groceries online, specify a convenient delivery time, and free up my schedule to do other things. Today's delivery should have included a 6-pack of Bundaberg ginger beer, a necessary ingredient for a batch of Moscow Mules. Instead the grocery mistakenly substituted a 6-pack of Bundaberg root beer, an entirely different flavor of soda, more sweet and less spicy, and definitely not what I had in mind for Moscow Mules.


Okay, switch over to a taste-test of dueling root beers, not a bad plan for lazing about on the deck in 80-degree weather. It only took a few sips of each to reaffirm my preference for Henry Weinhard's root beer. Bundaberg tasted sweeter, maybe too sweet, and a bit thin in flavor. Henry's, pleasantly smooth and creamy, had a somewhat stronger flavor (honey, vanilla and maybe some licorice or wintergreen) with a hint of a bite . Both root beers fizzed nicely when combined with ice cream. So, sip, taste, switch samples. Repeat. Repeat. Repeat. Yes, a valid taste test requires much sampling.

The crystalized ice cream foam remained the star of the show, frothy bubbles of carbon dioxide released when carbonated root beer and ice cream meet. The fat and foaming agents in the ice cream coat the CO2 bubbles, increasing surface tension, which allows the the bubbles to expand and produce a longer-lasting, foamy head. Technique gurus dispute the order in which ingredients should be added to a chilled glass. 

  • Begin with root beer, filling the glass 3/4 full, and carefully add ice cream to allow foam without overflowing. 
  • OR add scoop(s) of ice cream to the glass, then tilt the glass and gently pour the root beer down the side. This prevents a wasteful splash when you drop the ice cream in. Detractors say it results in a murky-looking liquid from the ice cream melting more quickly as the soda is poured over it.

Pick your method, or experiment with both. Enjoy the original, a two-ingredient classic float of root beer with vanilla ice cream, or get creative and try a few flavor additions. Maybe a splash of bourbon and a dollop of whipped cream, or kahlua with coconut ice cream, or just skim Pinterest for a gazillion more tempting combinations. Myself, I'm happy enough with the classic... with Henry Weinhard's root beer, of course.


Tuesday, May 23, 2017

Fresh Apple Upside-Down Cake


Apple Cake. Made with fresh apples, not dried. Bursting with appleness. Hinting at apple pie flavors, but truly a cake. How difficult can that be? Damned difficult, it seems. My search for a satisfying apple cake began with Dorie Greenspan's Fresh Apple Custard Cake which won honors for aroma but seriously underperformed in flavor. I thought my Swedish Apple Custard Cake was an improved appley version of the same, but it was still somewhat between a cake and a custard. My hunt continued.

The latest cake came from a Martha Stewart recipe for an apple upside-down cake. Pineapple upside-down cakes are certainly a classic American dessert, one made popular in the 1920s soon after James Dole introduced pineapples precut into rings. Martha's fresh apple version sounded tempting.      

My first attempt yielded a dry interior and over-caramelized bottom (flipped to become the top). Adjust the baking time/temperature and try again. The second cake was an improvement, adequately moist but still not appley enough. Add a dollop of whipped cream or scoop of ice cream and no one would turn down a slice or two. I might make this recipe again, though a box cake version would tempt me, but THE apple cake recipe remains one of my dreams.


Fresh Apple Upside Down Cake

based on a Martha Stewart recipe

Makes one 8-inch cake

½ stick (1/4 cup) butter, melted
¼ cup brown sugar, firmly packed
¼ cup walnut bits, chopped 

1 large tart apple, peeled, cored & sliced thin
1 TBS lemon juice

2 large eggs
¼ cup granulated sugar
½ tsp vanilla

½ cup AP flour
½ tsp baking powder
¼ tsp salt
½ tsp cinnamon
½ tsp cardamom

sweetened, flavored  whipped cream or vanilla ice cream as an optional topping or accompaniment

Preheat the oven to 400 degrees F.
Pour the melted butter into an 8-inch round cake pan, tilting to cover the entire bottom, and sprinkle with the brown sugar. Scatter the nuts over the top.

Core, peel and cut the apple into thin slices; place in a small bowl and toss with lemon juice to retard browning. Arrange in overlapping circles over the surface.

 In a medium bowl use an electric mixer to mix the eggs, sugar and vanilla. Blend for at least 3 minutes or until the mixture pales, thickens and forms a ribbon when lifted.

Place a mesh strainer over the bowl; add the flour, baking powder, salt, cinnamon and cardamon to the strainer and sift into the egg mixture, folding gently but thoroughly until incorporated.


Pour the batter evenly over the apple slices; bake in the middle of a preheated 400 F oven for 25 minutes or until a tester comes out clean. Remove from the oven, run a butter knife around the side of the pan, and invert onto a serving dish. Best served warm, sprinkled with powdered sugar or accompanied by a bowl of whipped cream or ice cream balls.


Saturday, May 20, 2017

Savory Hand Pies with Three Fillings


Random thoughts as I played with more filling combinations for Savory Hand Pies and a Minty Cucumber Sour Cream Sauce.

Photo: Savory Sausage Hand Pie with a side of Minty Cucumber Sour Cream Sauce


More Savory Hand Pies? Well, why not? my Asparagus Mushroom Hand Pies were a success (after tweaking the recipe and adding some lemon zest) and I was on a roll with some new filling combinations to try. Once again frozen pie dough made for a quick and easy baking session. 

Asparagus starred as a repeat ingredient, of course, since it was local and fresh. This time I severed the tips, halved each thick spear lengthwise and then cut them into short pieces. Tossed with oil and minced garlic, all of the pieces were sauted in a cast iron skillet until softened and lightly browned. Sprinkled with lemon zest they were tempting to nibble on "as is".


Caramelized onions should add a sweet/savory backnote to each of the three filling combinations. The thin slices of white onion cooked low and slow in a dash of oil and butter until lightly caramelized. Some recipes call for a finish of brown sugar and balsamic vinegar, but this batch did not require any flavor boost.


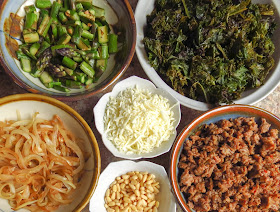
Sweet Italian pork - crumbled, cooked and drained - joined the party as a savory meat option. Yum! a flavor-packed spicy sausage, asparagus and onion mixture would be perfect for a cool-weather Spring treat.


Sausage and kale pair well tastewise in any season, so a bowl of braised kale joined shredded cheeses and toasted pine nuts as the remaining filling choices. 


Left column: skillet roasted asparagus, caramelized onions pies topped with mozzarella.
Center column: braised kale, Italian sausage, caramelized onion pies topped with mozzarella.
Right column: all of the above ingredients plus lemon zest and pine nuts.


All three of the fillings rated high marks, though my personal favorite was the everything hand pie. I love my pizza slices loaded with ingredients and evidently prefer hand pies the same way. That said, next time I'll simplify the ingredient mix, experiment with new flavor combos, and make a sweet hand pie or two for RL to enjoy.   


The simple asparagus/caramelized onion filling surprised me with its overly sweet flavor punch. A quickly mixed faux tzatziki sauce tamed the sweetness, balancing sweet and savory with some light flavor pops. The same sauce boosted the appeal of the kale/sausage/onion filling.


...and what do you do with leftover spoonfuls of filling? I tossed it all into a ramekin for a delicious baked snack. Once again... Yum!


Minty Cucumber Sour Cream Sauce - faux Tzatziki

1/2 English cucumber, shredded and wrung dry in a tea towel
2 green onions, green and white parts minced
2 Tbs fresh mint leaves, minced
1 tsp dried dill
1/2 cup sour cream 
1 Tbs lemon juice
dashes of green Tabasco, to taste (optional)


Friday, May 12, 2017

Asparagus Mushroom Hand Pies


It's Spring! and that means local asparagus is finally available. Grill it, roast it, steam it, or bake it; serve it plain or sauced with hollandaise. Mmmmm, I do love that vegetable during the few months it's availableAn asparagus and mushroom galette spotted at a local bakery counter looked intriguing, so I purchased one as a taste treat. Gulp, $3.99 for a single-serving little pastry! 


The crust was crisp and flakey on top while the bottom tended toward soggy. The galette's generous mound of filling underperformed on taste, bland and lacking much flavor beyond the earthy essence of asparagus and mushrooms. Where was the punchy tang of goat cheese? "Hah!" I thought, "I could do this at home and pop that flavor."

Savory pies tempt me to indulge; sweet pies, not so much. What's more satisfying than a savory little homemade pie, it's flaky crust filled with seasonal vegetables and complementary seasonings? Answer: the same pie made with frozen pie crust dough. But that's just me, facing reality because I'm missing the requisite pie-crust making gene. No matter, a reliable red box of Pillsbury Pie Crusts had my back for this adventure.


Green onions, fresh parsley, dried tarragon, lemon peel and Parmesan cheese joined the basic filling ingredients of asparagus, mushrooms and feta cheese. Sour cream plus one egg added a moist binder to the mix. One circle of pie crust yielded four irregular squares, and the Hand Pie adventure was ready to roll.

The short version of the recipe is:
       Cook down the mushrooms
       Soften the asparagus
       Combine the filling ingredients
       Fill dough squares, shape, add egg wash for shine
       Bake at 400 F until golden brown


The first hand pies emerged from the oven with light, crisp crusts and mildly seasoned filling, an improvement over that purchased galette, but still not quite there flavorwise. Neighbor Marcie, recruited as a taste tester, suggested adding lemon zest, an acidic element to better balance the heavier mushroom and asparagus. Yes! swapping a lot of lemon zest for a little lemon powder made a subtle but noticeable difference in the second batch. Thanks, Marcie. Now I'm eager to play with some other Spring ingredients and flavorings in more hand pie or galette experiments. Sigh, elastic waistbands could become necessary wardrobe adjustments.


Asparagus Mushroom Hand Pies

Yields 4 individual hand pies


1 Tablespoon butter
1 Tablespoon olive oil
1 pound mushrooms, cleaned & thinly sliced
salt and freshly ground pepper
1 Tablespoon balsamic vinegar
1 Tablespoon dried tarragon
5-6 asparagus spears, trimmed and chopped
1 egg, beaten
1/2 cup sour cream (or plain Greek yogurt)
6 green onions, green and white parts, chopped
1/4 cup (4 Tablespoons) fresh parsley, chopped
1 teaspoon powdered lemon peel grated zest of 1 lemon 
1 premade pie crust (Pillsbury recommended)
1/4 cup (4 Tablespoons) goat cheese ( Greek feta), crumbled
beaten whole egg wash to brush dough
2 Tablespoons fresh Parmesan shreds

Heat the butter and olive oil in a large skillet and saute the mushrooms until they brown. Add the pepper, vinegar and tarragon; cook until all liquid evaporates. Remove from the pan and set aside in a bowl to cool.

Snap off & discard the woody stalk end of each asparagus spear. Keep the tender heads intact and chop the rest of the stalks into 1/2 to 1-inch pieces. Place in a microwave-safe container with a Tablespoon of water; cover and nuke for 1 minute or until barely tender. Drain and set aside to cool.

In a medium bowl use a fork to whisk together the egg and sour cream. Add the green onions, parsley and lemon zest; stir to combine. Add the cooled mushrooms and asparagus. Gently stir to combine, coating all ingredients with the eggy sour cream.

Unroll a single piecrust sheet onto a lightly floured surface; roll out to 1/8-inch thickness (if necessary) and cut into four squares, roughly 5.5-inches per side. (Use a straightedge if neatness matters to you - I went irregular and rustic).

Onto each pastry square place 1/4 of the filling mixture, typically a mounded 1/2 cup. Top each pie with 1 Tablespoon goat cheese crumbles. Fold each pastry corner onto the center of the filling, keeping the tips apart, and crimp the outside edges slightly. Brush the exposed dough lightly with some beaten egg wash and sprinkle with 1/2 Tablespoon fresh Parmesan shreds.

Place the hand pies on a silpat or parchment-covered baking sheet. Refrigerate for 30 minutes to firm up the dough. Preheat the oven to 400 F while the pies chill.

To bake, place the baking sheet in the center of the preheated 400 F oven and bake for 15-17 minutes or until the crust is a golden brown. Rotate the baking sheet after 10 minutes to encourage even browning. Remove the hand pies to a wire baking rack to cool slightly. Serve warm or at room temperature.

Saturday, May 6, 2017

Aebleskivers


Two Aebleskiver pans take up precious drawer space under the cooktop, squeezed into a rear corner and crowded against a stack of frequently-used skillets. These specialty items have been there so long that I can't remember their purchase date, the suppliers, or the reason why I thought each pan was essential. Evidently they have hidden out in plain sight for a very long time.

One pan is heavy cast aluminum with five cups, the other, a seven-hole pan, is made of heftier cast iron. A bakeoff comparison sounded like a fun activity and the perfect excuse to eat pancakes on a cool, foggy morning. First-batch issues with both pans frustrated the cook, but my taste-tester RL declared those first misshapen, lumpy pancake balls were delicious. It must have been the cardamom. 

Thinner/looser batter, cooler cooktop temperatures, turning method adjustments and more patience from the cook made a measurable difference in the subsequent batches. Next I tried adding a dollop of jam to each ball - messy, but tasty. Then I ran out of patience and finished off the batter with one fluffy pancake and two thin crepes. YUM! 

Thin batter and a lower temperature allows the uncooked batter to flow more readily as the aebleskiver is turned again and again. A crisp, browned crust with a dry, hollow center is the goal. Less-than-perfect pancake balls won't win points for beauty, but they are still delicious. I'll keep practicing with these iconic pans, but am tempted to experiment with the waffle iron as well. Hmmmm, sourdough aebleskivers sound interesting.... Tomorrow?  


Aebleskivers: Dry ingredients, wet ingredients and a bit of melted butter.


Bubbles rise in the batter in cast iron aebleskiver pan


Pancake balls ready for the first turn in aluminum aebleskiver pan.


The batter is a bit too thick or overcooked to flow easily.


Aebleskivers brown slowly as the centers finish cooking.


Aebleskivers with a teaspoon of jam added just before the first flip. Alas, the jam ran out during the turns.


Crepes and pancakes using the same cardamom-flavored batter are delicious... and take less time and patience.


Aebleskivers - Danish Pancake Balls

Dry Ingredients
1 1/4 cup AP flour (use less than 1 1/4 cup or increase the milk)
3 Tablespoons sugar
2 1/2 teaspoons baking powder
1/4 teaspoon salt
1/4 teaspoon cardamom

Wet Ingredients
1 cup milk
1 large egg
3 Tablespoons melted butter, plus more for oiling the cooking pan

jam and powdered sugar, optional

Directions
Mix the dry ingredients in a bowl.
In a 2-cup measure or small bowl, whisk the wet ingredients to blend thoroughly.
Add the wet mix to the dry mix and whisk until evenly moistened.

Use a heavy aebleskiver pan (cast iron preferred) and preheat on the stovetop over medium to medium-low heat. When heated, brush each cup lightly with melted butter immediately prior to filling. Add batter to fill each cup about 3/4 full.

A crust will form on the bottom of each cup while the centers remain quite wet. Use a wooden skewer or fork to gently rotate each ball so the bottom crust rotates to become a more vertical side while uncooked batter flows down into the cup. Repeat when a crust forms again on the bottom. Repeat again, rotating the ball so a seam or ridge is on top. Continue cooking, turning occasionally until the balls are evenly browned and the centers are dry. (This took roughly 8 minutes on my cooktop, depending on burner temperature setting and which pan I used.) Lower the heat if the centers are still raw when the exteriors are quite brown.

Remove from the pan and serve immediately sprinkled with powdered sugar and accompanied with jam and butter. (or keep warm in the oven at a very low heat setting).

Re-butter each cup and repeat with the remaining batter.

Notes:
1. Thinner batter and medium-low heat worked better for subsequent batches; cook a test ball and adjust your batter and burner temperature as needed.

2. These were cute little treats to serve the family, but even with two pans would be a challenge to prepare for a crowd. However, using the same batter, flat pancakes and crepes were delicious!

3. The cups on my aebleskiver pans hold different amounts of batter; I used a 1 Tablespoon measure for the smaller cups and just poured the batter into the medium-sized cups. This recipe yielded 2 dozen aebleskiver balls, 1 fluffy pancake and 2 very thin crepes.

Monday, May 1, 2017

In and Out of My Kitchen

IMK May 2017

Photo: Some days it's so wet and windy that even the Canadian geese hunker down and wait for a break in the weather.
Seattle's wetter than usual Winter-to-Spring transitional weather has contributed to symptoms of cabin fever. I wait for big breaks in the clouds to grab a jacket and head outdoors, hoping to complete a walk in between major showers or downpours. Sigh, I am such a weather wimp! The Pacific Northwest is living up to its rainy reputation.   
"The city measured 44.7 inches of rain between October and April, making it the wettest such period since records began in 1895, the National Weather Service in Seattle said"
 ...and that was a week ago. It's still raining;140+ days straight with measurable precipitation. Tulips need umbrellas, mosses flourish everywhere in the yard, and I long for some back-to-back sunny days. Omigosh, was that a whine?!


Back in the kitchen...30 to 40-degree Spring mornings have justified a few hearty, wintery meals like braised kale with a fried egg and mounds of applewood smoked bacon. This might have been a form of food therapy, combining healthy, beneficial kale with not-so-healthy bacon. On most days breakfast means almond milk and fruit smoothies, or yogurt-topped granola, maybe a bowl of steel-cut oats with dried fruits and nuts. But oh! I do love an occasional bacon feast.  


What do you eat for lunch? Soups, salads and lots of leftovers are routine Spring choices in my kitchen. Leftover roasted chicken inspired this tasty Curried Chicken Salad snack. (linklink) Some store-bought California grown strawberries added more color than flavor to the plate, but I couldn't wait for our local berry harvest. That won't happen until June. Our lakeside strawberry bed of fragaria virginiana is primarily a groundcover that feeds the birds and squirrels days before the fruit completely ripens. How do they know when to nibble? We appreciate the sparkle of these sprightly white blossoms during April and May, but cede the summer fruit to the local critters.  


I haven't done much with pasta lately, but this recent version of a peanut-sauced Asian noodle salad was a filling side dish to a grilled meat entree. Salad leftovers filled my lunch bowl the next day. Soba noodles, fresh peapods, spring onions, cilantro, sesame seeds and a spicy Thai peanut sauce dressing tasted even better on day two; perfect.  


An empty cookie jar whispered to me, "diets are fine, but cookies are an essential food group." Okay, I believe, and why would I argue with an empty cookie jar? Adding grated zest from four sweet little clementines brought a bright citrusy tang to a batch of Shipyard Cruising Cookies; a restrained but noticeable flavor note. Just remember to remove the zest before peeling the fruit; just saying... 


In and out of the kitchen...
April birthdays of two friends prompted a ladies lunch celebration at Meet the Moon in the nearby Leschi neighborhood. When we arrived the cafe was already humming with activity since Seattle Restaurant Week was in full swing, but service was pleasantly attentive and the menu held enough tempting choices to make selection difficult. Here's a peek at my choice, a deliciously satisfying poke (po keh) bowl. The city has seemingly gone mad for poke, a bit surprising since ceviche hasn't been that ubiquitous.

ALBACORE POKE BOWL* 

seaweed, sesame seeds, togarashi, ginger, soba noodles, green onion, cucumber, cabbage, red bell pepper, carrot, chile akes, avocado, fried wonton and soy dressing


RL and I finally visited a newish local lunch spot, Raconteur. Just a mile away from the house, this restaurant/coffee shop/bar shares a building and open space with an independent bookstore, Third Place Books (link). I love them both; Raconteur for its good food and friendly vibe, and the bookstore for its selection of new and super-quality used books. Yes, my waistline and cookbook collection are both growing. My order of Carne Asada Tacos arrived upright, well-supported in a handy aluminum device. What a useful gadget!


Two tortilla racks now reside in my kitchen, and more may soon join the party. They are useful for the two of us, but I need want more for future taco bar entertaining. Ahem, I had good intentions to avoid buying any more single-purpose kitchen gadgets, but Amazon Prime makes it SO easy to succumb to temptation.


Several more single-use items have entered the kitchen via Amazon. I'm proclaiming a "no guilt zone", even while I work on excuses: 
1. Hilary and I signed up for a ravioli making cooking class. These tools will encourage us me to practice. 
2. My already underused pasta machine and various cookbooks need a workout.
3. A gazillion online recipes for ravioli, both the pasta and the filling, exist online and need testing.
4. I just wanted them.   


April has been a generous month, loaded with welcome edible and visual treasures: 
  • Local asparagus, ramps, fiddleheads, rhubarb, radishes and a wider selection of greens are newly available citywide at farmers' markets. It's time to get more creative working with fresh, seasonal produce. 
  • In all directions colorful blossoms on bulbs, bushes and fruit trees are showcased by the soft greens of newly opened foliage. What an invitation to grab the camera and enjoy the display.
  • Newly-hatched goslings, such comical little fluffballs, dart about like windup toys as they explore the shoreline, plopping in and out of the water.    


Photo: This flowering pink dogwood, a memorial tree for a friend's daughter, lights up a corner of the fragaria planting bed, drawing me out of the kitchen.
Sherry Mackay is the new host of the monthly In My Kitchen gathering. Click over to Sherrys Pickings (sherryspickings.blogspot.com.au) to add your post to the group or just to enjoy the writing and photos from others in the IMK community.