Pages

Sunday, August 12, 2018

Apple Buttermilk Scones


Sigh! my photos are traveling, lost somewhere in the blogosphere, so here's a placeholder; a post with a not-so-wonderful scone from Tim Hortons. Updates to come whenever I track down those pesky traveling photos.

It's HOT outside, the air conditioner has been going full blast... and I'm baking scones?! What's up with that? Typically we don't love scones, often finding them too dry and crumbly, not as tasty as sweet or savory drop biscuits. But the second week of August is unofficially International Scone Week, a tradition begun by Celia in 2011 (link), now hosted by Tandy at Lavender and Lime, and I couldn't resist an early morning bake. Good decision, since this small batch of Apple Buttermilk Scones was a winner.

The scones sported a toothsome crispy crust and a meltingly tender interior, more reminiscent of an apple cake or quickbread rather than my (obviously incorrect) memories of dry, disappointing scones. While the glaze was a tasty addition, it wasn't necessary... especially since RL added butter and jam to each split half. Half-batch baking provided breakfast and a shared snack later in the morning, with no pesky leftover scones to dry out on counters or fridge. Thanks, Tandy, for nudging me into baking this delicious taste treat.

The base recipe came from Jen at bakedbyanintrovert, click here for her original full-batch recipe. Below is my slightly adjusted, half-batch version for #ISW2018.

Apple Buttermilk Scones
yields 4 fat scones

Ingredients
  • 1 and 3/8 cups all-purpose flour
  • 1/4 cup light brown sugar, firmly packed
  • 1/2 tablespoon baking powder
  • 1/4 teaspoon baking soda
  • 1/2 teaspoon salt
  • 1 and 1/2 teaspoon Penzey's Apple Pie Spice
  • 2 tablespoons buttermilk powder
  • 1/4 cup chilled or frozen butter, grated
  • 3/4 cup chopped fresh apple, unpeeled 1/2" pieces
  • 1/2 cup milk
  • 1/2 tablespoon vanilla extract
  • 1 tablespoon heavy cream
  • 1 teaspoon vanilla sugar

For the glaze (optional)

  • 1/2 cup confectioners' sugar
  • 1-2 tablespoons apple juice

Directions 

  1. Whisk or sift the flour, brown sugar, baking powder, baking soda, salt, Apple Pie Spice and buttermilk powder together. Add the chilled, grated butter into the flour mix and combine using your fingertips until the mixture looks like coarse crumbs. 
  2. Gently fold in the apples. Whisk the vanilla and the milk together and gradually add half of it to the flour mixture. Stir just until the dough comes together. Add more milk as needed. a little at a time until the mixture is moist but not too wet. Do not over mix the dough. Place the bowl of dough in the freezer while you place an oven rack in the center of the oven and preheat to 400 F.
  3. When the oven reaches 400 F, transfer the dough to a lightly floured surface and gently knead the dough four or five times. Pat the dough into a square and cut from corner to corner into four triangles.  Arrange the scones 2 inches apart on a baking sheet lined with a silicone mat or parchment paper. 
  4. Lightly brush the top of each scone with heavy cream. Sprinkle lightly with vanilla sugar. Bake for 20-25 minutes or until golden brown. Transfer to a wire rack to cool and drizzle with glaze. 

    Optional Glaze: Sift powdered sugar into a small bowl; whisk or stir in apple juice in small amounts until desired consistency. 

    Note: One scone is very filling so next time I will use the half-batch recipe to create 8 smaller scones.(and then eat 2 of them, no doubt).

Wednesday, May 16, 2018

Crustless Swiss Quiche with Bacon & Spinach


"A quiche is basically a frittata poured into a pastry shell." ... or not. Today we enjoyed a crustless version so, by definition, did that make it a frittata instead of a quiche? I don't know, don't really care, since the quiche pan held a deliciously loaded custardy something we both enjoyed. Filled with bacon, swiss cheese, spinach and green onions, it was a well-received taste treat. Who says real men don't eat quiche? RL loved it.


Quiche Lorraine was the darling of the menu for ladies-who-lunched in the 60's; a light but rich, sparsely filled, one crust custardlike pie. Over time I recall it morphing into a dense, custardy casserole filled with unusual ingredients and baked in a soggy crust. Not an improvement. Thus my preference for crustless quiches, or it might be my utter lack of the pie-crust baking gene.


We enjoyed half of this quiche/frittata served warm at lunch, and some remaining wedges served chilled the next day. Maybe next time I'll play with a pie crust... or not. 


Crustless Swiss Quiche with Bacon & Spinach


8 luncheon servings, 4 main dish

6 strips streaky bacon, diced
4 green onions, sliced
1 bunch spinach, rough chopped
1 generous cup swiss cheese, shredded (or cut in smallish chunks)
5 large eggs
1/2 cup half-and-half
1/2 cup milk (I used 2%)
1/4 tsp dried oregano
1/8 tsp ground nutmeg
Salt & white pepper, to taste

Prehea the oven to 375 degrees F.

Use a large skillet and cook the bacon until done, but not super crispy. Use a slotted spoon to remove the cooked bacon to an 8 or 9-inch quiche pan. Remove all but 1 Tablespoon of bacon fat from the skillet. Add the onions and spinach to the skillet and heat until wilted. Layer evenly on top of the cooked bacon. Sprinkle the cheese evenly over the top of the spinach.

Whisk together the eggs, dairy, & seasonings. Carefully pour the egg mixture over the layered fillings. Place in the center of the preheated oven. Bake at 375 F for 20 minutes. Reduce the heat to 325 and cook 15 to 20 minutes longer or until the center is just set. Remove from the oven, let cool for several minutes to firm up; cut and serve warm. 


Wednesday, May 9, 2018

Zucchini Lemon Muffins with Ginger & Nuts


Zucchini is in season somewhere this month, so why wait for summer to stock up on new zucchini recipes. It's barely time to set out plants so, yes, I know I know, I'm rushing our local season by several months. The payoff will come later when facing an overabundance of zucchini, I'll be ready. 

During the past several weeks I've been playing with stuffed zucchini recipes, changing up ingredients and seasonings in pursuit of optimum flavor in addition to scads of health benefits. (posts may or may not follow) All good... until suddenly I couldn't face one more healthy zucchini entree. Okay then, how about a dessert? Zucchini quickbread is an old standby, zucchini-pineapple cake is another tasty treat, but savory zucchini muffins have become our latest favorite. Moist and tangy, lemony and not overly sweet, these little gems are delicious! A bonus feature is they freeze well if we grow tired of them after a few days.


A standard recipe from King Arthur Flour provided the base zucchini muffin recipe, but I didn't stop there. Oh no: swap currants for the required raisins, add some powdered ginger and crystallized ginger, double the lemon impact with more fresh zest and a teaspoon of powdered lemon zest, and then bake in different sizes of muffin tins. All good - so good that the mini muffins disappeared before their photo op. The "regular" size muffins were popular at breakfast and during mid-morning breaks. The larger muffins, baked in a cast iron cornbread pan, were strangely less popular. Commitment issues, perhaps? Evidently it was easier to enjoy several small muffins rather than commit to finishing one larger one. Go figure.


Zucchini Lemon Muffins with Ginger & Nuts
adapted from a classic recipe at King Arthur Flour

Makes 12+ muffins, depending on size of muffin tin used

Dry Ingredients:
2 cups All-Purpose flour
scant 1/2 cup granulated sugar
1 TBS baking powder
1 tsp salt
grated peel of 1 medium lemon
1 tsp powdered lemon peel
1/2 tsp powdered ginger
1 generous cup chopped walnuts
1/2 cup dried currants
1/4 cup sweet crystallized ginger bits

Wet Ingredients:
2 large eggs
1/2 cup milk (I used 2%)
1/3 cup canola oil


Plus:
1 cup (packed) shredded zucchini (not drained or squeezed dry)
optional granulated sugar to sprinkle on top before baking

To Prepare:
Preheat the oven to 400 F. Grease or spray a 12-muffin tin (or equivalent). Assemble the ingredients.

In a large bowl, sift together the flour, sugar, baking powder, and salt. Stir in the remaining dry ingredients.

Use a small bowl and whisk together the wet ingredients. 

Add the wet ingredients to the large bowl of dry ingredients. Use a large spoon and stir to just combine (don't overmix!). Gently fold in the shredded zucchini.

Using a cookie scoop or ladle, add the batter to the prepared muffin tin, filling each opening about 3/4 full. If desired, light sprinkle the top of each muffin with sugar.

Bake 20 to 25 minutes until lightly browned, or the muffins spring back to the touch. (note: times can vary by 5 minutes or more with different size muffins) Remove muffin tins from the oven and rest for 5 minutes on a baking rack. Gently remove from baking tin and serve warm or cool completely before storing, covered or well-wrapped, for up to 3 days at room temperature. Freeze for longer storage.


Sunday, April 15, 2018

Flakey Scallion Pancakes


I continue my quest for a terrific Green Onion Pancake recipe, a favorite menu item at Chinese restaurants but one that still eludes me at home. I've tried recipe after recipe, but continually miss the mark of the ideal crunchy yet flakey Scallion Pancake. It shouldn't be all that difficult; it's just a pancake, right? Flour and water, plus oil and chopped green onions. Hah! Just a pancake, not


My first Korean Green Onion Pancake attempt was far too omelette-like.

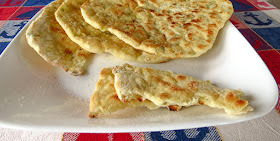
This next try was an Asian Style Flatbread (Pancake); tasty but not flakey and much too bread-like. 

Then I slid into shrimp and cabbage pancakes (okonomiyaki) link and link, an entirely different pseudo-omelette/pancake-like adventure. Take a minute to skim Pinterest and you'll find all manner of Green Onion Pancakes; thick ones, fluffy ones, flat ones, stuffed or flat ones, coiled pancakes or rolled... Who knew there were that many Scallion Pancake variations? Decisions, decisions, what to try next?!

A Kenjii Lopez-Alt "Food Lab" treatise encouraged me to try his hot-water, twice-rolled dough method. What made this technique so different?
 * Adding hot-water to the flour to retard gluten development and limit the airy bounce and chewiness of the finished pancake.
 * Rolling and coiling the dough twice to create multiple layers of dough separated by sesame oil. Think laminated dough, like puff pastry (only much easier).

The basics are simple: 
Place 1 cup flour in the bowl of a food processor and slowly add up to 1/2 cup boiling water until the dough just comes together. Knead briefly on a floured surface; cover and set aside for an hour. Then the fun begins.   

Divide dough into two balls; roll until smooth. Roll out one ball of dough into a very thin circle; brush lightly with sesame oil

Roll up tightly into a log

Coil the log into a tight snail; roll out again

Sprinkle with a scattering of chopped green onions

Roll up into a log; coil into a snail; roll flat again

Repeat with remaining dough

Place in hot oil in a cast iron skillet; cook until brown (about 2 minutes)

Turn and cook side two until brown (another 2 minutes)

Slice into wedges and serve warm.

Yum! The Scallion Pancakes of my dreams are still a work in progress, but this first batch was a big step in the right direction. 

You'll find the detailed recipe and directions at Kenjii's post here; check it out. Take a few minutes and read the backstory here, whether you decide to make the pancakes or not. The science of baking is intriguing.

Tuesday, March 20, 2018

Sourdough Cinnamon Raisin Bread with Walnuts


This is not your old school, sweet and soft-textured raisin bread. As a kid I loved an occasional raisin bread treat, a toasted thin slice swirled with barely a hint of sweet cinnamon and raisins. That loaf was fluffy, a close cousin to Wonder bread in taste and texture, and rare enough in our household to be a special treat. This sourdough version isn't even remotely relately to that insipid bread of my childhood. Ahhhh, this raisin bread from Emilie Raffa's book Artisan Sourdough Made Simple offers texture and crunch along with a distinct cinnamon flavor in every bite.

Raisin bread is not a new idea, 
Wikipedia notes "there have been published recipes for bread with raisins since 1671. Since the 15th century, breads made with raisins were made in Europe. In Germany stollen was a Christmas bread. Kulich was an Easter bread made in Russia and panettone was made in Italy. The earliest citation for "raisin bread" in the Oxford English Dictionary is dated to an 1845 article in Blackwood's Edinburgh Magazine."
Raffa's sourdough version changed my view of what raisin bread could be. I took a few liberties with her recipe on my first attempt and still ended up with good results. We are already anticipating the next loaves for breakfast slices and snacks.

Results from the first bake:

Crust: I'll admit that first crunchy bite was a bit of a shock when my food memory anticipated the squishy-soft bread of childhood. RL and I quickly adjusted our expectations and reveled in this altogether new slice. Yes, the crust was crackling hard on day one, but thin enough so no tooth was endangered. After overnighting in a plastic bag, the crust softened somewhat, but remained fairly firm on day two. There was no bread left for further comment, we ate it all quite happily.

Crumb: the interior was soft but not sandwich-bread soft. My first loaves were not as airy as those pictured in Raffa's photo; an issue for this cook to work on. Now that my sourdough Old Faithful is back in active form any missteps are definitely mine.

Filling: the ratio of cinnamon mix, raisins and walnuts was ample, providing a treat to savor in each bite.   

Taste: cool or toasted and spread with just a slather of butter, the bread seemed undersalted. A sprinkle of sea salt on top made a difference. Spread with cream cheese or berry preserves, salt was not an issue. 

Baker's Notes
  • I do not own the long rectangular proofing basket or baking pot specified so formed two smaller loaves instead. One loaf baked in a round cast-iron dutch oven with lid, preheated at 400 F, and the second loaf baked uncovered in a glass loaf pan that was not preheated. The results were remarkably similar.
  • When/if the cinnamon and sugar mix leaks out it will caramelize in spots on the bottom crust to form a rock-hard lava-like blob. Cut that mess away and toss - burnt sugar adds nothing to the bread experience!
  • Soaking the raisins and walnuts did not keep the exposed bits from scorching on my loaves. Next time I will carefully poke them back in before baking. This round I just popped those few bits off before slicing.
With only two of us to indulge in a freshly baked loaf I'll put off a second round of baking for another week or two, but there will be more sourdough cinnamon raisin bread with walnuts in my kitchen soon. Sooner if I decide to share more loaves - anyone nearby want to share?


 Sourdough Cinnamon Raisin Bread with Walnuts

slightly adapted from Emilie Raffa's Artisan Sourdough Made Simple.

makes 2 standard loaves

1/4 cup active sourdough starter
1/4 tsp rapid rise yeast (optional, added for insurance only)
generous 12 oz warm water
rounded 4+ 1/4 cups bread flour (Raffa used bread flour & whole wheat flour)
1+ 1/2 tsp fine sea salt

1/3 cup raisins, soaked to plump
1/2 cup walnuts, chopped large & soaked to soften

1/4 cup granulated sugar
2 rounded tsp cinnamon

Day 1:
Whisk the starter and water together in a large bowl. Add the flour and salt; stir to incorporate. Cover with plastic wrap or a damp tea towel and rest for an hour. While the dough is resting soak the raisins and walnuts in warm water. Note: drain well before using!

Add drained raisins and nuts to the rested dough; knead briefly & gently to incorporate. Add a sprinkle or two of flour to adjust the consistency, as needed. Note: avoid adding too much flour.

Cover the bowl with plastic wrap or a damp tea towel and let rise overnight until doubled in size (or 8 to 10 hours).

Day 2:
Place the dough on a lightly floured board & let rest for 15 minutes or more. Line proofing vessels with flour-dusted towels or sprayed parchment paper. Mix the sugar and cinnamon in a small bowl & set aside.

Flour your hands and stretch half of the dough into a long rectangle. Brush the surface with water & sprinkle the sugar/cinnamon mix evenly over the top. Leave a clean border around the rim for a better seal after rolling. Begin with a short side and roll the dough into a log. Pinch the ends to seal. Move to the proofing vessel with seam side up. Repeat with the remaining dough.

Cover the dough logs and let them rest and rise again, 30 to 60 minutes. They will not double in size. Preheat the oven to 425 while the dough rests. Cut parchment paper to generously fit the baking pots if you used proofing baskets. Put the paper over the baskets, invert and remove baskets. Otherwise gently roll your loaves over, seam side down on their parchment bases. Gently poke any exposed nuts and raisins back under the surface to prevent scorching.

Dust the surface with flour; make 2 or 3 shallow diagonal slashes (shallow to avoid exposing the filling). Use the paper & lift the loaves into their baking pots.

Bake covered 20 minutes on the center oven rack. Remove lid and bake uncovered for an additional 30 to 40 minutes (aim for 190 to 200 degrees F at the center). Remove to a wire baking rack and cool for at least one hour before slicing.
   

Thursday, March 15, 2018

Pressure Cooker Pork Chili Verde


My pressure cooker is seriously underutilized, a handy, timesaving device that stores out of sight and evidently out of mind. It proved its usefulness again recently when I wanted a quick, tasty bowl of chili in under an hour, not several hours from now. Too many of my chili recipes call for browning the meat, then cooking slowly for 2 to 3 hours on the stovetop (or 6 to 8 hours in a slow cooker). Not so this pressure cooker version; after browning the meat, it took just 20 minutes under high pressure to develop both taste and texture. 

RL noted the chili heat needed taming on day one, and unusual response from him, but the bite had mellowed significantly by day two. It took a few tablespoons of sour cream to tame the chile bite for me on both days, but I am an admitted chili heat wimp.


A recipe for Abilene Beef and Bean Chili from a Rick Rodgers cookbook, Pressure Cooking for Everyone, provided guidance as I changed up the ingredients. I substituted pork shoulder for the specified beef bottom round, used 2 Hatch chiles instead of 1 jalapeno and a single tablespoon of Penzeys' awesome Chili 3000 blend rather than 2 tablespoons of anyone else's chili powder, then added tomatillos and fresh orange quarters for a hint more flavor.

The results? Mmmm, that was some tasty peppy chili. The Rogers cookbook is noted for requiring multiple steps, pre-browning or adding ingredients requiring additional after-pressure cooking, but if this chili is any guide then a few extra steps are worth it. Now it's time to try a few more quick pressure cooker recipes. 


Pressure Cooker Peppy Pork Chili Verde

Adapted from Pressure Cooking for Everyone by Rick Rodgers

2 TBS olive oil, divided (more as needed)
2 LBS pork shoulder, cut into 2” chunks
3 cups yellow onion, chopped (roughly 1 large yellow onion)
1 cup sweet bell peppers (not green), seeded & chopped
6 large tomatillos, quartered
2 Hatch chiles, roasted, skinned, deseeded, chopped (or 1 jalapeno)
1 TBS minced garlic
1 TBS Penzeys 3000 chili mix (or ½ TBS ancho chili powder plus 1 tsp each cumin, smoky paprika, dried Mexican oregano, cilantro and lemon peel)
½ tsp salt, more according to taste
2 cups low-sodium beef broth
1 orange, unpeeled and quartered (or 4 mini oranges, halved)
¼ cup masa or yellow cornmeal
2 cans (15-oz each) black beans, rinsed & drained

Suggested optional toppings: fresh tomatilla salsa, sour cream, lime wedges, tortilla chips, fresh cilantro, crumbled queso fresco, red onion, avocado…

Heat 1 tablespoon of the oil over medium-high heat and brown the pork chunks in several batches. Don’t crowd the meat or it will stew instead of searing. Remove to a plate and set aside. Add more oil as needed for subsequent batches.

Discard the excess fat, but leave the browned bits on the bottom of the pan. Heat the remaining tablespoon oil and add the onion, peppers, tomatillos, chiles, and garlic. Cook to soften, stirring often.

Return the pork to the pot along with any juices that accumulated on the plate. Sprinkle with the spices and salt; stir and toss to mix well. Add in the stock; stir and scrape up the browned bits from the bottom. Add the oranges.

Cover, lock the lid in place and bring to high pressure over high heat. Adjust the heat as needed to maintain high pressure and cook for 20 minutes (I used a flame tamer under the pot on my electric element). Do a quick-release, open the lid and let stand for 5 minutes. Remove and discard the orange halves; skim excess fat.

Note: I often use some bone-in pieces and pull the meat out at this point to debone, defat and shred.

Use a small bowl and make a masa slurry, whisking the masa into a generous cup of the cooking liquid. Stir this slurry into the pot and add the beans. Cook over medium heat until the juices thicken a bit; stir frequently to prevent scorching the bottom of the pot. Return the meat chunks or shreds to the cooker; taste and adjust seasonings.

Serve in bowls with optional toppings alongside, or use to fill tortillas.


Sunday, March 11, 2018

Thai-Style Chicken Soup


Chicken soup comforts both body and soul. So it is no surprise that many cultures around the world have their own version; unique with the varying preparations, ingredients and seasonings to account for the world of difference. In my kitchen you'll often find one of these chicken soup recipes simmering away on the stove:


Avgolemono - Greek Lemon Soup

Green Posole with Chicken

Coconut Green Curry Soup

plus an Indian-style Chicken Coconut Curry Soup, and our all-time favorite Mexican Chicken Taco Soup (I can't believe I haven't posted a recipe for this one yet). This month's interest in ginger nudged me toward a Thai-style version of chicken soup with coconut milk. This chicken soup was fast, flavorful and carried enough of a "zip" from the Tom Yum  sauce to keep RL smiling. 

My fridge and freezer usually hold a few containers of cooked chicken, left after roasting a whole bird, pulled from a purchased deli chicken or after I precook a batch of chicken thighs. Chicken soups and chicken enchiladas benefit from this versatile ready-to-use ingredient. 

What's your favorite use of already cooked chicken?  


Thai-Style Chicken Soup
yields 4 servings

2 fat cloves garlic, peeled & minced
2-inch piece ginger root, peeled & minced or shredded
2 TBS canola oil
1 TBS brown sugar
1 tsp Tom Yum sauce or a Thai curry paste (adjust for your level of spicy heat)
1 TBS Thai fish sauce 
1 TBS Gourmet Garden Thai seasoning paste (or 1 tsp each dried cilantro & basil)
1 small onion, peeled & chopped
1 cup red pepper, cored & chopped
1 fat carrot, peeled & sliced thin into rounds
2 ribs celery, strings discarded and stalks chopped
2 cups cooked chicken, chopped
1 can (15-oz) low-sodium chicken broth 
1 can (15-oz) coconut milk (NOT coconut cream!)
2 to 3 heads baby bok choy, cleaned & chopped
salt and pepper to taste
lime wedges for serving

Use a wide-bladed knife or bench scraper to mash the garlic and ginger together into a paste. Heat the canola oil in a medium, heavy-bottomed pot and saute the ginger-garlic mash for a minute or two until aromatic. 

Stir in the brown sugar, Tom Yum sauce, fish sauce and Thai seasoning paste.

Add the chopped onions, red pepper, carrot & celery. Stir to coat and saute for another minute. Add the chicken and stir some more to coat.

Add the chicken broth and coconut milk and bring to a barely bubbling simmer. Taste and adjust seasonings as necessary. Add the baby bok choy and cook for a minute or two until just tender. Ladle into bowls and enjoy at once.

Notes: 
1. Offer lime or lemon wedges to add a citrus pop to each bowl.
2. For hungry appetites, offer a small bowl of rice alongside. The solids are always finished first and the remaining soup liquid works well as a sauce for the rice.