Thursday, April 28, 2011

It Looks Like Clam Chowder

 A Potato Soup-Style Clam Chowder 


Meals can be, well... let's call them interesting, just before we move back aboard Rhapsody. What's left in the kitchen? The freezer is finally empty, the refrigerator looks bare and the pantry offers few staples to work with? Who wants to cook? Not me, however I still chose to eat at home; it would have been such a bother to tidy up just to go out to eat, and then come home to work on more messy projects. 


Inspiration struck as I gathered up odds and ends; a large baking potato, one big Spanish onion, a fat poblano pepper, a small jalapeno pepper, two cans of minced clams, half a bunch of fresh parsley, some sour cream and an assortment of spices and seasonings. RL deserved a comforting bowl of soup after doing battle for hours setting up the new boat computer. For myself I needed the comfort of an easy, can't-fail dish after losing a battle with bread dough.


I never, ever have failures with bread, that is not until today. A round of my sourdough rye collapsed in the center, creating a dense little boule with a rock solid crust and a moist middle. Was the starter tired? Did I add too much rye flour? or let it rise too long? or bake at too low an initial temperature? or... or... or... Note to selfs: it did make exceptional toasted rye croutons for the soup. (Without a soup soak those little cubes might chip a tooth or crack a filling!)


Back to the soup. I declared it a new version of clam chowder. RL claimed it was more like a potato soup with clams. Whatever, we both agreed it was delicious. The jalapeno and poblano added interest without being too assertive. We adjusted the heat in our separate bowls with more Cajun Sunshine - one of us used three times as much as the other! This will be a bowl of comfort on some chilly future afternoon, maybe anchored in a secluded cove or during a long passage across big water. It will certainly warm us up after a fishing trip or kayak exploration. Can you tell, my thoughts are already afloat and not ashore?! 


Here's the process rather than an exact recipe. Soup is so forgiving, it allows for freeform improvisation, careless measurements, and it still manages to taste good... unlike the precision suggested for baking.  This time I ended up with...


A Different Clam Chowder
  1. Microwave 1 large, scrubbed baking potato for half of the usual cooking time. Let it cool and chop into 3/4 to 1-inch dice. Set aside.
  2. Heat a drizzle of olive oil in a medium-sized pot and saute a diced onion and a seeded, diced poblano pepper until the onion begins to soften. 
  3. Add some minced garlic and jalapeno; cook until briefly until the kitchen smells garlicky and wonderful. 
  4. Stir in generous amounts of oregano, thyme, ground pepper and a bay leaf; cook for a minute or two until fragrant. 
  5. Add a heaping tablespoon or two of flour and stir to blend; cook for another minute or two. Add 2 small cans (or 1 large can) of chopped clams along with their juices. Stir some more to incorporate all into a paste-like mixture. 
  6. Add the chopped potato chunks to the pot along with enough chicken stock (or water) to cover. Stir some more. Bring to a boil, then simmer until the potatoes are tender. 
  7. Remove the bay leaf and stir in some chopped flat leaf parsley. Add some milk or cream if the soup is too thick. Taste and adjust the seasonings. At this point I added half a dozen shakes of Cajun Sunshine hot sauce. Green tabasco is another favorite for heat without hurt.
  8. Ladle into bowls and top with a pat of butter or dollop of sour cream and a handful of toasted, garlicky croutons.
Notes: the minced clams were too tiny to provide any visual impact, but they did their part flavorwise. Bacon or salt pork is traditional in many clam chowders, but it was not missed in this recipe. I would add a bit of cream at the end, if there was any cream in the fridge... which there wasn't yesterday. 

Tuesday, April 26, 2011

A Southwest Corn Salad with Black Beans and Peppers

aka Fiesta Salad, Mexicorn Salad, Confetti Corn Salad...


An explosion of color on a plate, this black bean, red pepper and corn salad sets the mood for any Cinco de Mayo feast. Throughout the year it's a versatile dish, a proven crowd pleaser whether served as a salad, side dish or even an appetizer. The basic ingredients, simple preparation and multi-day serving life combine to make this a go-to favorite. Corn salad accompanied Arroz con Pollo for a 2010 Cinco de Mayo dinner and it partnered with barbecued salmon and grilled meats throughout many cruising seasons afloat.     


I love a scoop of corn salad served on a bed of lettuce with avocado slices or chunks of Dungeness crab. RL enjoys his with extra salsa, scooped up with taco chips for an appetizer snack. 


Mix any leftover corn salad with a meltable cheese like pepper jack and you have a delicious filling for omelettes, quesadillas, tacos or enchiladas. A cup or two of this salad blend would add tasty crunch to a bowl of taco soup. Fill a bite-sized tortilla cup with a scoop of corn salad, top with a dab of sour cream and a cilantro leaf and you have a party snack. A breakfast choice? well, maybe (link). Not that we ever have much corn salad leftover.


Southwest Corn Salad

1 can black beans; drained, rinsed and drained again
2 cups fresh or frozen corn kernels (Mexicorn is a good choice)
1 red pepper, seeded and chopped
1 poblano pepper, seeded and chopped
1 jalapeno, seeded and chopped
1/2 red onion, chopped
1 bunch cilantro, rough chopped
1/2 tsp cumin
1 tsp oregano
1/2 cup mild red salsa
2 Tbs fresh lime juice
4 Tbs olive oil
salt and pepper to taste
6 good shakes of Cajun Sunshine or Tabasco
  1. Mix all ingredients together in a medium sized bowl. Taste for seasonings and heat; adjust as needed. 
  2. Let stand for 20 minutes to defrost the corn and blend the flavors. Mix well before serving.
Note: Use fresh-cut corn kernels straight from the cob during the season, but frozen corn is a surprisingly good substitute. Beware - frozen and processed peppers are too soft to be a good choice. This salad embraces crunch!

Friday, April 22, 2011

Kale and Egg Skillet


Green eggs and ham? No, not quite, but the tang of fresh kale and the comforting smoothness of a poached egg did please my palate this morning. Incredulous at this breakfast item, RL opted for fruit and coffee, insisting that kale only belongs at lunch or dinner. 


Leftovers-for-Breakfast is one of my favorite things, a new possibility every day. Opening the refrigerator door each morning to search for interesting ingredients is much more fun than reaching for a box of cereal. I'll occasionally wake up thinking about steel-cut oatmeal or sourdough waffles, but today I had kale on my mind. Last night's side dish of kale with raisins, onions and white balsamic vinegar called to me as I romped down the stairs to the kitchen.


Poached egg atop a frisee salad with bacon and croutons is a dish I enjoy, and tasty kale made sense as a substitution. I skipped the usual bacon and bread in the standard dish, in the name of healthier eating, and added a layered strawberry and honey-flavored Greek yogurt parfait to the menu. Ooh, didn't I feel virtuous for incorporating healthy choices and tasty leftovers all in the same meal.


Don't you love the vibrant colors of these two dishes? a beautiful start to a sunny Spring day in Seattle. 


 Following is the braised kale recipe that prompted this breakfast dish.


Stovetop Braised Kale
1 small bunch kale; washed, cut from stem, roughly chopped 
1/4 cup onion, medium dice
1/8 cup raisins, currants, sultanas or dried cranberries
A drizzle or two of white balsamic vinegar (red wine vinegar will do)
Salt and pepper to taste

  1. Heat a few tablespoons of water in a non-stick skillet (or use a tablespoon or two of olive oil) and add the onions. Cook over medium heat until the onions soften, but don't brown.
  2. Add the raisins and about 1/2 cup water; bring to a boil and add the chopped kale all at once. Cover the skillet, reduce heat to a simmer, and steam and simmer away until kale wilts. You want it softened, but not mushy! Stir and toss once or twice while it cooks, so the crisp top pieces change places with the softened bottom pieces.
  3. Remove the lid, drizzle the vinegar over the greens, toss to mix and cook over a medium-high heat briefly until the liquid is reduced. Season to taste and serve.

Kale with Egg
Several TBS water or 1 whoosh of olive oil cooking spray
2 TBS onion, diced
2 cups braised kale with raisins
1 large egg

  1. Heat the water in a small skillet over medium heat. Cook the onions until softened. Add the kale and cook, covered, until warm. Stir occasionally to heat the kale evenly. 
  2. When the kale is heated, use a spoon to create a depression in the middle of the greenery. Break an egg into this spot, adding salt and pepper if desired. Cover and reduce the heat to low. Cook until  the egg is done to your preference. Cooking time will vary accordingly. (I like the white just set and the yolk runny) 
  3. Use a spatula to loosen and slide onto a plate or bowl. (This is a good time to add Cajun Sunshine or your favorite hot sauce!) 

Thursday, April 14, 2011

Daring Cooks - 3 Edible Containers


Renata of Testado, Provado; Aprovado! was our Daring Cooks’ April 2011 hostess. Renata challenged us to think “outside the plate” and create our own edible containers!

Consider the term - Edible Containers. The everyday cooking world is full of savory examples; stuffed peppers, stuffed mushrooms, filled crepe purses, tortilla wraps and quesadillas, chowder or chili in a bread bowl, stromboli and calzone, ravioli, filled wontons, spring rolls and summer rolls, potato skins with fillings, arancini… and that doesn’t even begin to list the familiar dishes. So many edible containers are now commonplace, how do you create a new one????

This challenge was an invitation to play with food, to experiment with some new ideas and to adapt new versions of old favorites. RL and I nibbled and noshed our way through some “interesting” dishes, and laughed at a few failures. Small bites (you know, finger food) are a practical size for a recipe tryout, so we had a several all-appetizer lunches during the month. Here are three of the favorites.


Deconstructed BLT 


The standard components - bacon, lettuce, tomato, mayo and toasted bread - are all there, just rearranged somewhat. 
Wrap 3 or 4 strips of bacon around the outside of an ovenproof custard cup.
Bake upside down at 375 F to form a crispy bowl, about 25 minutes.
Cool the bacon bowl a bit to firm up; carefully remove from the mold, turn over and fill with dressed lettuce, tomato and freshly toasted croutons.

The kitchen smelled heavenly and the cup did work as a container, but it would have been much tastier with hot bacon. Cold bacon isn't much of a treat, not unless it's a crispy bit stolen from the pan when no one is looking.


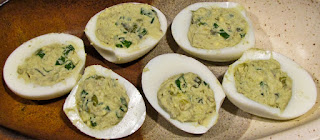
Eggs in a Nest


The cheese nest used a standard frico recipe: 
Mound 1/8 cup grated fresh Parmesan on a silpat; tap down and smooth into a thin circle.
Bake at 375 F until golden and bubbly, but don’t overcook to the browned stage.
Remove from the oven; quickly mold over an upturned glass, or place inside a muffin tin and gently press down with the bottom of a thin glass to form into a bowl.
Let it cool until firm, about 5 minutes.
Repeat for more nests.


Use your favorite savory deviled egg stuffing recipe. I like a mustard/mayo combination with dill relish, capers and chopped green onions. Fill only to the top of the whites, patting the stuffing down gently and leveling the surface. 
Heat a bit of butter in a skillet and sear the flat, filled side of the egg until it is just browned. Do not cook the rounded side.
Carefully remove the egg from the pan and place on a frisee-filled cheese nest.
(I added a bacon rosette to one and liked the effect.) Sprinkle with paprika for a more colorful presentation, if you like.


Gyoza Fishbowls with Trout


Gyoza skins or wonton wrappers make such versatile containers, and the process takes almost no effort. Note from a taster: beware! when baked they are brittle and their edges can be a little hard on the mouth.
Lightly coat the insides of mini muffin tins with olive oil.
Lay the gyoza out on a cutting board and brush one side sparingly with oil. Cut to size if using large wonton wrappers.
Place a square, oiled side up, inside each muffin cup, pleating somewhat to fit.
Bake at 375 F for about 8 to 10 minutes, until lightly browned and crisp.
Remove from the muffin tins and cool before filling with ingredients of your choosing. I used smoked trout pieces, capers and fresh parsley atop spoonfuls of a whipped cream cheese/horseradish mix.
Crab salad, salmon mousse, or a chopped chicken salad with curry and chutney are other tasty options. 


The April Daring Cooks' Challenge is now officially ended, but I’ll keep playing with this idea for months to come. What's next? I know there are endless ideas for edible containers waiting to be explored. Think side dishes, soups, entrees, even desserts presented in a container that's part of the treat. I know I will be inspired by the scores of April posts from the Daring Cook's community of bloggers. You should check them out... Go ahead, google "Daring Cooks edible containers". You'll enjoy the variety and creativity.


Monday, April 11, 2011

Another Hummus Recipe


What! did I really need one more recipe for hummus? Probably not, but this hummus seemed so much smoother, silkier, even tastier than the usual recipe. (here). I found this version while paging through an under-utilized cookbook on an overcrowded shelf; either wasting time or looking for inspiration. The ingredients and procedures are similar to other hummus recipes, with small variations in quantities. What made the difference? 

Could it have been the cook? I had spent the day procrastinating, avoiding some tasks that really must be done this week. Instead of working down the long list of Things To Do in April, I busied myself in the kitchen. I lingered over simple tasks, read directions thoroughly, organized all required ingredients ahead of time and planned several healthy meals for the week ahead. There was time for several cups of tea too, while I relaxed, studied the patterns of raindrops as they merged and meandered down the tall windows. 

I think that project list lengthened while my back was turned. I could feel the weight of it pressing down on my conscience.  Do you suppose a guilty cook produces an improved dish? It seemed to work with hummus. 


Hummus Bi Tahini      
Recipe from Joanne Weir’s From Tapas to Meze, 2004

1 1/3 cups dried chickpeas (8 0z), or one large can garbanzo beans, drained and rinsed and drained again 
Juice of 3 lemons, divided (about 6-8 TB of bottled juice)
1/2 cup tahini or sesame seed paste
2 TB water
4 TB olive oil (divided)
6 cloves garlic, minced or smashed into a pulp
1/4 tsp cayenne
1 1/2 tsp plus a pinch of sweet paprika (or smoky pimenton)
1/4 tsp cumin
Salt
1 tsp chopped fresh Italian flat-leaf parsley
6 lemon wedges
Kalamata or nicoise olives
Pita bread, warmed or pita chip wedges

Rinse the dried chickpeas and discard any stones. Cover with water and soak 8 hours or overnight. Drain and place in a saucepan with enough water to cover by 2 inches. Simmer until very tender and the skins begin to crack, 1 to 1 1/4 hours. Drain the chickpeas but reserve the cooking liquid. Reserve a few whole chickpeas for garnish. (I didn't bother to cook the canned chickpeas; just pureed them in the blender after the drain and rinse procedure.) 

In a food processor or blender, puree the chickpeas, the juice of 2 of the lemons (about 4 TB), the tahini, the water, 3 TB of the olive oil, the garlic, cayenne, 1 1/2 tsp of the paprika, the cumin, and 3/4 tsp salt (to taste) until a soft, creamy paste is obtained. Season with additional salt and lemon juice as needed.

Spread the puree on a plate and make a small well in the center. Drizzle the remaining 1 TB olive oil in the well. Sprinkle with parsley and the remaining pinch of paprika. Garnish with the lemon wedges, olives, and reserved whole chickpeas. Serve with warm pita bread or crispy pita chips. (Disclaimer: I skipped the pretty presentation directions and just piled the hummus into small bowls.)

Serves 6

Notes:
Use the reserved cooking water to thin the blender mixture as needed. Don’t overthin the paste.

This recipe can be made up to 2 days in advance. Bring to room temperature before serving.

Monday, April 4, 2011

Chicken Broccoli Sort-of Caesar Salad


It’s April again, almost time to move out of the house and aboard the boat. I’m running a bit behind on my schedule for clearing out the freezer and using up all of the perishables in the kitchen. I think I say that every year, usually in March. No matter, it makes meal-planning an interesting game.

When I opened the refrigerator door last night, WOW!, thoughts of summer cruising flashed through my mind. Really? after a wet and dreary Seattle day, those memories were something to smile about! Discovering some deli-roasted chicken, a head of broccoli and some red peppers in the fridge brought flashbacks of past galley meals.  Quick-to-fix, full meal salads are very popular with this cook, and the Capt. and guests seem to enjoy them as well. I know, there are a gazillion recipes based on those ingredients, but this Chicken Broccoli Sort-of Caesar Salad is perfect for any day when I want to play outside instead of cooking inside. Last night it was the perfect dinner solution - an attractive and delicious one-pot meal that reminded us of good times past and future. (It also made good use of a lot of on-hand items.)

The recipe came from a 1996 cookbook by Prevention Magazine, and the original version is useful as a guide. It handles substitutions well, though any adaptations can impact the listed calorie/fat/cholesterol numbers. For me it’s all about taste and convenience; forget those numbers. Regular Greek yogurt is tastier than any nonfat yogurt, grated lemon zest provides a tangy zip, white balsamic vinegar looks prettier than regular, and dried cranberries add a nice touch of sweetness. Last night I also skipped the croutons and scattered a handful of crumbled feta cheese on top. That worked. Next time I’m sure the salad will feature different variations. I might skip the croutons or feta cheese topping and add a side of cheese quesadillas, grilled garlic toasts or even warmed pita rounds for larger appetites. The salad won’t care.


Balsamic Chicken Caesar Salad

 Prevention's Healthy One-Dish Meals in Minutes , serves 4

1 Tablespoon olive oil        
1/4 cup plain nonfat yogurt (note: it's regular Greek yogurt for me!)
2 Tablespoons balsamic vinegar (white balsamic is more attractive!)        
3 cloves garlic, minced (or less, to suit your taste)
2 Tablespoons grated Parmesan cheese
2 cups shredded cooked chicken breast
1 cup chopped broccoli florets
1 sweet red pepper, diced
1 head romaine lettuce, torn into bite-sized pieces
1 cup croutons

In a large bowl, whisk together the oil, yogurt, vinegar, garlic and Parmesan.

Add the chicken, broccoli and peppers. Toss well and let stand for 10 minutes (the chicken will absorb some dressing).

Add the lettuce and fresh croutons. Toss well.

(Optional: sprinkle with lemon juice & black pepper just before serving)

Hands-on time: 5 min.         Per serving: 205 calories
Total time: 15 min.                  7.1 g. total fat (31% of calories)
                                             1.6 g. saturated fat
                                             26 mg. Cholesterol
                                             170 mg. Sodium

Related Posts Plugin for WordPress, Blogger...