Showing posts with label seafood. Show all posts

Wednesday, March 7, 2018

Lemon Ginger Shrimp in Parchment Paper


US wild jumbo shrimp frolicked in my dreams last night. Oh yes, not only in costume but performing silly dances and unbelievable acrobatic feats. Better than a nightmare, this exhibition just might have been inspired by a package of Gulf shrimp that should have been last night's dinner. But the cook was lazy, reheated some spicy soup, and went to bed quite early. Hmmm, maybe I should blame the evening's entertainment on that spicy soup. Today those frisky crustaceans shared the spotlight with some Asian flavors and starred in Shrimp en Papillote... aka Lemon Ginger Shrimp in Parchment Paper.


Local groceries and big box stores offer frozen shrimp sourced from a variety of countries, but I know very little about these other fisheries. Lacking specific knowledge of or confidence in foreign catch and processing methods, I choose US wild seafood, especially Pacific Northwest products, whenever possible. Lucky for me, Seattle holds several quality fish markets with impeccable fresh and frozen seafood. I have previously used this simple method with fish fillets, but admittedly not often. Surprising, since the results were so popular. 


Sturgeon in Parchment

Why not cook shrimp en papillote? Somehow other favorite shrimp and prawn dishes tend to muscle parchment pouchs out of the limelight.


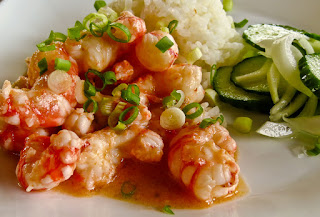
No more understudy role for shrimp in parchment; this dish is ready for star billing.    


Shrimp en Papillote

for 2 servings

1/2 cup Napa cabbage, julienned (or substitute baby bok choy)
1/2 cup cooked rice
1/4 cup green or white onion, sliced thin
1/4 cup carrots, julienned
2" fresh ginger, peeled & cut into 8 coins
10-12 wild jumbo shrimp (size 16-20/lb), shelled & cleaned
salt and white pepper
1/2 lemon, sliced into thin rounds
2 TBS mirin
2 TBS sesame oil
1 TBS ponzu sauce (or use lemon or lime juice plus soy sauce)
2 pieces of parchment paper, roughly 15"x24"

Preheat the oven to 425 F. Set out a baking sheet, ready to transfer the parchment packets to the oven. Fold each parchment sheet in half (now 15x12) and cut a large, fat heart shape.

Spread half of the cabbage shreds on one open sheet of heart-shaped parchment close to the fold line. Spread it out, but leave an inch or two bare along the cut outside edge. Top with half of the rice, onion, carrots and coins of ginger. Add half of the shrimp on top, sprinkle with salt and pepper and arrange half of the lemon rounds over the shrimp. Sprinkle with half of the mirin, sesame oil and ponzu sauce. (Short version: layer half of the ingredients on the paper and sprinkle half of the liquids evenly over the top.)

Fold the other half of the heart over the top, lining up the edges. Begin with the top of the heart (the fat part) at the fold; fold over a short section, pleat and pinch together, press down to seal and repeat the fold/pleat/pinch/press as you work around the edge to the bottom point. Twist the final section to seal and tuck under the pouch to secure it. 

Repeat with the remaining ingredients to create a second packet.

Move the packets onto a baking sheet and place in the center of the preheated oven. Reduce the oven temp to 400 F and bake for 15 minutes (only 10-12 minutes for smaller shrimp). The packets should puff slightly as they cook. (I suggest opening one packet a few minutes early to check for doneness - you don't ever want to overcook shrimp!

To serve, transfer each packet to a dinner plate; use kitchen shears to cut an X on top to fold open. The aroma is tantalizing. Serve with lemon slices and/or Sweet Thai Chile Sauce to drizzle over the packet contents if you like. (I prefer mine plain.


Friday, October 2, 2015

Japanese Cabbage and Shrimp Pancakes - Okonomiyaki revisited


My iPhone camera roll is out of control! Too many pictures in too few albums make it impossible to locate anything quickly. Last week I decided to tackle the disorganized mess, discard the surplus shots and organize the rest. Like several other ambitious plans, an enthusiastic start soon bogged down in the details. Progress slowed as I gazed at each shot, flooded with memories of the occasion. So many photos recalled special friends, fun adventures, brief moments of scenic beauty, tasty meals, etc. Gazillions of shots still need organizing, but I did find a cache of food photos, perfect for menu planning inspiration. Those colorful restaurant food shots reminded me of countless tasty meals, prompting an online search for recipes. 

Photo: Okonomiyaki plate at Arnie's in Edmonds
This amazing okonomiyaki luncheon plate shown above, an October 2014 daily special from Arnie's in Edmonds, topped my newly-inspired "must make" list. Two airy pancakes, plated atop braised spinach and a puddle of tangy sauce were so tasty I didn't want to share a single bite... though I probably offered, just to be polite. 

This week Hilary ran across the okonomiyaki recipe in my Food52 cookbook and recalled enjoying this Osaka specialty treat during a recent trip to Japan. 


I have made these savory cabbage and shrimp pancakes before (link), but wasn't thrilled with the results. Now, with renewed photo inspiration and a kitchen helper, it was time to revisit this delicious savory treat.


Hilary mixed the ingredients, aiming for a loose egg batter that would produce crispy, crepe-like pancakes. Ron grabbed a spatula and joined the party at the stove. We soon had two skillets heating on the cooktop, the oven warmed and a bowl of dipping sauce mixed and set aside. Let the okonomiyaki cookoff begin. 


The most successful technique involved adding 1/4 cup batter to a hot, oiled skillet and smooshing it out flat with a large spoon. Flatter pancakes cooked more evenly and were much easier to flip than those that held mounds of filling.


The smooth surface of the cast iron pan accounted for easy release and flipping, while the small ridges on the bottom of a Circulon skillet resisted releasing the pancakes. Messy, but doable.
  

We ended up with plump pancakes rather than flat, crispy edged crepes. No matter. The pancakes were delicious; tangy, crunchy, eggy little disks packed through with toothsome cabbage and shrimp. Tasty enough on their own, their flavor really popped with the addition of the dipping sauce. Hilary added more sriracha, Ron reached for the sweet Thai chili sauce, and I claimed more dipping sauce for myself. Win, win.

The iPhone camera roll still awaits organization, but now I'm eagerly looking for the next food inspiration as I begin to sort through the photos. 


Cabbage and Shrimp Pancakes - aka Okonomiyaki
based on a recipe at Food52.com
Yield: 12 medium pancakes

Pancakes:
4 large eggs
2 teaspoons lime Ponzu (or soy sauce and a splash of lime juice)
1 teaspoon hot sesame oil
1/2 teaspoon sea salt (optional, I find the Ponzu salty enough)
1/3 cup AP flour
2 cups thinly sliced cabbage shreds (we substituted 1/2 cup carrot shreds and red cabbage for some of the green cabbage
6 green onions, sliced thin
1 cup salad shrimp (or chop larger shrimp into small pieces)
Minced pickled red ginger, to taste (optional, but it adds a nice bite)

Canola oil for the skillet
Toasted sesame seeds, for garnish
Dipping sauce*

  1. Whisk together the dipping sauce ingredients and set aside while you make the pancakes.
  2. Preheat the oven to 200 F, to hold the finished pancakes as you make several batches.
  3. Using a large bowl, whisk together the eggs, Ponzu, spicy sesame oil and salt. Add the flour in several batches, whisking to blend completely after each addition. Fold in the cabbage, green onions, shrimp and pickled ginger(optional).
  4. Drop a few tablespoons of canola oil into a cast iron or nonstick skillet and heat over medium-high heat until the oil shimmers. Give the batter another stir or two to mix in any egg mixture that might have settled out; add a heaping serving spoon of batter to the pan. Smooth out the batter to an even thickness, tidy up the edges, and cook for several minutes until golden brown. Flip carefully and cook a few more minutes until the second side is golden brown. Keep warm, covered, in the oven as you work with the remaining batter.
Dipping Sauce
1/2 cup lite Best Foods mayonnaise
2 tablespoons lime Ponzu sauce
1 tablespoon Sriracha, adjust more or less to your own taste (we recommend more)

Note: use as a dipping sauce or add to a squirt bottle and squeeze over the pancakes.


Monday, July 27, 2015

Smoked Salmon on the Barbecue


Sometimes - when fishing has been good, when the weather cooperates, when the Capt. feels like manning the barbecue – we feast on Ron’s special Smoked Salmon with a Honey Lime Pepper Glaze. This delectable treat isn’t a quick, spur-of-the-moment preparation. While not difficult, it does require planning ahead to accommodate overnight brining and an hour or two of carefully tending the barbecue. It’s well worth the time spent monitoring, and taste-testing, the low-and-slow batch of smoked salmon. 


When smoking big batches of salmon ashore, I use multiple Little Chief smokers. These electric units  make it easier to regulate the temperature with minimal tending, but smoking aboard seems to add something special to the flavor. Either way, freshly smoked salmon has been a major hit with both crew and guests.


Kalinin Barbecue-Smoked Salmon

Brine: Makes 5 cups, enough to brine 4-5 pounds salmon
4 cups water
¼ cup kosher salt or other non-iodized salt
½ cup brown sugar
½ cup soy sauce
1 tablespoon garlic granules or powder (not garlic salt)
1 tablespoon pickling spices, crushed
1 teaspoon powdered ginger
1 teaspoon ground Indian coriander
3 or 4 splashes liquid smoke (optional)

4 to 5 pounds skin-on salmon, cut into 2-inch strips
Honey Lime Pepper Glaze (see recipe below)

Untreated wood boards, strips or sticks/branches soaked in water for at least one hour prior to use on the barbecue (alder preferred)

Add the brine ingredients to a large glass or other nonreactive container. Whisk together and microwave until the sugar dissolves. Chill thoroughly.

Place the salmon strips in the brine, one at a time so each piece is coated on all sides. When all of the salmon strips are in the container they should be completely immersed. If necessary, weight down the top surface with a plate to keep everything submerged and covered in brine. Cover and hold in the refrigerator overnight or at least 8 hours.

When ready to smoke the salmon, remove the strips from the brine. Lightly rinse to remove the bits and pieces of pickling spice, dry with a paper towel and air dry on a baking rack for 3 hours. Air-drying sets up a dry finish and will encourage absorption of a smokey flavor. 

Preheat the barbecue grill to its lowest setting (85-120 degrees F), arrange the wet wood pieces across the grate, leaving small gaps between each piece for smoke and air flow. Place the brined-and-airdried salmon chunks on top of the wet wood, leaving a gap between each piece. Close the lid and let cook at the lowest temperature possible for 20-30 minutes.

After the salmon has cooked for 20-30 minutes, baste with the Honey Lime Pepper Glaze. Cover and continue smoking. Continue to baste and check for doneness frequently; for the thinner pieces check every 15-20 minutes and remove from the grill as they finish. RL likes to add one last coat of the honey/lime glaze as he takes each piece off the grill.

Sampling is the recommended best test for doneness. <grin> It may take several hours, up to 2 to 3 for thicker pieces of king salmon.

Serve immediately or cool and store covered in the refrigerator. Use as an appetizer, snack, or an amazingly tasty addition to soups, salads, or breakfast dishes.

Honey Lime Pepper Glaze:
Use a 4:3:1 ratio (by volume) to mix batches of this glaze, for example
4 ounces honey
3 ounces lime juice (fresh or bottled)
1 ounce freshly cracked black pepper

*Quick Cook Note: if I’m in a hurry or the weather is really crummy, I’ve brushed the fish with a few drops of liquid smoke diluted in some water, and slow-baked the racks over baking sheets in a 180 F or lower oven. It works, sort of. One step better is to partially cook on the barbecue grill and finish in the oven, but nothing is as flavorful as a total smoke on the barbecue (or in an electric smoker with wood chips).

*Canning Note: after the salmon cools I pack it into pint or half-pint jars and have to refer to a canning book or on-line link for the time and temp details. Smoked salmon takes as long as fresh salmon; some of the oil will come out of the fish, so I turn and up-end the jars every so often if I store it a long time.


Saturday, July 25, 2015

Salmon with Puttanesca Sauce


Salmon Supper: Always Have a Plan B

Fresh salmon usually calls for barbecuing a fillet… usually. However, there is no way our gas grill will stay lit when the wind gusts reach 30 knots, and The Capt. isn’t too enthusiastic about manning the grill in a windy downpour either. Fishing in unsettled weather is an entirely different thing, however.


This week’s changeable weather meant switching from our favorite outdoor grilled salmon to two galley recipes instead. One night Cast Iron Skillet Salmon utilized the thinner tail end of a king (Chinook) salmon fillet. We consumed every last shred at dinner – sigh! no tasty leftovers for salmon salad or salmon spread with this recipe.

The thicker head-end of the same salmon fillet seemed perfect the next day for an oven roasting experiment. I have baked salmon before; sometimes with a lemony, garlic butter, scampi-style sauce… or a peppy and creamy green chili sauce… or wrapped in parchment en papillote… etc.  It must have been the crazy, changeable weather that encouraged me to go a little wild and pair the remaining portion of that gorgeous salmon fillet with a savory, spicy Italian puttanesca sauce.  Red sauce with salmon?! I know, I know, it sounds a little over the edge but OMG, this combination worked! The salmon held its own against the robust sauce, delivering flavor beyond expectations.

Salmon plus sauce makes a delicious entrée, but add some spaghetti to the plate and it’s heavenly and filling.

Note: I tossed the cooked pasta with a drizzle of olive oil and a sprinkle of garlic powder, keeping it warm in a covered pan while the salmon finished. To serve I added a swirl of spaghetti to each warmed plate, topped the pasta with salmon and spooned a bit of sauce over each portion. Next time I’ll save some pasta cooking water to thin the sauce a bit before this last step – or just make more sauce.


Salmon with Puttanesca Sauce
Serves 4

For the Sauce:
1 can (14-to-16 ounces) diced tomatoes with their juices
½ cup black olives, pitted and chopped or sliced
3 Tablespoons capers, drained
2 cloves garlic, finely chopped
½ teaspoon dried Italian herbs (thyme, oregano, basil…)
¼ teaspoon dried red pepper flakes
2 teaspoons freshly grated lemon zest
2 anchovy fillets (optional)

4 salmon fillets ( or a 1 ½ -to- 2 pounds chunk), skinned and boned
freshly ground black pepper (or substitute lemon pepper)

cooked spaghetti or other long pasta (optional)

Preheat the oven to 400 degrees F.
Add all of the sauce ingredients to a saucepan; bring to a boil then lower the heat and simmer for 5 to 10 minutes to blend the flavors. Stir occasionally.
Sprinkle the salmon with pepper; place in baking dish just large enough to hold the fillets with some space in between each piece. Ladle the sauce around the salmon and place on the middle rack in the preheated oven. Bake until just cooked through,  10-15 minutes for thinner pieces and 12-20 minute for thicker chunks. Remember, fish will continue cooking for several minutes after you remove it from the oven.
Serve immediately on warmed plates, or even better top a swirl of hot, cooked pasta with a fillet and a dollop of sauce.

Notes:
*Next time I’ll try adding ¼ cup chopped scallions (white and green parts) and a handful or two of baby spinach leaves or kale to the sauce… just because.
*Halibut is another good choice for this preparation.


Related Posts Plugin for WordPress, Blogger...