Thursday, May 30, 2013

Sourdough Crust Pizza


We had a near tragedy earlier this month when the refrigerated sourdough starter was too long ignored. That all-important mass of flavorful dough threw off liquid (hooch) and sat sulking, inert and non-bubbling, for hours after being fed. So I fed it again... and again... and eventually it responded with some enthusiasm. Disaster averted, but the whole exercise left me with a lot of sourdough starter hanging out in the kitchen. 

A serendipitous wander through the internet led me to Sourdough Surprises," a fun monthly baking group who strive to use sourdough starters for things besides bread". Well now, count me in on the fun. One portion of that extra starter led to amazingly good chile-enhanced Mexican Sourdough Chocolate Brownies for the group's May linkup. Next came inspiration from the Sourdough Surprises archives for a savory dish, Sourdough Pizza. This was an opportunity to try a sourdough pizza crust without adding any commercial yeast. 


The base recipe came from Sourdough Home, an incredible resource for all things sourdough. I added some herbs and seasonings to the dough, and then followed two different methods suggested for baking. 

Method A: Roll out dough and rebake a naked crust for five minutes at 450 - 500 degrees F. Add toppings immediately or at some later time and bake again.
Method B: Roll out dough, add toppings and bake immediately until crust browns and the cheese melts.


Photo: Sourdough patted into a 10-inch round
Photo: Prebaked sourdough crust with red sauce added
Photo: Coins of Basque chorizo sausage are a favorite pizza topping
Photo: Both baking methods produced a too-puffy edge
The resulting pizzas were both tasty, but differed somewhat in texture. For me pizza success is all about the crust. Method A produced an irregular puffy crust that was a bit challenging to sauce. The super-puffy edge held a slightly undercooked core after baking while the bottom crust was well-browned and crisp. That didn't stop me from cutting a few slices to devour sample and enjoy. Method B produced a flatter center with an airy, puffy edge. RL raised his eyebrows, shook his head, and announced I had imagined any textural difference. He focuses on the toppings, preferring a much thicker base of red sauce, but judged both pizzas to be equally good. Next time I will roll out a flat base and skip the raised edge.This was a fun experiment, altogether surprising in how much oven spring occurred. Sourdough pizza crust could become a regular go-to item in this household.

Too much starter turned out to be a very good thing.


Sourdough Crust Pizza  
recipe adapted from Sourdough Home

1.5 cups sourdough starter, well-fed and rested

1 tablespoon olive oil + a bit more to rub onto the shaped crust
1 teaspoon salt
1 teaspoon each dried basil and oregano
1/4 teaspoon garlic salt
1.5 cups AP flour

  1. Mix the first 5 ingredients together, starter through garlic salt, blending thoroughly. Add the flour by half cups, working it in until incorporated and you have a soft dough. Quantities will vary depending on the consistency of your starter, so adjust as needed. If  too dry, add some more starter or a little water, but avoid adding too much more flour. You want a soft, slightly tacky dough. (I like to knead the dough at this point until I feel the texture change, roughly 5 minutes for this batch.)
  2. Let the dough rest for 30 minutes, covered loosely with plastic; it may lighten but don't expect it to raise much. (60 minutes in my cool kitchen)
  3. Preheat the oven to 450 - 500 F, depending on your ovens capabilities.
  4. Roll or pat the dough out into a round shape, thin or slightly thick depending on your preferences. (I patted the dough into two 10-inch pizzas with a slightly raised rims.) Cover loosely with plastic and let rest for 30 minutes.
  5. Optional: Prebake the crust by sliding the shaped dough onto a heated stone in the oven for about 5 minutes. Remove the pizza crust from the oven and rub a bit of olive oil on top of the crust to keep it from getting soggy. (OR skip step 5 and move on to step 6.)
  6. Top with whatever toppings you like and (return to the oven to) bake for about 12-15 minutes, or until the crust is golden and the cheese is melted.

Tonight's Toppings, per each 10" pizza
1/2 cup thick red sauce, homemade or commercial
1 Basque chorizo sausage, sliced in thin coins, precooked & drained
1/4 cup red onions, caramelized
3 yellow mini sweet peppers, sliced in thin rings
kalamata olives, sliced
1/2 cup shredded mozzarella
handful of fresh basil leaves, julienned

Thursday, May 23, 2013

Almost No Knead Bread with Parmesan, Rosemary and Walnuts

#TwelveLoaves May 2013 


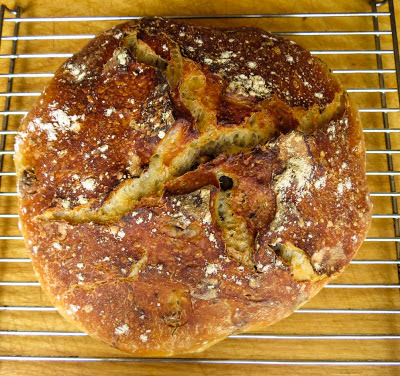
It has been ages since I have done much baking, let alone participated in any baking challenges or link-ups, and suddenly May brought two opportunities. May's theme for #TwelveLoaves is "share your favorite bread... any bread you'd like to bake", and that's an invitation too tempting to pass up. Interesting too that I'd recently discovered another group that bakes together each month, SourdoughSurprises which focuses on creative sourdough recipes. Was this a sign? Sign or not, it was definitely time to get busy baking again and share one of our favorite loaves. CakeDuchess featured an amazing Mexican Hot Chocolate Bread for her creation, but after my Mexican Chocolate Sourdough Brownies (link) it was time to bake a non-sweet favorite . I went with a savory loaf, a "Sort of Sourdough, Almost No Knead Bread" with Parmesan cheese shreds, fresh Rosemary needles and a generous handful of Walnuts.  

Ignoring everything written about cooling down a freshly-baked boule before slicing off a piece, we can't resist the heavenly aroma and make a serious dent in this loaf within minutes of it coming out of the oven. I love, really love, a thick slice warmed or toasted, spread with a smear of butter and a sprinkle of coarse sea salt. RL prefers his grilled for a bruschetta topped with a soft cheese and lingonberry jam or ginger marmalade. Days old slices have made a flavorful base for panzanella salad, savory bread puddings, even French toast and stratas. Toasted croutons and bread crumbs are tasty last-resort options, but the loaf is usually long gone before it comes to that.


The sort-of-sourdough claim comes from adding beer and vinegar AND/OR a portion of sourdough starter to a typical no-knead recipe for  an extra flavorful tang, or sometimes just because it's time to feed my starter and use it in something. After the l-o-n-g first rise, it's time to be creative and add an assortment of savory elements. For this loaf I added my favorites, drifts of freshly grated parmesan cheese, just a bit of rosemary from the garden and a hearty scattering of walnuts. Mmmm, just thinking about it makes me hungry. Other variations have featured briny olives, stronger cheeses like feta or stilton, onions or even bacon, but I keep coming back to parmesan, rosemary and walnuts as the perfect flavor partners.


If you haven't made a loaf of No Knead Bread yet, give it a try, and DO check out the amazing recipes from other #Twelve Loaves bakers each month.


Photo: add savory elements after the first rise and knead to thoroughly incorporate

Photo: resting on parchment in a skillet for the second rise

Photo: fresh from the oven with a crisp crust and tantalizing aroma

Photo: check out the open crumb and crispy crust - oh, yum!
Almost No Knead Sort of Sourdough Bread
with Walnuts, Parmesan and Rosemary
recipe found on Seattle PI's website, attributed to Cook's Illustrated version of the Jim Lahey recipe whick inspired countless variations found all over the web!

3 cups (15 oz) all-purpose flour, plus additional for dusting work surface
1/4 teaspoon instant yeast
1 1/2 teaspoons table salt
7 ounces water at room temperature
3 ounces mild-flavored lager beer
1 tablespoon white vinegar
1/4 cup sourdough starter, optional (note: my starter is quite "stiff")
  1. Whisk flour, yeast and salt in a large bowl. Add water, beer, vinegar and sourdough starter (if using). Using a rubber spatula, fold the mixture, scraping up dry flour from bottom of bowl, until a shaggy ball forms. Cover the bowl with plastic wrap and let sit at room temperature for 12 to 18 hours. (We're talking typical Seattle room temperature here)
  2. Lay a 12- to 18-inch sheet of parchment paper inside a 10-inch skillet and spray with nonstick cooking spray. Set aside.
  3. Move the dough to a lightly floured work surface, add any optional ingredients and knead a dozen times using a dough scraper to help. The dough will be sticky, but resist the urge to add a lot of additional flour. Shape the dough into a ball by pulling opposite edges into middle. Transfer the dough ball, seam-side down, to the parchment-lined skillet. Spray a sheet of plastic wrap with nonstick cooking spray and drape loosely over the dough. Let it rise at room temperature until the dough has doubled in size and does not readily spring back when poked with finger, roughly 2 hours in a warm kitchen.
  4. 30 minutes before baking, adjust an oven rack to a low but not lowest position, place a 6-to-8-quart heavy-bottomed Dutch oven (with lid) on the rack, and preheat the oven to 500 degrees F.
  5. Lightly flour the top of the dough and use a sharp knife to make one deep slit, 6-inches long, 1/2-inch deep along the top of dough, or slash an X if you prefer. Carefully remove the pot from the oven and remove the lid. Pick up the dough by lifting the parchment overhang and lower into the pot, allowing any excess parchment to hang over pot's edge. Cover the pot with its heated lid and place in the oven. Reduce oven temperature to 425 degrees F and bake covered for 30 minutes. Remove lid and continue to bake uncovered until loaf is deep brown in color, about 20 to 30 minutes longer, until an instant-read thermometer inserted into the center registers 210 degrees. Carefully use the parchment to lift and remove bread from pot; transfer to a wire rack and cool to room temperature, about 2 hours... if you can wait that long to taste this delicious loaf.

Monday, May 20, 2013

Mexican Chocolate Sourdough Brownies

Sourdough Surprises May 2013


Sourdough and Brownies are not a typical twosome, or so I thought. Now it appears that the food blogosphere is full of recipes pairing two of my favorite ingredients. You can even find a page of sourdough brownies on Pinterest, who knew? Interesting, unusual, but so what?  The WHAT is this month's cooking challenge at SourdoughSurprises featuring... you guessed it, sourdough and brownies. I'm in! What could be better than dark chocolate brownies? maybe dark chocolate brownies with a Mexican twist. Mexican chocolate drinks blend unsweetened chocolate with a hint of cinnamon and a bite of chile heat, so why not add those flavors to chocolate brownies? 


Photo: brownie ingredients - note the blue/green shells on the Polish chicken eggs
Photo: melted chocolate and butter wait for the remaining ingredients
Photo: corners pull away from the pan when brownies are fully baked
I began with a recipe from BakeNQuilt, who adapted it from WildYeast, and then I tweaked it a bit to add a minor Mexican note. The first batch was a pleasant surprise with a dense chocolatey texture, less sweet than most cloyingly sugary brownies, and more cakelike than I expected for a recipe with no extra flour beyond that in the half cup of sourdough starter. The chile is a backnote, subtle but noticeable, so for the chile sensitive you might serve a square with a dollop of whipped cream, sweetened crema, honey Greek yogurt or ice cream to temper the bite and add a touch more sweetness. For batch two I might adjust the quantity of chile and add a touch more sugar, or not. RL enjoyed them as baked and I'm still waiting for reports from the neighbors. Thank you, SourdoughSurprises, for launching this delicious challenge. 


Mexican Chocolate Sourdough Brownies

6 oz dark bittersweet chocolate (60%), broken into pieces

1 stick unsalted butter, cut into pieces
1/2 cup sugar
1/2 teaspoon salt
1 teaspoon vanilla
1 teaspoon cinnamon
1/2 teaspoon ground ancho chile
1/2 teaspoon ground chipotle chile
1 egg, beaten
1 egg white
1/4 cup cocoa powder
1/2 cup sourdough starter, well-fed and rested
1/4 cup caramel bits or chopped nuts (optional) 
  1. Preheat the oven to 325 F. (My oven runs cool so I used 350 F)
  2. Line an 8x8 baking dish with foil and butter the foil for easy removal of the brownie square.
  3. Place the chocolate and butter in a 4-cup microwave safe measuring cup. Melt in successive 30-second bursts, stirring after each interval. Be careful not to overheat and burn the chocolate. (I don't know what that does, but several recipes include that warning. I was careful to heat only until the chocolate lumps disappeared)
  4. Add the sugar, salt, vanilla and ancho and chipotle chile powders to the mix and stir briefly to incorporate.
  5. Add the egg and egg white and whisk to combine.
  6. Sift the cocoa powder into the mix and stir, not whisk, to combine. (Again, the warnings caution against whisking. This might change the texture of the brownie and not in a good way)
  7. Add the sourdough starter and stir in gently.
  8. Spread half of the batter evenly in the prepared pan. Scatter half of the caramel bits or nuts (if using) across the surface. Add the remaining batter and top with the remaining caramel or nuts. Bake in the preheated oven for 40 minutes, rotating pan half way through. Test in the center with a toothpick; it should come out clean or with very few crumbs. The corners of the brownie will also have pulled away from the pan.
  9. Cool for 20 minutes, then use the overhanging foil edges to lift to a baking rack. Cool completely before cutting into squares.

Sunday, May 12, 2013

Cucumber Melon Refresher

SRC: Secret Recipe Club May 2013


http://otm-inthegalley.blogspot.com Cucumber Melon Refresher

It's a heat wave, in May no less. Seattle tied with Phoenix for the highest daily temperature in the nation this past week, a scorching 87 degrees F. No complaints here, it has been lovely, if just a bit unreal. The hot weather made it easy to choose a few drink recipes from Amy's Cooking Adventures for my Secret Recipe Club post this month. I picked the coolest, most refreshing beverage I could find, Amy's Cucumber-Melon Refresher. Actually I tried several other drinks, but this was the first and most in-season with mint and strawberries. As a bacon and popcorn fan I was tempted to make multiple batches of her Bacon Caramel Corn with Dark Chocolate, but we're on a renewed campaign to eat healthier. Healthier probably shouldn't include bacon, brown sugar, light syrup and dark chocolate but damn! that sounded tasty. Sigh, moving on...

Amy's base recipe works best with a really sweet, flavorful watermelon. My mini melon was pretty cute, quite colorful and waaaay too bland. Lime juice and fresh strawberries came to the rescue, adding a sweet/tart note that balanced the more assertive cucumber flavor. The watermelon played a minor role, adding volume, color and just a hint of flavor. We tried a glass straight up, then another one with rum and finally a third with a shot of tequila. I enjoyed the kid's version, served over ice, but would never turn down the high test adult version with alcohol. Mmmmm, delicious. Thanks, Amy. 


Note: you will enjoy cruising through Amy's blog, checking out her recipes and admiring her sense of adventure and humor. For example, 

"I love taking risks in the kitchen. One thing my wonderful husband has taught me is that cooking experiments are always welcome, as long as McDonald’s or Little Caesars is an option in the event of a cooking disaster. “


Photo: Cucumber Melon Refresher basic ingredients - in generous measure

Photo: Ready to blend, no liquid needed 

Photo: Frothy mixture of fruit and vegetable

Photo: Straining the pulp is a recommended step

otm-inthegalley.blogspot.com Cucumber Melon Refresher

Cucumber Melon Refresher
adapted from Amy's Cooking Adventures (link

Makes 1 serving

1 cup seedless watermelon, cut in chunks
1/2 cup strawberries, cleaned & hulled (optional)
splash of lime juice (optional)
1/2 cup cucumber, peeled & seeded
1 sprig mint, 6-8 large leaves
1/2 cup Sprite, or other lemon-lime soda
1 oz white rum or tequila (optional)
  1. Place the watermelon, strawberries (optional) cucumber and mint into a blender. Blend until smooth.  
  2. Use a fine-mesh sieve and strain the mixture into a bowl, discarding the pulp.
  3. Pour the strained juice into a glass. Stir in the Sprite and lime juice (optional). Add liquor and ice, if desired.
  4. Garnish with a slice of cucumber, a chunk of watermelon, a sprig of mint and/or a fat, ripe strawberry. Enjoy!  


Tuesday, May 7, 2013

Train Wreck for Lunch

  
YOU may have reveled in Mexican menus on Cinco de Mayo, but we were happy to celebrate with friends, sipping a brew and ordering off the regular menu at Burlington's Train Wreck Bar & Grill. The restaurant sits close to a main rail line, close enough so that everything vibrates whenever a freight train passes. I mean everything: the building, the floor, your chair, your bones kind of everything. Conversation stops, seconds pass and then the party gets rolling again. But even more memorable than the locale were the friendly, knowledgeable servers and the tempting menu. It took me forever, much longer than usual, to read through each section, trying to settle on the perfect item for a late lunch. Once again fish tacos sounded too good to ignore.

Just look at this loaded plate of fish tacos, doesn't that bring a smile to your face and tempt your appetite? The cod was impeccably fresh and perfectly grilled, the accompaniments well-suited to complement the marinade. Three tacos were more than I could eat for lunch, so RL speared some fish onto his plate and declared it delicious. I agreed!


The BBQ Burger held a juicy patty composed surprisingly of flavorful smoked BBQ pork pieces. Served on a toasted, house-baked bun, this tasty sandwich held together until the very last bite. No annoying dissolving bun syndrome here, and check out the tasty sauce drippings on the plate. The clam chowder was creamy, well-seasoned with an unidentified special something, and packed with more seafood than potatoes - my criteria for a good recipe. I sampled a spoonful or two, and could have easily worked my way through the entire bowl.


Bill and Charlene ordered house favorite Train Wreck Burgers with cheese and bacon, but I think Char was most enthusiastic about the battered onion rings with tartar dipping sauce. I'll have to take her word for it. I passed on the offer to sample one, 'cuz you know you can't eat just one.


National TV News reported two cities tied for high temperature records on May 5 - Phoenix, AZ and Seattle, WA. Whaaat? Seattle?!? That was a surprise and a half. It was the perfect day for a road trip north to Burlington to visit friends, and enjoy a late lunch at a terrific eatery. Ole! Train Wreck Bar & Grill, we'll be back.

I'll get to the side trip some other time. The wolf dogs, fluffy-headed (Polish?)chickens, fat turkeys and multi-colored fresh eggs deserve their own post. 

Monday, May 6, 2013

Reflections on Swedish Pickled Herring


Swedish Pickled Herring - I enjoy eating it, but did NOT have much fun preparing it... once, only once.  In fact, it was so NOT FUN that I swore I wouldn't mess with herring again. But that was in 2008. Today I went back to reread my old post, "The Great Herring Experiment", and had to giggle. Was it really all that traumatic? 


There's not a fresh herring in sight today, so what brought that episode to mind? I found a Pickled Herring recipe at Hank Shaw's site Honest-Food that tempted me to try again, just one more time. But only IF I discover an easy way to get rid of all of those stubborn little bones. Please, share the secret if you know it.


Does pickling herring work as a metaphor for life? Well, it's quite a stretch to link the two. Both surprise us with unexpected challenges that invite analysis and adjustment. We can give up to avoid frustration when things don't go as planned. Or we can persist by learning new skills or developing other approaches. Forget the whole metaphor notion, I should just revisit the whole pickled herring issue again in Petersburg this Spring. Just because. 


Meanwhile you might consider giving Hank's recipe a try. (link)

Confession: two years have passed since I wrote this draft and left it sitting unpublished in my files. We still enjoy pickled herring, the refrigerator currently holds a brand new quart jar of Vita brand labeled "wild caught of Canada". Could this be the year I take Hank's advice to ignore the tiny bones and get on with it? One more time, it's the year for Petersburg and pickled herring. Maybe... in June... or...


Thursday, May 2, 2013

Buttermilk Skillet Scones with Cheese & Peppers


Buttermilk Scones with Cheese & Peppers

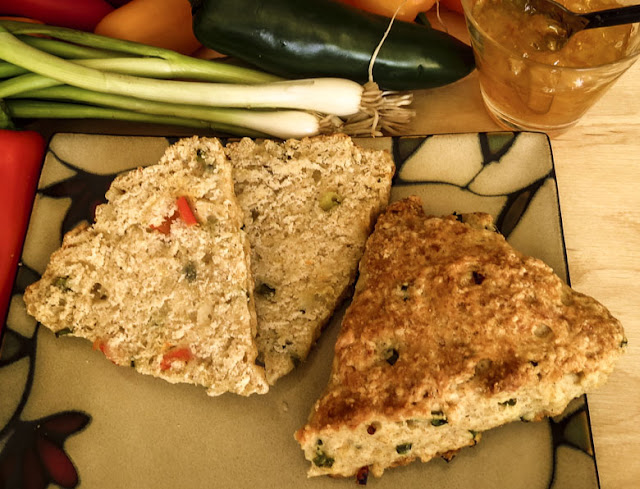
Savory scones are an occasional store-bought indulgence, a secret sneaked treat when I'm at the co-op, or the local bakery, or some Farmers' Markets. Somehow these flaky, veggie-filled triangles of delight have never come out of my oven, not until today. I woke up craving scones, jalapeno scones in particular, scones loaded with cheese and chunks of multicolored peppers. It's easy to find sweet scones, some okay and others meh!, but really good savory scones take a little searching. 
wanted them now, right now, without waiting to shower and get dressed to drive around town hunting for those savory treats.

No problemo. The Cast Iron Skillet Cookbook supplied a basic recipe that accommodated savory peppers and cheese as add-ins. Who knew? This book has traveled on the boat for years but was rarely used, so last Fall I moved it from the galley afloat to the kitchen ashore. Good move, since it thwarted any recipe panic this morning, 


The scones were wonderful served warm for breakfast, split in half and barely coated with a slick of butter. RL topped his halves with orange marmalade and ginger preserves, preferring to add a sweet note to the savory. Cooled and nibbled without butter or jam, a scone was the perfect lunch accompaniment to a bowl of chicken tortilla soup. Now I'm considering splitting one more scone, adding a slice of cheese and popping it into the microwave for a late-night snack. Sigh, my will power disappears when freshly baked scones are available, and that's the reason they should remain a store-bought indulgence. You I can't eat just one.


Buttermilk Cheese Scones with Peppers & Onions 
Recipe adapted from The Cast Iron Skillet by Kramis & Kramis-Hearne

Makes 12 scones

2 1/3 cups unbleached AP flour
2/3 cup whole wheat flour
1/8 cup sugar
2 1/2 teaspoons baking powder
1/2 teaspoon baking soda
1/2 teaspoon salt
3/4 cups chilled butter (1 ½ sticks), cut into 6 to 8 pieces
1/4 cup jalapeno, small dice
1/4 cup green onions, small dice
1/4 cup sweet red pepper, small dice
1/2 cup pepper jack cheese, shredded
1 cup buttermilk (or 1 cup milk + lemon juice to curdle)

  1. Preheat the oven to 400 F. 
  2. Add flour, sugar, baking powder, baking soda and salt to the mixing bowl of a stand mixer and stir briefly to mix. 
  3. Add the butter pieces and mix at low speed until just combined. (Low speed is recommended to avoid a cloud of flour billowing out of the bowl – ask me how I know this detail.) 
  4. Add the jalapeno, green onions, red peppers and cheese to the bowl. Run the mixer at low speed and pour in the buttermilk. Again, mix at low speed until just combined. 
  5. Divide the dough into two balls. On a lightly floured surface, pat or roll one dough ball into a circle, roughly ¾-inch thick. Cut the circle into 6 equal-sized wedges. Place the wedges in a buttered cast-iron skillet, spaced apart and forming a circle. 
  6. Repeat with the second ball of dough. 
  7. Place on a rack in the center of the oven and bake until golden on top, about 25 minutes in my oven. Remove from the oven and serve immediately, or cool on a baking rack and reheat later in the day. 

  8. Note: the use of a stand mixer is purely optional, you can mix the scones with a hand-held mixer (or by hand if you put a little muscle into incorporating the butter)


Related Posts Plugin for WordPress, Blogger...