Showing posts with label peppers. Show all posts

Monday, March 23, 2015

Pasta Salad - Plus Peppers and Carrots and Broccoli... oh my!


Moving off the boat after a short project-filled few weeks at the dock or following a lengthy cruise, means our meals grow interesting. It reminds me of an episode of the TV show Chopped where cooks prepare a dish from a basket filled with "must-use" ingredients. Thankfully boat cooking is considerably less exotic than the TV challenge. Some days we win with new flavor combinations, on other days the food is just... unusual. The goal is to empty the fridge and freezer in case of a power outage on the dock while we are gone. Most of the assorted bottles and jars that fill the refrigerator door shelves will survive a brief power interruption, but experience has taught me not to leave any meat or seafood in the freezer. Don't ask, it's a marriage-threatening tale.

One recent end-of-stay breakfast was a winning combination of apple-filled, syrup-drizzled, sourdough crepes topped with sliced almonds and apple pie-flavored whipped cream. Sigh! what a decadent contrast to a more typical bowl of cereal, yogurt and sliced bananas. Apples are on the traveler's prohibited food list for transport across the US and CDN border in either direction, and I hated to waste the few beauties remaining in our fruit bowl, thus the apple crepes. Fruits with seeds, stone fruits, potatoes and onions, dairy, some meats, etc. are on the list. This list is long and seemingly variable so it's easiest not to carry much uncooked food north or south in order to avoid Custom's delays. But I digress... let's move on to lunch and a tasty, colorful pasta salad packed with vegetables and protein.


Pasta salad shines as a superstar dish, versatile and ready to embrace a mixed assortment of vegetables, cheeses and occasionally protein. The latest combination was colorful with a rainbow assortment of mini peppers, broccoli and carrots. Cavatappi is always a favorite short pasta, its open curls attract other ingredients in a welcoming hug and hold the dressing as well. Cheeses, capers and some protein added more flavor punch and a zesty vinaigrette dressing pulled it all together. The dish served as a hearty lunch for two, plus a generous portion left over for a next-day snack on the southbound ferry. 


 Pasta Salad Plus Peppers and Carrots and Broccoli, oh my!
  • cooked cavatappi (5 generous handfuls uncooked pasta)
  • 6 fat green onions, chopped 
  • 1 cup of diced mini sweet peppers 
  • 1 cup broccoli flowerettes, blanched  
  • 1/2 cup carrot coins, blanched  
  • 2 tablespoons rinsed capers 
  • 1 cup shredded mixed cheeses (Parmesan & mozzarella) 
  • 3 slices of hard salami julienned 
  • 1 small can of premium, solid tuna packed in oil
The dressing included: 
  • 1/2 package dehydrated onion soup dip mix
  • 5-count swirl of extra virgin olive oil
  • 3-count swirl of balsamic vinegar
  • 2-count swirl of seasoned rice vinegar
  • fresh ground black pepper to taste
  • Hot sauce on the side for individual tastes 
You know the drill: 

  1. Cook, drain and rinse the pasta, drain again
  2. While the pasta cooks, prep the vegetables and slice the meat
  3. Prepare the dressing; taste and adjust seasonings
  4. In a large bowl combine the cooled and drained pasta, chopped vegetables, meats and dressing mixture. Toss gently to coat all with the dressing. 
  5. Let rest for several minutes, then toss again. Taste and adjust seasonings - at this point I usually add some hot sauce and red pepper flakes.

Monday, February 23, 2015

Savory Sausage and Vegetable Gravy with Cheese Grits


Somehow we skipped a meal yesterday, a rare occurrence around here. Our very late breakfast meant sliding lunch into late-afternoon, and then we weren't hungry enough to eat dinner before turning in for the evening. Much later the tummy-rumble chorus started up loud and strong, signaling that it had been a l-o-n-g time between meals. Finally I couldn't ignore those increasingly annoying, noisy stomach gurgles and the impending threat of hunger pangs, either real or imagined. Fine! back downstairs to the kitchen to build a snack plate to share. We nibbled on stacked pear and cheese slices layered with a touch of jam, light fare but it quieted my growling stomach for the evening. Today I woke up hungry! eager for something savory, substantial and maybe even healthy

A sensible version of Cheese Grits qualified as substantial; sensible? well, they were cooked in water with no added milk or cream. I did add modest amounts of butter and cheese, forgoing my usual heavy hand with both of these ingredients, and doubled up the hot sauce for flavor instead. Sort-of-healthy?

Sweet mini peppers, some white onion, cremini mushrooms, lacinato kale and assorted seasonings joined bits of smoky sausage in a loose beef stock sauce. That took care of savory and healthy, with added bonus points for the gravy coming together quickly while the grits bubbled away on another burner. 

One heaping scoop of tempting, cheesy grits covered with a generous serving of the sausage and vegetable gravy, topped with a sprinkle of smoked salt and freshly ground pepper, made a deliciously filling breakfast bowl. OMG it was good! Both elements were tasty enough alone on a spoon, but a blended spoonful was terrific. The combination of smooth and crunchy textures, smoky and spicy flavors, plus pops of neon bright colors made this dish a two-thumbs-up winner.  I'll cheerfully make this again for breakfast... or lunch... or supper, ashore and afloat. C'mon by and join me for some grits and savory sausage and vegetable gravy - and don't pass up the hot sauce.


Savory Sausage and Vegetable Gravy

2 counts olive oil
1 link smoked sausage (I used Kielbasa today)
4 mini sweet peppers
1/2 cup sweet onion
4 large cremini mushrooms
1 cup lacinato kale, rinsed & deribbed
3 fat cloves garlic, smashed or chopped
freshly ground black pepper, to taste
1/2 teaspoon dried oregano
1/2 teaspoon dried thyme
pinch of ground ancho or chipotle chili pepper
pinch of smoky paprika (pimenton)
1 heaping Tablespoon AP flour
1 cup low sodium beef broth (more as required)
Optional ingredients:
  smoked salt
  hot sauce, to taste (I like Cajun Sunshine or Chipotle Tabasco)
  Creamy Cheese Grits, cooked with dairy or water

  1. Slice the sausage lengthwise into quarters, then chop crosswise into 1/2-inch pieces. Dice the peppers, onion and mushrooms into pieces roughly the same size as the sausage. Chop the kale into bite-sized shreds.
  2. Add a two-count of olive oil to a heavy-bottomed skillet and warm over medium-high heat until shimmering. Add the sausage bits and cook to heat through and brown slightly, releasing any oils. Add the vegetables and garlic; saute until softened but not crispy. 
  3. Stir in the oregano, thyme, ground black pepper and smoky paprika; heat until fragrant, 1 to 2 minutes. Sprinkle the flour over the pan; toss and stir to incorporate. Slowly add the broth and whisk or stir to blend thoroughly. Continue heating and stirring until gravy thickens and is smooth. Cook longer to thicken the gravy; add more broth if it seems too thick. Taste, adjust seasonings, add hot sauce to desired level of heat.
  4. Serve over Creamy Cheese Grits, sprinkle with smoked salt and pass the hot sauce. Enjoy!  


Thursday, May 2, 2013

Buttermilk Skillet Scones with Cheese & Peppers


Buttermilk Scones with Cheese & Peppers

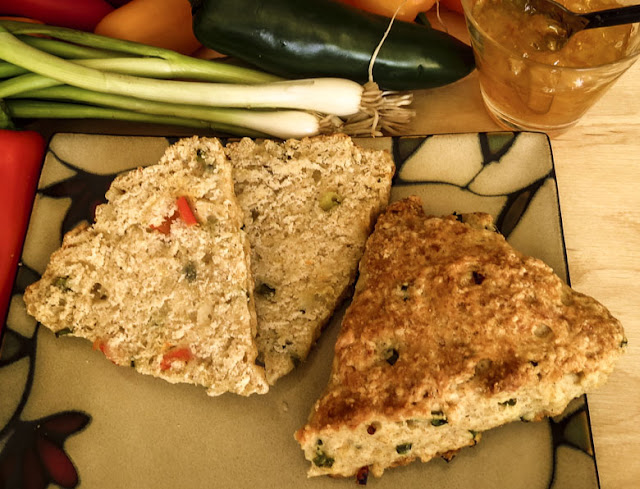
Savory scones are an occasional store-bought indulgence, a secret sneaked treat when I'm at the co-op, or the local bakery, or some Farmers' Markets. Somehow these flaky, veggie-filled triangles of delight have never come out of my oven, not until today. I woke up craving scones, jalapeno scones in particular, scones loaded with cheese and chunks of multicolored peppers. It's easy to find sweet scones, some okay and others meh!, but really good savory scones take a little searching. 
wanted them now, right now, without waiting to shower and get dressed to drive around town hunting for those savory treats.

No problemo. The Cast Iron Skillet Cookbook supplied a basic recipe that accommodated savory peppers and cheese as add-ins. Who knew? This book has traveled on the boat for years but was rarely used, so last Fall I moved it from the galley afloat to the kitchen ashore. Good move, since it thwarted any recipe panic this morning, 


The scones were wonderful served warm for breakfast, split in half and barely coated with a slick of butter. RL topped his halves with orange marmalade and ginger preserves, preferring to add a sweet note to the savory. Cooled and nibbled without butter or jam, a scone was the perfect lunch accompaniment to a bowl of chicken tortilla soup. Now I'm considering splitting one more scone, adding a slice of cheese and popping it into the microwave for a late-night snack. Sigh, my will power disappears when freshly baked scones are available, and that's the reason they should remain a store-bought indulgence. You I can't eat just one.


Buttermilk Cheese Scones with Peppers & Onions 
Recipe adapted from The Cast Iron Skillet by Kramis & Kramis-Hearne

Makes 12 scones

2 1/3 cups unbleached AP flour
2/3 cup whole wheat flour
1/8 cup sugar
2 1/2 teaspoons baking powder
1/2 teaspoon baking soda
1/2 teaspoon salt
3/4 cups chilled butter (1 ½ sticks), cut into 6 to 8 pieces
1/4 cup jalapeno, small dice
1/4 cup green onions, small dice
1/4 cup sweet red pepper, small dice
1/2 cup pepper jack cheese, shredded
1 cup buttermilk (or 1 cup milk + lemon juice to curdle)

  1. Preheat the oven to 400 F. 
  2. Add flour, sugar, baking powder, baking soda and salt to the mixing bowl of a stand mixer and stir briefly to mix. 
  3. Add the butter pieces and mix at low speed until just combined. (Low speed is recommended to avoid a cloud of flour billowing out of the bowl – ask me how I know this detail.) 
  4. Add the jalapeno, green onions, red peppers and cheese to the bowl. Run the mixer at low speed and pour in the buttermilk. Again, mix at low speed until just combined. 
  5. Divide the dough into two balls. On a lightly floured surface, pat or roll one dough ball into a circle, roughly ¾-inch thick. Cut the circle into 6 equal-sized wedges. Place the wedges in a buttered cast-iron skillet, spaced apart and forming a circle. 
  6. Repeat with the second ball of dough. 
  7. Place on a rack in the center of the oven and bake until golden on top, about 25 minutes in my oven. Remove from the oven and serve immediately, or cool on a baking rack and reheat later in the day. 

  8. Note: the use of a stand mixer is purely optional, you can mix the scones with a hand-held mixer (or by hand if you put a little muscle into incorporating the butter)


Sunday, April 14, 2013

Southwestern Stuffed Peppers - two ways

SRC: Secret Recipe Club April 2013


The tantalizing roasted pepper aromas wafting out of the kitchen this week were inspired by a SW Stuffed Pepper recipe I found at my SRC assigned blog, Mostly Food and Crafts (link). That site is bursting with recipes, craft ideas, kid projects and a gazillion linky party connections. Wow, Danielle is one busy blogger keeping up with all of that and two active children. 

The Secret Recipe Club assigns its members a new blog to explore each month, and I explored the MostlyFood archives like crazy, mentally tasting and bookmarking some interesting recipes to try soon. Michelada? Eggs in Hell Veges? I love the spices and flavors of the Southwest, so it's no surprise that a SW stuffed pepper recipe caught my attention. Since April has been w-a-a-y too busy for me to linger long over meal prep, I tweaked Danielle's recipe to cut down on the cooking time. After several days of small-batch trial and error two preps were deemed successful. Method 1 utilized the microwave and Method 2 pre-roasted the pepper. There were also a few ingredients changes, nothing too drastic and still keeping to a SW flavor profile. The original recipe is posted below, with my substitutions and changes noted in red. Compare the original with either alternative method: give all three preparations a try, or create your own variation. 


My basic stuffing ingredients included: quinoa cooked with a package of frozen spinach, crumbled and cooked chorizo sausage, defrosted frozen corn, pepper jack cheese, cumin, green onions, peppers/chilies plus salt and pepper that are not pictured. Next time I might add a drizzle or two of cream to bind the mixture together. (Note: I did not precook the corn or reheat the filling mixture. Three minutes in the microwave and quick hit under the broiler heated the pepper shell and the stuffing quite nicely.) 


Method 1: Cut a red pepper in half, remove the seeds and veins and fill loosely with some stuffing mixture. Place in an oven and microwave-proof dish, cover tightly with plastic wrap, and cook in the micro for 3 minutes. Remove the plastic wrap, sprinkle with additional shredded cheese, and place under a preheated broiler until the cheese bubbles. Serve warm with salsa and sour cream or Greek yogurt.

Method 2: Broil a poblano pepper until blistered on all sides. Let cool until you can handle it and peel away the blistered skin. Carefully slit the body in a T-cut, remove seeds and inner veins and fill loosely with some stuffing mixture. Place in an oven and microwave-proof dish, cover tightly with plastic wrap, and cook in the micro for 3 minutes. Remove the plastic wrap, sprinkle with additional shredded cheese, and place under a preheated broiler until the cheese bubbles. Serve warm with salsa and sour cream or Greek yogurt. 

Now how easy is that?!? The peppers/chilies and filling are tender, moist and oh! so flavorful. Poblanos can be a bit "peppy", so if you are not overly fond of chili heat I'd omit any jalapeno or use a few canned peppers . Or you could just add more sour cream topping to your serving; dairy is reputed to moderate the chili heat. The jalapeno seemed less assertive in the sweet bell pepper shell, but it still had a noticeable bite to it. Still too peppy sounding for your taste? Skip the jalapeños and substitute plain jack cheese for the pepper jack. Prefer a meatless version? Substitute mushrooms or black beans for the sausage. 

Photo: Before and after the finishing broil.

Photo: Stuffed peppers waiting for salsa & sour cream


Recipe found at MostlyFoodsandCrafts, with my changes in red

Ingredients
1 cup rice (quinoa)
1 package frozen spinach (or use fresh kale or chard)
1 tablespoon olive oil
6 scallions, sliced thin, with white and green parts separated
1/2 pound ground beef (Falls brand chorizo links)
1 cup frozen corn
1 (4.5-ounce) can chopped green chilies (2 fresh jalapeños)
1 teaspoon  cumin
1 cup shredded Monterey Jack cheese (WSU Crimson Fire pepper jack)
kosher salt and black pepper
4 large bell peppers, halved lengthwise, ribs and seeds removed (red bell pepper and poblano chili)
1/2 cup plain low-fat Greek yogurt or sour cream
salsa, for serving

Directions:
  1.  Prepare your rice according to the package directions.  When you are ready to start assembling heat oven to 375° F.
  2. Heat the oil in a large skillet over medium-high heat. Add the scallion whites and ground beef.  Cook, breaking the beef up, until no longer pink, 3 to 5 minutes. Add the corn, chilies, cumin, cooked rice, ½ cup of the Monterey Jack, ½ teaspoon salt, and ¼ teaspoon black pepper.
  3. Place the bell peppers, cut-side up, in a 9-by-13-inch baking dish or on a pan. Divide the beef and rice mixture evenly among the bell peppers, add ½ cup water to the dish, tightly cover the dish with foil, and bake until the bell peppers are soft, 30 to 40 minutes. Uncover, sprinkle with the remaining ½ cup of Monterey Jack cheese, and bake until browned, 5 to 7 minutes more.
  4. In a small bowl, whisk together the yogurt and ¼ cup water. Drizzle over the bell peppers and top with the salsa and the greens from the scallions.                            
Now checkout the other Group B posts for this month.


Saturday, January 26, 2013

Fresh Tomatillo Salsa


I first tasted a tangy tomatillo salsa over 15 years ago at a cooking class in Albuquerque, New Mexico and it's been a favorite of mine ever since. It isn't a unique condiment, newly-foodie or even a weird recipe. You can find thousands of recipes online (try a Google search and check it out). AmateurGourmet posted his smooth version in January, Rick Bayless's pureed version is referenced in scads of blogs. Why bother with this post? Just because it's just a darned good salsa and I made a large batch. 


Tomatillos and poblano chiles are always present in my galley, two important and versatile ingredients to act as supporting players in many entrees, sauces and side dishes. They are typically blistered roasted under a broiler, chopped in a blender and cooked in a sauce or added to a filling (link). But not today. Today they were featured in raw form, two starring players in a fresh, crisp salsa verde. I prefer this recipe to the original cooking school version of long ago; it's a personal preference for crunchy, chunky salsa vs. pureed, soupy salsa. (Note:The original cooking school recipe is still found online and in a video here.)

Warning! Don't bother making this with canned tomatillos, they just won't work! There's a tinny, canned, not-so-pleasant taste and slippery-almost-slimey texture that comes along with the canned version. Ugggggh. Okay, I can stop now, that's out of the way.


Photo: Tomatillo Salsa tops a Taco and flavors rice
The salsa is a terrific stand-alone condiment to enjoy with chips, or to add to tacos, quesadillas, omelets, hamburgers, hot dogs, corn salad, tortilla soup, black bean soup, guacamole, dips, or even stir into a bowl of cooked rice or beans. Use a food processor or coarsely chop the ingredients by hand, either way this salsa is a quick prep. Add a little sour cream and mayonnaise for a creamy, slightly tamer version if you prefer. Add some chopped avocado for an extra bit of deliciousness.  

Chop, blend and season a batch of Tomatillo Salsa Fresca soon - it won't change your life but I'll bet you'll enjoy the fresh, tangy taste. 


Fresh Tomatillo Salsa

5 or 6 large tomatillos, husked & chopped
2 poblano chiles, seeded & chopped
1/2 medium red onion, chopped
4 green onions, white & green parts, chopped
zest and juice of 1 small lime
1 garlic clove, minced or pressed
1/2 bunch fresh cilantro, rough chopped
Salt to taste
Hot sauce or green tabasco to taste (optional)

Process tomatillos, poblano and red onion separately in food processor until coarsely chopped (but not pureed!) Add to a medium-sized bowl, draining off most of the tomatillo liquid. Add remaining ingredients and mix thoroughly. Let sit 10 or 15 minutes, then taste and adjust seasonings as necessary. Too tart? ad a bit of sugar. Too bland? add more salt and some hot sauce. Too spicy hot from the poblanos? add a little sour cream and mayonnaise, but not too much or you'll have a sandwich spread instead of a salsa.

Wednesday, December 19, 2012

Corn Chowder with Shrimp


Who knew that Corn Chowder could be such a luxurious, indulgent surprise? It sounds simple enough, almost boring, with frozen corn, sweet yellow bell pepper, onions and potatoes cooked in a broth. Ahhh, but then there’s the bacon and butter, and honestly, what doesn’t taste better with a bit of fat? Cream adds another level of sweet deliciousness, a scant tablespoon of chipotle pepper pack a subtle punch, parsley and black pepper bring a tangy bite and the garlicky, smoky shrimp bits take it over the top. Corn Chowder is definitely luxurious… indulgent… surprising. Oh yes, altogether a damned good bowl of soup! 

Fresh ingredients would be a bonus, but December isn't corn or pepper season. Frozen fire-roasted corn and peppers from Trader Joe's work just fine, as do frozen cleaned and peeled raw shrimp. Still, I can't wait to try this recipe in Fall with fresh produce and just-caught prawns, though it's hard to imagine corn chowder being any tastier. 


On Day One I topped the soup with bacon, green onions and parsley. Hmmm, I might have been overly generous with the chipotle chili powder and a slow burn built up, bite by bite. Tasty, but a large dollop of sour cream added to my bowl helped to tame the heat. Note: RL was quite happy with the level of chili heat.


Many corn chowder recipes add fresh crab to the soup, but I thought crab would add another heavy, rich, sweet flavor to this already decadent dish. Shrimp, however, might bring a brighter, cleaner note making this more of a soup-for-company choice. So on Day Two, when H came to lunch, I covered several large shrimp with a dusting of garlic powder and smoky Spanish paprika, sauteed them quickly with a dab of butter and and slid them onto each bowl along with the other toppings. That's it; no more fiddling with this recipe. We love it as is.

Fully-Loaded Corn Chowder with Toppings
Serves 6-8

Soup
4 slices thick-sliced bacon
1 medium onion, chopped
1 medium yellow bell pepper, chopped
1 small to medium poblano pepper, chopped
3 cloves garlic, minced
1 teaspoon to 1 tablespoon chipotle chili powder (more or less, to taste)
½ teaspoon dried thyme
1 heaping tablespoon flour
3 to 4 cups low sodium chicken stock
1 bay leaf
1 large potato, peeled & diced
1 package frozen roasted corn kernels (16 oz or more)
1 cup heavy cream (or half-and-half, or cream and milk combo)

Toppings
Fresh Italian parsley, chopped
Green onion, chopped
Sour cream
Raw Shrimp, peeled & cleaned (3 to 4 large shrimp per serving, or equivalent of other sizes)
1 tablespoon butter
dash of garlic powder
dash of smoky Spanish Paprika (pimenton)

Add the bacon to a heavy-bottomed pot and cook over medium heat until the bacon is crisp and browned. Remove with a slotted spoon; transfer to a paper towel to cool and reserve. Don’t nibble too much, you will use it later. 

There should be 3 to 4 tablespoons of bacon grease in the pan (add butter or oil as needed). Add the onions and peppers to the pan and sauté until softened, about 3 to 4 minutes. Add the garlic and sauté until fragrant, about 1 more minute. Sprinkle on the chipotle chili powder, thyme and flour; heat and stir for another minute. Add the chicken stock and stir vigorously until thoroughly combined. Add the bay leaf and potato chunks and simmer until the potatoes are soft but not quite tender. Add the corn and simmer for 10 more minutes to blend the flavors. Stir in the cream and bring back to a low simmer, but don’t let the soup boil; it won’t be happy. Taste, then season with salt and lots of freshly ground pepper as needed. Use an immersion blender to whiz up a portion of the soup, thickening it slightly. OR put a scant ¼ into a blender, cover with the lid and place a towel over the lid, carefully puree and return to the pot. Let the soup continue to simmer over low heat, barely bubbling, while you prepare the shrimp. (Add a bit more stock or cream if you think the soup is too thick at this point.)

Peel and devein the shrimp. I used 4 large shrimp per person, but you can adjust quantity according to size (of shrimp, not people). Slice each shrimp into 3 or 4 pieces and sprinkle lightly with garlic salt and smoky paprika. Heat a tablespoon of butter in a small skillet over medium-high heat. Add the shrimp and cook quickly until they just turn color, barely a minute per side.

To serve
Ladle the soup into individual bowls and garnish with a dollop of sour cream, the reserved bacon, minced parsley and green onion and cooked shrimp.
OR, pour into a heated serving bowl or small tureen and sprinkle on the toppings. Ladle it up immediately.   

Note: check out the Recipe Index for other soups and chowders you might enjoy.

Related Posts Plugin for WordPress, Blogger...