Showing posts with label bacon. Show all posts

Wednesday, May 16, 2018

Crustless Swiss Quiche with Bacon & Spinach


"A quiche is basically a frittata poured into a pastry shell." ... or not. Today we enjoyed a crustless version so, by definition, did that make it a frittata instead of a quiche? I don't know, don't really care, since the quiche pan held a deliciously loaded custardy something we both enjoyed. Filled with bacon, swiss cheese, spinach and green onions, it was a well-received taste treat. Who says real men don't eat quiche? RL loved it.


Quiche Lorraine was the darling of the menu for ladies-who-lunched in the 60's; a light but rich, sparsely filled, one crust custardlike pie. Over time I recall it morphing into a dense, custardy casserole filled with unusual ingredients and baked in a soggy crust. Not an improvement. Thus my preference for crustless quiches, or it might be my utter lack of the pie-crust baking gene.


We enjoyed half of this quiche/frittata served warm at lunch, and some remaining wedges served chilled the next day. Maybe next time I'll play with a pie crust... or not. 


Crustless Swiss Quiche with Bacon & Spinach


8 luncheon servings, 4 main dish

6 strips streaky bacon, diced
4 green onions, sliced
1 bunch spinach, rough chopped
1 generous cup swiss cheese, shredded (or cut in smallish chunks)
5 large eggs
1/2 cup half-and-half
1/2 cup milk (I used 2%)
1/4 tsp dried oregano
1/8 tsp ground nutmeg
Salt & white pepper, to taste

Prehea the oven to 375 degrees F.

Use a large skillet and cook the bacon until done, but not super crispy. Use a slotted spoon to remove the cooked bacon to an 8 or 9-inch quiche pan. Remove all but 1 Tablespoon of bacon fat from the skillet. Add the onions and spinach to the skillet and heat until wilted. Layer evenly on top of the cooked bacon. Sprinkle the cheese evenly over the top of the spinach.

Whisk together the eggs, dairy, & seasonings. Carefully pour the egg mixture over the layered fillings. Place in the center of the preheated oven. Bake at 375 F for 20 minutes. Reduce the heat to 325 and cook 15 to 20 minutes longer or until the center is just set. Remove from the oven, let cool for several minutes to firm up; cut and serve warm. 


Sunday, November 27, 2016

Monte Cristo Sandwich


Thanksgiving dinner arrived at the door along with the hugs and warm greetings of family. They brought it all, everything, the entire dinner. Everything even included the turkey fryer for an 18-pound bird! (Note: I was allowed to contribute my Zesty Cranberry Relish.) What a thoughtful, caring present from this cast of characters; Seattlites Niece Hilary and Dave plus Californians Meg and Brother Mike. For hours the house was filled with conversation, friendly teasing, suspected tall tales and humorous stories, wedding plan updates and endless laughter. All in all, a terrific family celebration and a delicious meal. 
Photo: The Thanksgiving Cooks 2016

On Friday RL and I revisited Thanksgiving memories, surveyed the many containers of leftovers in the fridge, and nibbled on a rerun of Thursday's feast. 

Turkey sandwiches, enjoyed late night or next day, are always a major highlight of this holiday meal. Some years we favor simple sliced turkey on white bread, other years we crave Kentucky Hot Browns with cheese sauce or turkey gravy. This year we opted for Turkey and Ham Monte Cristo Sandwiches. Possibly a variation of the Croque Monsieur, this batter-dipped, butter-fried sandwich is an over-the-top and delicious use of leftover turkey meat. Ooey gooey, salty, savory decadence... sigh, but so worth every artery clogging bite (and a reason to return to healthier eating the very next day).  

My Monte Cristos are a cross between French Toast and a grilled cheese and meat sandwich, occasionally with some crispy bacon added... just 'cuz. No recipe required, just freeform it.

1. Use 2 slices of bread per sandwich. Slather one side of the bread with mayonnaise and Dijon mustard. Add some chutney or cranberry relish if you like.


2. Alternate layers of thin-sliced meat (ham and/or turkey), cheese (Havarti or Swiss) and bacon (optional) on the bread. Close the sandwich and press top gently to compact slightly. This will help hold it all together when you flip it in the  pan.


3. Beat an egg and a bit of milk in a pie pan or shallow, rimmed plate. Dip each side of the sandwich briefly in the egg mixture, long enough to coat thoroughly but not get soggy. You want a crisp exterior and soft, gooey middle. 


4. Melt a pat of butter in a heavy skillet over medium-low heat. Place coated sandwich in frying pan and cook until bottom is golden brown. Flip the sandwich, adding more butter as needed, and cook until the second side is golden brown and the cheese is melted. This takes 4 to 5 minutes per side in my kitchen.


5. Transfer to a cutting board and let cool briefly to set cheese a bit. Cut into wedges, plate and serve.


Note: It is traditional to dust the sandwiches with powdered sugar and serve with a side of jelly. I skip that feature, relishing the salty, savory richness of the sandwich without the distraction of an added sweet. For a flavor pop, I would prefer a swipe of Zesty Cranberry Relish rather than powdered sugar and jam, but that's just me. 

Don't wait for Thanksgiving to enjoy a Monte Cristo. They are delicious using deli-sliced cold cuts or meat pulled from a deli-roasted chicken. Get creative and add some roasted green chiles, or substitute thin waffles for the bread. Go for it! 


Tuesday, March 15, 2016

Bacon Cheese Puffs: Gougeres+

...recommended for breakfast, as appetizers, or as anytime treats!


Pastry puffs and I have a long and complicated history. Here's the short version of our troubled relationship:
    1) Sweet cream puffs (choux) are sometimes unreliable, often failing to puff, instead producing flat wafers. 
    2) Savory cheese puffs (gougeres) perform more consistently, but an occasional batch will still go rogue.
    3) Sweet and savory puffs only fail when success is really, really important, like a company event. Always have a biscuit backup plan, just in case


That said, this week's gougeres, a potential disaster-in-the-making, ultimately rose to the challenge and saved the day and my reputation as a cook. A guest texted a message announcing major traffic problems and her late arrival for lunch. No problem, I delayed mixing a small batch of cheese puffs until the last minute. Fiddling around in the kitchen, I created a new salad dressing, set the table, eventually grew totally distracted and it all went downhill from there. In a rush to get the puffs mixed as she arrived, I somehow doubled the liquids but didn't notice the mistake until after adding the butter and flour. No matter how much I beat in the flour, the dough refused to come together into a ball. Oops! Reread the recipe, check out the measuring cup, roll eyes and smack self on the head. 

Instead of starting over I pressed on and hoped for the best. At worst there would be one more interesting kitchen story. Sigh! 

  • Melt more butter and beat in over low heat.
  • Beat in 4 eggs, one at a time, and don't complain when arm grows tired because the dough is heavy. 
  • Beat in more flour and keep beating until the dough forms a ball. (Remember to smile.) Sing Hallelujah! when it finally comes together. 
  • Add the cheese, bacon bits and pepper; scoop 16 balls onto two silpat-lined baking sheets and send a prayer skyward to the kitchen gods while the puffs bake.

Whew! luck prevailed. The texture was spot on; a crunchy exterior covered light, tender insides and most puffs displayed hollow centers. These were the best gougeres ever. Go figure! Doubling the recipe worked, even with such an unorthodox method. Slone left with a package of puffs for her drive south and we enjoyed the remaining treats as breakfast sandwiches over the next several days. 


Bacon Cheese Puffs (Gougeres+)
 adapted from Gourmet’s In Short Order, 1993

Makes 8 puffs

1/4-cup milk
1/4-cup water
1/4 cup (1/2 stick) unsalted butter
1/4-teaspoon salt
1/2-cup all-purpose flour
2 large eggs
1 cup freshly grated Parmesan cheese
1/4-cup crumbled cooked bacon
Freshly coarse-ground black pepper to taste (or substitute white pepper)

Directions:
Preheat the oven to 400 F.

Use a small, heavy saucepan and combine milk, water, butter and salt. Bring the mix to a boil over high heat. Reduce the heat to moderate; add the flour all at once and beat the mixture with a sturdy wooden spoon until it leaves the side of the pan and forms a ball. Stir for 2-3 minutes longer to dry out the dough a bit. 

Remove the dough from the heat and transfer to a bowl; beat for another minute or two until the dough cools down a bit and stops steaming. Use a heavy spatula or whisk and beat in the eggs, 1 at a time, whisking well after each addition.  Stir in the cheese, bacon and pepper.

Drop or scoop the batter in 8 mounds on a prepared baking sheet or silpat. Bake puffs in upper third of a preheated 400 oven for 20-25 minutes, or until crisp and a rich golden brown. 

The puffs may be kept overnight in an airtight container. Reheat briefly in the oven, if desired, but note the puffs will lose crispness if reheated in a microwave. 

Monday, April 27, 2015

Sweet & Spicy Baked Bacon


Just one whiff of cooking bacon is enough to make my tummy rumble, stir up the appetite, change any eat-healthy resolutions... you get the idea. I love bacon. The aroma is irresistible, but the sound of thick slices sizzling in a pan on the cooktop is a thing of the past. I'm a long-time convert to baking bacon in the oven. While I might occasionally miss the sizzle symphony, I certainly don't miss the mess, or the perfume of cooked bacon that used to cling to clothes and person after cooking a pan on the stove.

Bacon? a recipe post about cooking bacon? Of course. I just couldn't resist after reading this morning's post at Food52 on "The Best Way to Cook Bacon". They almost got it right; baking strips in the oven is the best approach but they blew it on flavor. Gourmet published their ultimate version of Sweet-and-Spicy Bacon ages ago (November 2001) and that has been the real deal, the only way to cook bacon ever since. 

Years ago one of the contestants on Top Chef used this method during a cooking ahallenge and received rave reviews and a lot of positive press over his "original" preparation. Original? not so much. But definitely tasty!

I have adapted Gourmet's method only slightly, laying the bacon strips on a baking rack set over a foil-lined baking sheet. This drains away the excess fat and makes for easier clean up after baking. Bacon cooks almost-unattended in the oven for roughly 35 minutes while I prepare the rest of the meal. Forget the mess and try this easy peasy method. Just heat the oven, arrange the bacon on the rack, turn the strips once during baking and sprinkle with the spicy sugary mix, and let the magic happen.


Sweet and Spicy Baked Bacon

1 1/2 tablespoons packed brown sugar
Generous 1/4 teaspoon cayenne
Generous 1/4 teaspoon black pepper

1 lb thick-cut bacon (typically 12 slices)

Directions:

  1. Preheat oven to 350°F. Cover a large baking sheet with foil or parchment. Place a metal baking rack on top of the lined pan. Or use an unlined broiler pan.
  2. Stir together the brown sugar, cayenne, and black pepper in a small bowl.
  3. Arrange the bacon slices in l layer on the baking rack and bake in the middle of the preheated oven for 20 minutes. 
  4. Turn the slices over, sprinkle evenly with the spiced sugar. and continue baking until each strip is crisp and brown, about 15 to 20 minutes more. Enjoy!


Monday, December 1, 2014

Beef Bourguignon , aka Beef Stew


We woke up to a hint of snow, a skim coat of flakes barely thick enough to frost the decks, bushes and lawn but not sufficient to blanket the landscape. This wasn't the snow event predicted by TV forecasters, not a real snow like the storms hitting the central and eastern states. No, this sprinkle of snow was just a reminder of things to come.


After several days of winds and hard rain this was a welcome weather change! By afternoon the clouds cleared, the sun came out and the temperature dropped into the mid-to-high twenties. Brrrr, time to layer on some sweaters and get busy in the kitchen with some comfort food cooking... easy-prep comfort food... beef stew kind of comfort food.

Friends are coming by tomorrow for a late lunch and a round of Mexican Train. I mentally skimmed the list of our favorite cold-weather soups, chilies, gumbos and the like, searching for something that would be a delicious but casual kitchen meal, a no-fuss menu to fit a flexible schedule. Richly flavorful Beef Bourguignon sounded like a winner; a dish that actually improves in flavor if prepared a day ahead. It helped that I had all of the ingredients in stock and didn't have to go out and play with the post-Thanksgiving crowds of shoppers still clogging the shopping center parking lots. 

The rest of the menu will be simple since stew is such a substantial main dish. I'm thinking hot spiced cider and deviled eggs for a warm-up nibble as people arrive, colorful marinated grape tomatoes and mozzarella balls as a salad...


...tiny red potatoes to add to the stew, some crusty French bread to soak up every last drop of that wonderful gravy...


 ...and an apple galette for dessert as we take a break midway through the game. (not pictured: RL added a towering pile of whipped cream to each slice, and no one protested.)


That's my menu, what do you serve with your beef stew?   


Beef Bourguinon
based on a favorite recipe found in Tyler Florence's cookbook, Real Kitchen.

Yields 3 quarts, about 8 servings

1 Tbs Canola oil
2 slices bacon (not maple flavored)
4 lbs chuck roast, dried with paper towels, fat trimmed & cut into large, bite-size cubes
Salt & freshly ground pepper
1/2 cup all-purpose flour
1/4 cup brandy (or port or marsala, etc.)
1 bottle hearty red wine (Pinot Noir, Merlot, Burgundy, etc)
1 can (14.5 oz) low-sodium beef broth
2 generous Tbs tomato paste (from a tube)
cheesecloth bag with 4" sprig rosemary, 6 sprigs thyme, 2 bay leaves
4 garlic cloves, chopped (or Gourmet Garden chunky garlic in a tube
2 cups pearl onions, blanched & peeled (or 1 bag frozen) 
1 pint white mushrooms, stems trimmed, large 'shrooms halved (or add some reconstituted, dried 'shrooms)
Pinch of sugar
2 Tbs unsalted butter (optional)
Gremolata garnish of freshly minced flat-leaf parsley and the zest of 1 lemon

Add the oil to a heavy-bottomed Dutch oven and heat over medium heat. Add the bacon strips and cook until crisp; remove to a paper towel and hold until ready to serve. Pat the beef dry again with paper towels, then add to the pot to brown in several batches. Sear the beef cubes on all sides in the bacon drippings, letting each side sit undisturbed until browned. Remove to a bowl and season each batch with salt and pepper.

Return all of the browned meat and their juices to the pot. Sprinkle the flour over the meat and stir to completely coat each cube until all of the flour is incorporated. Add the brandy and stir; loosen all of the browned bits on the bottom of the pan (there's a lot of flavor lurking there). Cook and stir to evaporate the alcohol. Add the red wine and beef broth; stir in the tomato paste; add the cheesecloth bag of herbs. Bring to a simmer and cook until the liquid begins to thicken and develops a sauce like consistency, about 12-15 minutes. Cover the pot and simmer over very low heat for 1 hour. Use a flame tamer/heat diffuser if needed to keep the pot at a low simmer instead of a hearty boil.

Uncover the pot; add the garlic, onions, mushrooms and the pinch of sugar. (The sugar will balance the acidity of the red wine.) Taste; season with salt and pepper as needed. Raise the heat slightly and simmer for another 40 minutes, or until the vegetables and the meat are tender. Remove the cheesecloth packet of herbs; stir in the butter to add a glossy finish to the sauce (optional). Sprinkle with the gremolata (minced parsley and lemon zest) and crumbled, reserved bacon just before serving.

Accompany with whole or mashed potatoes or buttered noodles, crusty bread or soft biscuits, You won't want to waste any of the delicious gravy!

Note: if you prepare the stew a day ahead, hold it in the fridge overnight and skim of the solidified grease before reheating and adding the finish of butter and gremolata.


Thursday, April 3, 2014

German Potato Salad - the family version.


What is sweet, sour, tangy, loaded with bacon, and both smooth and crunchy all in one bite? Of course, it's Kartoffelsalat, Mom's German potato salad. Just thinking about it returns a craving for this satisfying side dish. It's cool-weather comfort food, though at times it has also been a popular item at summer evening potlucks on the dock.

Why haven't I posted this recipe before now? Maybe I take it for granted, it has been a family favorite forever. Two generations, often three, expect this warm potato salad to accompany homestyle entrees like pork schnitzel, kraut-roasted pork, grilled wurst, braised rouladen, etc. Or forget the accompaniment idea, RL finds German potato salad a satisfying lunch all by itself, it's just that good. 

Mom was born in Austria, and this recipe is based on her version of German Potato Salad. Hmmm, does that make it an Austrian-German Potato Salad, or an Americanized version of a Bavarian regional recipe. Whatever! authentic or not, we love it. Be aware, I  typically don't measure ingredients when preparing this dish, adjusting by taste and consistency as I go to find the right proportions and occasionally adding other ingredients. You'll find it quite adaptable too as you balance the sweet and sour to suit your taste.

The recipe below records this week's dish, with measurements noted as close as possible to account for several rounds of "taste, then adjust." 

Mom's German Potato Salad
4 generous servings

4 thick strips bacon (not maple flavored)
1 yellow onion, chopped (approx 1 cup)
4 stalks celery, strings removed, diced
2 tablespoons flour
1 cup water 
1/2 cup cider vinegar
1/2 cup granulated sugar
1 generous teaspoon celery seed
kosher salt and fresh cracked pepper, to taste
fresh Italian parsley and green onions (optional)
5 fat Yukon Gold potatoes

Directions:
  1. In a skillet, cook the bacon until crisp. Drain on paper towels, chop and set aside. Save 2 to 3 tablespoons of the fat.
  2. Reheat the skillet of bacon fat over medium heat and cook the onion and celery until softened.
  3. Sprinkle flour over the top of the vegetables; stir to incorporate. Add the water, vinegar and sugar and cook until the sauce thickens. (It will be fairly loose and soupy, just what you want since the potatoes will absorb quite a bit of the liquid.) 
  4. Add celery seed, salt and pepper; taste and adjust.
  5. While making the sauce cook the potatoes until barely tender. Peel and dice or slice into bite-sized chunks. Add to the sauce while still warm and gently fold in with a heat-proof spatula.
  6. Let the potatoes rest in the sauce for a few minutes; stir again; taste and adjust seasonings and the sweet:sour ratio.
  7. Top with parsley and green onions (optional) and serve warm or at room temperature. Enjoy.


Monday, October 28, 2013

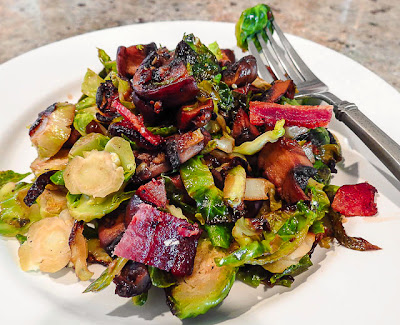
Mushroom and Brussels Sprouts Hash... with Bacon


What defines a great hash? Several years ago I posted (link) my view that any really good hash would:
  • be crisp with some browned, caramelized  bits, 
  • offer soft textures along with the crunch,
  • incorporate cooked meat, potatoes, onions  and roasted vegetables, and
  • include a seasoning tang or some serious chile heat. 
Hash typically begins with potatoes, but not today. Oh no, the rules changed for a hash based on mushrooms instead of potatoes. There would be no crispy, browned potatoes here, but who could resist caramelized 'shrooms and onions with bacon?! Add some Brussels sprouts because... well, just because they're a favorite Fall vegetable, they are bursting with healthy attributes, and I have some left after Saturday's Potato and Brussels Sprouts hash (link). 

I was not kidding earlier this week (link) when I said I really, really craved a skillet of hash, and that the next batch would have bacon. This second skillet of hash was inspired by JoytheBaker's post with it's meltingly delicious mushroom base. I didn't change much, just added some fresh thyme plus the all-important bacon and its rendered fat, used small white onions instead of shallots and finally, omitted her recommended cooked egg topping. Swap the 'shrooms out for potatoes and you have the base ingredients for my Oven-Roasted Sprouts! No wonder I was so ready to try this mushroom version of hash.


The hash was not a fast-prep dish. It takes a while for the mushrooms to release their liquid, cook down and brown nicely, but you don't want to rush through this step. Steamed 'shrooms are not as tasty or pretty as their slow-cooked, caramelized kin. Most of my time was spent working with the onions and Brussels sprouts, not a difficult chore but I was slowed down by trying to use my left hand for chopping/slicing those little round globes. (No blood was spilled during this event.) 


The result? we enjoyed this vegetable combination at lunch, thinking it more of a side dish than breakfast fare. Perhaps serving an egg on top would have made the difference there. The rich, mellow taste of the bacon-flavored mushrooms shone in this recipe, and that alone was enough to win me over. The sprouts came along for the ride, a pleasant sidekick to the spotlight-grabbing 'shrooms. Crisp bacon crumbles provided a fine topping to each serving, but a tiny internal voice queried, "Where's the crunch of crispy potato that makes this hash?" 


Photo: These large cremini were chopped into 8 wedges each.

Photo: Sprout pinwheels will separate a bit when cooked
.
Photo: Sizzling crisp bacon left a scattering of browned bits in the pan.

Photo: Cremini fill the skillet, ready to cook in bacon fat... yum!

Photo: Cremini turn golden brown as they release their juices and caramelize.

Photo: Lid the pan briefly to heat the Brussels sprouts.


Photo: The seasoned Mushroom and Brussels Sprouts Hash is almost ready to serve.


Mushroom and Brussels Sprout Hash... with Bacon
Serves 2

2 strips thick-sliced smoked bacon (NOT maple-glazed)
1 tablespoon olive oil (if needed)
1 dozen tiny onions, small dice (or several small shallots)
6 large cremini mushrooms, rough chopped
1 large clove garlic, minced
3 to 4 cups shredded Brussels sprouts
1 teaspoon fresh thyme, chopped (or 1/4 tsp dried thyme)
juice of a small lemon (2 to 3 tablespoons), zest optional
salt and pepper to taste


Prep the vegetables:
  1. Peel and chop the onions, discarding any papery skin.
  2. Clean the mushrooms with a damp paper towel (do not rinse them under running water).Quarter or cut them into bite-sized chunks. 
  3. Clean each sprout, slice off the dried-out stem end and discard any discolored outer leaves. Slice into thin rounds horizontally. 
  4. Mince or use a garlic press on the garlic clove and rough chop the thyme.
To Prepare:
  1. Use a medium cast iron skillet to cook the bacon until it renders its fat and crisps up. Remove the bacon and set aside but leave the drippings and crispy bits in the pan.
  2. Add the diced onion to the pan and cook over medium heat until softened and beginning to brown. Add the mushrooms with a generous sprinkle of salt and cook until they release their liquid and begin to brown. Stir or flip with a spatula occasionally to insure most 'shrooms contact the pan. Add the garlic and fresh thyme, stir in and cook until fragrant (about one minute). 
  3. If the pan looks dry at this point, add a bit of olive oil. Add the sprouts and fold in or toss to combine with the mushrooms. Cover and cook for 2 or 3 minutes to warm the mixture. Remove the lid, increase the heat to medium high and cook until the sprouts just begin to crisp and the mushrooms are browned. 
  4. Remove from the heat. Sprinkle the lemon juice over the top and fold or toss to mix. Plate and scatter crisp bacon bits over each serving. 
Notes:
  • The hash is best served warm and enjoyed immediately, though I would be tempted to reheat and eat some the next day if there were any left over.
  • I ate my serving without any extra condiments. As usual, RL topped his with some additional seasoning, this time he chose Heinz 57 Sauce. 
  • The dish rated two thumbs up, but it may be a while before Brussels sprouts make another appearance at the table. (Two days in a row was too much for one of us.)

Friday, October 11, 2013

Breakfast Tacos


Doesn't that taco look like it's smiling? Really, a huge grin? I did need a smile this morning, even if was my breakfast giving me attitude. Some days are like that, and it's the little things that help. Forget the less-than-healthy aspect of smoky bacon, sriracha-flavored eggs, fried onions and peppers, pepper jack cheese and full-fat sour cream tucked into a flour tortilla. Instead, imagine the combined flavors of those ingredients bringing joy to your taste buds. Oh yes, I'll bet you're smiling too. 

I just wanted to share this morning's smile with you. Now I'm ready to attack the gigantic To Do List before the weekend. I hope your day goes well.     


Saturday, April 27, 2013

Lox Omelet Loaded with Flavor


Lox, gravlax, or gravad lax; whatever its label, this salt and sugar cured salmon is a delicious seafood favorite. Lox is easy to prepare (link) and so versatile to use. Think bagels and lox, lox crostini, pasta with lox and a creamy sauce, lox in seafood soups and chowders, lox mac 'n cheese, scrambled eggs with lox, lox frittata... the list goes on. 

This time I decided to go with lox and eggs. Guests have enjoyed Eggs Benedict with Lox at brunch, but this Lox Omelet was destined for a family breakfast for two. Its rich flavors meant one omelet divided nicely into two satisfying portions, accompanied by fresh fruit and a slice or two of toasted French bread. That also cut in half any pangs of dietary guilt at combining eggs, bacon, salted fish, cheese and sour cream in one dish. No, forget the guilt, this was one terrific breakfast.


Lox Omelet Loaded with Flavor

Ingredients


3 eggs (I used 2 eggs + 2 egg whites)

Sprinkle of dill weed (NOT dill seed)
2 tablespoons milk or cream
lox (smoked salmon) torn into pieces
1/4 cup any creamy or meltable cheese,cubed or chunked, at room temperature
2 green onions, finely chopped
2 slices crispy, cooked bacon (optional)
Freshly ground black pepper
1 tablespoon unsalted butter
Sour cream for topping (optional)

Directions

  1. Whisk eggs, egg whites, dill weed and milk together in a large mixing bowl.
  2. Heat a large nonstick pan over medium-low heat. Add the butter and as it melts, rotate the pan to spread it out. Add the egg mixture and let it cook undisturbed for a bit to set the bottom. After the bottom begins to firm up, use a spatula to gently push the sides toward the center, tilting the pan to let the liquids run out to the edge.  
  3. While the center is still somewhat moist but liquid no longer flows, scatter the pieces of salmon, small chunks of cheese, green onions and bacon (if you are using some) over the top. Season with salt and pepper, then fold one side over the other to form an omelette.
  4. Slice crosswise into portions and serve (topped with sour cream if you like).
Tasting Note: The sour cream seemed a good idea, but seemed too heavy along with the omelet's cheese and bacon. I'll try a sprinkle of lemon zest, dill and parsley gremolata as a topping next time. 

Tuesday, October 30, 2012

Frittata Muffins

aka Mini Frittatas, Mini Quiche, Omelette Bites


Some mornings call for emergency measures, and this was one of them. I was so hungry, hungry beyond words although my stomach had a lot to say, noisily growling and grumbling throughout the morning. I should have planned ahead and packed a snack to take along for a super early appointment, but I didn't. So today it was all about fixing something healthy and tasty for breakfast when we returned home after 10:00 a.m. Emphasis here on breakfast: it felt like a fast... deprivation... hunger pangs... A quick batch of mini frittatas came to the rescue with two apiece for us this morning and a couple more to spare. 

Q&A

  • Why use a muffin tin instead of the usual pie plate for a frittata? 6 large muffins bake faster than 1 whole pie, and the servings are much easier to save, store, reheat (or not) and grab to eat on the go.
  • Why not use the microwave instead of the slower oven? I think microwaves change the taste and texture of cooked eggs, making them less pleasant to eat. I was hungry, but not desperate.
  • What's your favorite filling? Whatever veggies and cheeses I find in the fridge. Bacon is always good, but not essential.
Mini frittatas aren't anything new, but I hadn't thought about them in ages. A friend's recent Paleo conversion brought these eggy treats to mind again. (Note: my version incorporates dairy, thus is not Paleo.) It took mere minutes to nuke the bacon strips, shred some basil, chop a few vegetables and cheese chunks, then whip up the eggs and milk. Divide the ingredients equally into six large prepared muffin tins, pop into a preheated 375 F oven and presto! finished minis in the minutes it took to prepare a fresh fruit plate, make coffee and set the table. 


Mmmmmmm, delicious. I enjoyed my frittatas plain, without any sauce or condiments, while RL spooned spicy/hot salsa on top of his. As for the leftovers, those two extra muffins disappeared later the same day, perfect as grab-and-go snacks straight from the fridge (though a little warming would improve the flavor and melt the cheese nicely.) 


Frittata Muffins
Makes 3 servings (2 apiece)

2 strips lean bacon, cooked crisp and crumbled
1 medium sweet red pepper, small dice
3 thin, green onions, both white and green sections, small dice
1 medium poblano pepper (or 1/2 cup roasted sweet potato), small dice
a small handful of fresh basil leaves (or Italian parsley or cilantro), chopped
1/4 cup sharp cheddar cheese, small dice
1/4 cup feta cheese, crumbled (or cotija or pepper jack)

4 large eggs, or 3 eggs and 2 TBS egg whites
generous 1/2 cup 2% milk
salt and freshly ground black pepper
Several drops of hot sauce (Cajun Sunshine, Chipotle Tabasco, etc.), optional
  1. Preheat the oven to 375 F. Use cooking spray and coat the 6 large cups in the muffin tin. (I call these Texas-sized, not regular and not mini-sized cups)
  2. Mix the filling ingredients together (or do each one at a time) and distribute equally among the 6 prepared muffin cups.
  3. Whisk the eggs, milk and seasonings together to blend well in a medium bowl and pour over the filling so the muffin cups are about 3/4 filled. 
  4. Bake 12 to 15 minutes, or until set in the center and lightly browned. Gently run a rubber spatula around the edge of each frittata to loosen from the muffin cups. Use the spatula to lift and remove from the pan and serve.
Updated note: Here it is, the day after my hungry morning grumble, and I'm riveted to the televised images of the devastation along the East Coast in the aftermath of Hurricane Sandy. Now there's a real emergency, and I can't imagine what those people are dealing with. Yesterday I was just a little hungry - today millions of people are looking at challenging weeks/months ahead dealing with basic needs, things like shelter, food, water and power, transportation. Then there's the rebuilding of the infrastructure... it's beyond imagining.

Sunday, January 22, 2012

Bacon Chocolate Chip Cookies


Bacon Chocolate Chip Ice Cream Sandwich 

This might have been was a bit over the top, but I couldn't resist the temptation. Blame it on the snowstorm, Seattlites do get a little crazy when it snows. Six inches of snow followed by an ice storm meant I didn't drive anywhere for the better part of a week. I hung out in the kitchen and cooked up kettles of soup, pots of chili, even beef stroganoff for goodness sakes. Then cookie madness struck, along with a craving for bacon.


Lightly sprinkle a little brown sugar and cayenne on bacon and it cooks up to crispy wonderfulness, so why not add a little crispy bacon to a cookie? Bacon adds a special sweet, salty something to most things savory, but I'd never used it in a dessert. (Note to self: there could be a good reason for that!) 


A Google search for bacon cookie recipes produced over 20 million hits; obviously this was not a new idea. I went with a recipe from SeriousEats, skimming it quickly to be sure all of the ingredients were on hand. I should have read it more thoughtfully, realizing that a pound of bacon, 4 cups of flour, 3 cups of chocolate chips, 3 cups of sugar and a cup and a half of butter would make a huge quantity of cookies.


Hilary and I measured, mixed, shaped and baked batch after batch of these cookies - a hefty five dozen in all. We sampled warm cookies, cooled cookies and finally cookie ice-cream sandwiches. Meh. This recipe didn't overwhelm us with goodness, or even bacon flavor. The cookies were just okay, overly-sweet chocolate chip cookies. 


I'll stick to my usual, more traditional chocolate chip recipes in the future. But if you care to check out the SeriousEats recipe, perhaps tweak it to suit your taste, use this link. If you're in the neighborhood, now that the snow has melted, c'mon by for coffee and cookies. I have dozens to share.

Related Posts Plugin for WordPress, Blogger...