Showing posts with label sandwich. Show all posts

Sunday, November 27, 2016

Monte Cristo Sandwich


Thanksgiving dinner arrived at the door along with the hugs and warm greetings of family. They brought it all, everything, the entire dinner. Everything even included the turkey fryer for an 18-pound bird! (Note: I was allowed to contribute my Zesty Cranberry Relish.) What a thoughtful, caring present from this cast of characters; Seattlites Niece Hilary and Dave plus Californians Meg and Brother Mike. For hours the house was filled with conversation, friendly teasing, suspected tall tales and humorous stories, wedding plan updates and endless laughter. All in all, a terrific family celebration and a delicious meal. 
Photo: The Thanksgiving Cooks 2016

On Friday RL and I revisited Thanksgiving memories, surveyed the many containers of leftovers in the fridge, and nibbled on a rerun of Thursday's feast. 

Turkey sandwiches, enjoyed late night or next day, are always a major highlight of this holiday meal. Some years we favor simple sliced turkey on white bread, other years we crave Kentucky Hot Browns with cheese sauce or turkey gravy. This year we opted for Turkey and Ham Monte Cristo Sandwiches. Possibly a variation of the Croque Monsieur, this batter-dipped, butter-fried sandwich is an over-the-top and delicious use of leftover turkey meat. Ooey gooey, salty, savory decadence... sigh, but so worth every artery clogging bite (and a reason to return to healthier eating the very next day).  

My Monte Cristos are a cross between French Toast and a grilled cheese and meat sandwich, occasionally with some crispy bacon added... just 'cuz. No recipe required, just freeform it.

1. Use 2 slices of bread per sandwich. Slather one side of the bread with mayonnaise and Dijon mustard. Add some chutney or cranberry relish if you like.


2. Alternate layers of thin-sliced meat (ham and/or turkey), cheese (Havarti or Swiss) and bacon (optional) on the bread. Close the sandwich and press top gently to compact slightly. This will help hold it all together when you flip it in the  pan.


3. Beat an egg and a bit of milk in a pie pan or shallow, rimmed plate. Dip each side of the sandwich briefly in the egg mixture, long enough to coat thoroughly but not get soggy. You want a crisp exterior and soft, gooey middle. 


4. Melt a pat of butter in a heavy skillet over medium-low heat. Place coated sandwich in frying pan and cook until bottom is golden brown. Flip the sandwich, adding more butter as needed, and cook until the second side is golden brown and the cheese is melted. This takes 4 to 5 minutes per side in my kitchen.


5. Transfer to a cutting board and let cool briefly to set cheese a bit. Cut into wedges, plate and serve.


Note: It is traditional to dust the sandwiches with powdered sugar and serve with a side of jelly. I skip that feature, relishing the salty, savory richness of the sandwich without the distraction of an added sweet. For a flavor pop, I would prefer a swipe of Zesty Cranberry Relish rather than powdered sugar and jam, but that's just me. 

Don't wait for Thanksgiving to enjoy a Monte Cristo. They are delicious using deli-sliced cold cuts or meat pulled from a deli-roasted chicken. Get creative and add some roasted green chiles, or substitute thin waffles for the bread. Go for it! 


Sunday, July 17, 2016

Pulled Pork Waffle Sandwich


...wait, I thought you served enchiladas?! The history of this stacked waffle creation is a long, rambling story, and if you don't care about the details just scroll to the bottom for a quick version. I will understand if you want to skip to the how-to details. But if you are interested in how a chicken enchilada lunch turned into pulled pork waffle sandwiches, here's the tale.


It began when ex-Seattlites Char and Bill, two college friends who introduced us eons ago, planned a return trip to the city for some appointments. What a perfect opportunity to visit and catch up on life events over a lengthy lunch here at the house. After checking with Char about food allergies and preferences, I planned an easy-to-prep-ahead menu for our buffet lunch. 

Chicken, Green Chile and Cheese Enchiladas
Sweet Potato and Black Bean Enchiladas 
Creamy Cabbage Slaw with Avocado
Butter Pecan Cookies and pecan caramel ice cream
.
.
.
and an unplanned serving of Baby Back Pork Ribs

A large rack of ribs, already trimmed and coated with my spicy homemade dry rub, already sat marinating in the fridge. I tossed the pork into the oven early in the day to prebake it low-and-slow, planning to reheat and sauce it for dinner that night or the next day. Lucky decision! That unplanned, spur-of-the-moment rib decision to bake the ribs saved the day. It seems there were just a few more food items to avoid - beans and nuts! Eek! without the pork ribs, "friendly" lunch choices could have been pretty limited. 


The hours flew by as we laughed, reminisced, nibbled away at lunch, talked some more and ate some more. The chicken enchiladas were a major hit, disappearing quickly, but the sweet potato enchiladas were strictly a "girly" choice. The guys preferred the ribs with barbecue sauce, no surprise there. Salads and vegetables were sampled, but no one scooped up a third helping. Eventually two servings of enchiladas and a ton of corn salad, cabbage slaw and various pickled vegetables plus half of the ribs remained to enjoy later in the week. Visualize one refrigerator shelf loaded with plastic containers of tasty leftovers. 


Reheated wedges of sweet potato and black bean enchilada starred as fabulous breakfast fare the next morning - okay, fabulous for at least one of us. Salsa and/or a poached egg boosted the visual appeal and popped the flavor; these might be a better brunch than lunch item. 


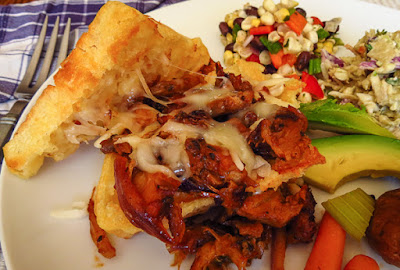
Reheated pork ribs, served on the bone, sounded boring the next day. Not terrible, just routine and boring. So I pulled the sauced meat off the bone, shredded it and mentally ran through some sandwich options. Pulled pork on a bun would be tasty, but then visions of Chicken and Waffles danced through my brain. Shazam! inspiration hit - pulled pork on a cheddar cheese, cornmeal-flavored waffle would be even better! and it was. lots better. minus the hot maple syrup, of course. This version made good use of yesterday's lunch leftovers, but I'd make bbq pork again and again just to revisit this waffle sandwich... a pulled pork wafflewich.


Pulled Pork Waffle Sandwich

Serves 3-4 (or more depending on serving size) 

For the waffles

I substitute 1/4 cup cornmeal for an equal amount of starter in a double batch of my standard sourdough waffle recipe (link). Sprinkle a small handful of shredded cheddar (or jack or Havarti) on top of the raw batter just before closing the lid on the loaded waffle iron. Cook until crisp; repeat with remaining batter. Place cooked waffles on a grate and hold in a warm oven (the grate keeps the bottoms from going soft and soggy).

For the filling

Pull the cooked, sauced meat off the bones of 6 meaty pork spareribs (link), discarding any large pockets of fat, and shred or pull apart the pork into bite-sized chunks. Slice a medium sweet onion into thin strips. Measure a cup or so of your favorite homemade or bottled barbecue sauce (I use Sweet Baby Ray's).

For the sandwiches
  • Heat a tablespoon of oil in a wide skillet and saute thin slices of onion until softened - add slices of sweet or spicy peppers if you like. Add the meat and a cup of  barbecue sauce to the skillet; stir to mix and heat until the meat is warm. 
  • Split a Belgian waffle quarter or half piece to separate top and bottom (or use 2 thin regular waffles) and ladle the filling generously over the base. Sprinkle with more cheese (and consider adding slices of avocado, bacon or grilled poblano chile slices). Add the waffle topper and serve. Repeat.
  • Note: One quarter of a fat Belgian waffle makes a filling lunch for dainty, ladylike appetites, but half-waffle portions are more the norm in my kitchen.   


Friday, February 26, 2016

Chicken Shawarma in the Oven


I enjoy Middle Eastern food, but have limited experience in preparing it. My repertoire to date has been limited to hummus, stuffed grape leaves, lamb kofta, fattoush salad, pita bread (minus the pumpkin porter experiment), tabouli, couscous and more: all simple items that only hint at the depth of flavors traditional to so much Middle Eastern fare. It's definitely time to expand my cooking horizons, so why not start with a favorite street vendor item, Shawarma. Every visit to the Pier Street Sunday Market in Campbell River, B.C. includes a visit to the Baba Gannouj food cart for a beef shawarma pita half. That sandwich filled with shaved, marinated and roasted meat is Delicious with a capital D.   
Photo: Food cart Beef Shawarma at Pier Street Sunday Market in Campbell River, B.C. 

Lacking a vertical rotisserie, I needed another approach and found two terrific resources. Faith Gorsky's cookbook and blog "An Edible Mosaic", and a recent Cooking:NYT post encouraged me to try Chicken Shawarma in the Oven. Good decision! the meat was well-flavored and delicious as an entree on day one, reheated well for lunch on day two, and on day three made an amazing shredded chicken pita filling.

It was a simple, quick process, though overnight marination was the key to well-flavored chicken thighs. A large ziploc bag made easy work of mixing the marinade and it stored easily in my always-packed fridge. Note to self: Remember to turn the bag several times to redistribute this messy, colorful marinade.   


Just before cooking, toss in the onion quarters to coat. Use kitchen tongs to avoid staining your fingers and arrange the thighs and onions in a single layer on a foil-lined sheet pan. Roast in the preheated oven until the chicken is no longer pink in the middle, turning occasionally. Optional finish: saute quickly in a tablepoon of oil in a hot skillet on the stovetop to further crisp up the edges.

Slice. Serve with an assorted accompaniments. Enjoy! This is Middle Eastern street food that translates well into kitchen fare... though I'll still order it whenever I visit the Baba Gannouj food truck.


Oven-Roasted Chicken Shawarma


Based on a Cooking:NYT online recipe (link), with additional inpiration from blogger Faith at An Edible Mosaic

INGREDIENTS 

2 lemons, juiced
1/2 cup plus 1 tablespoon olive oil
6 cloves garlic, peeled, smashed and minced 

1 teaspoon kosher salt

Shawarma Spice Mix
2 teaspoons freshly ground black pepper
2 teaspoons ground cumin
2 teaspoons ground sweet paprika
1/2 teaspoon turmeric
1/4 teaspoon ground cinnamon
1/4 teaspoon ground cardamom
1/4 teaspoon ground coriander
1/4 teaspoon ground red pepper, to taste (optional) 

2 pounds boneless, skinless chicken thighs
1 large onion, peeled and quartered (2 or 3 recommended)
2 tablespoons chopped fresh parsley

  1. PROCEDURE
  2. Marinate the chicken
  3. In a large bowl, combine the lemon juice, 1/2 cup olive oil, garlic, salt and Shawarma Spice Mix, then whisk to combine. (OR, put the marinade ingredients into a large ziploc bag and massage to combine.
  4. Add the chicken and coat well. Cover and store in refrigerator for at least 1 hour and up to 12 hours.
  5. To cook:
  6. Heat oven to 425 degrees. Use the remaining tablespoon of olive oil to grease a rimmed sheet pan (OR line the pan with aluminum foil for easy cleanup.) Add the quartered onion to the chicken and marinade; toss gently to combine. Remove the chicken and onion from the marinade, and place on the pan, spreading everything evenly across it in a single layer.
  7. Put the chicken in the preheated oven and roast until it is cooked through, browned and crisp at the edges, about 30 minutes, rotating the pan and turning the chicken at least once (less time if you use boneless, skinless breast pieces). Cook until the interior is no longer pink. Remove from the oven, allow to rest 2 minutes, then slice into bits. (For crispier chicken, use a large pan and saute in a tablepoon of olive oil over high heat until golden brown with crisp edges.) 
  8. Scatter the parsley over the top and serve with chopped tomatoes, cucumbers, chickpeas, pita, tzatziki or garlic mayonnaise, hot sauce, olives, feta, rice... or whatever sounds tempting.

Wednesday, September 16, 2015

Spicy Roasted Cauliflower Sandwich


Hilary and Ron worked together to prepare dinner last night, while I sat at the other end of the kitchen and played guest. What a treat! Ron built a healthy and delicious Greek salad and Hilary prepared an amazing roasted cauliflower sandwich. 

Usually I rave about toasted meat and cheese sandwich combinations, not roasted veggies, but this sandwich deserves enthusiastic praise. It comes long distance from one Washington to another; via Hilary from Ann Marie's recreated version of a favorite at Taylor Gourmet in Washington DC - with a few suggested tweaks of my own.

Sandwich love happens when the first bite brings a satisfied smile and happy taste buds without the brain fretting over what's on the inside of the fresh, crusty roll. Yum! Sweet, spicy, tangy, smooth and crunchy registered immediately and called for a second bite. Mmmmmm, this was SO tasty and satisfying that I didn't want to set the sandwich back down on my plate between bites. 


Hilary had raved about the sandwich when she enjoyed Ann Marie's original, but I blew off the notion that a vegan sandwich could be all that good. Wrong! The filling combination hit all the right flavor and texture notes and I'm already plotting some other presentations: tortilla wraps, savory crepes, pizzas or open-faced tartines...  

No, I'm not going to forgo my favorite green chile cheeseburgers or grilled cheese combinations, but this Spicy Roasted Cauliflower Sandwich has joined my list of favorites. Try it, you're going to love it and won't miss the meat. I promise. 


Spicy Roasted Cauliflower Sandwich with Hummus and Greens
variation of a recipe from Ann Marie at CiaoMama

Ingredients:


1 head cauliflower
2 teaspoons extra virgin olive oil
1 teaspoon crushed red pepper flakes
1 teaspoon cayenne pepper
1/2 teaspoon cumin (optional)
1/2 teaspoon garlic powder (optional)
2 teaspoons smoked paprika
smoked salt and freshly ground pepper to taste
4 large crunchy rolls or buns, warmed or toasted
hummus (homemade or purchased)
sweet Thai chili sauce
arugula, spinach and/or baby kale

Directions:

  1. Pre-heat the oven to 400 degrees. Line a large baking sheet with tin foil for easier clean up. 
  2. While the oven is heating, cut cauliflower into bite-size pieces and wash thoroughly. Thoroughly pat dry on paper towels.
  3. Spread cauliflower on baking sheet. Pour olive oil over the cauliflower florets; then sprinkle with cayenne, cumin, garlic powder, smoked paprika, crushed red pepper flakes, smoked salt and pepper. Use a clean hand or wide rubber spatula and toss the cauliflower to evenly coat each piece with oil and spices. Then spread out evenly in a single layer across the foil-lined pan.
  4. Place the baking sheet in the preheated oven and toast the cauliflower for 20-25 minutes, giving the pan a little shake half way through. When roasted to your liking (lightly colored OR with little crunchy, burnt bits), remove from the oven and allow to cool slightly.
  5. Slice the rolls horizontally and spread both top and bottom halves with hummus. Top each bottom half with cauliflower, a drizzle of sweet Thai chili sauce and a handful of arugula. Add the top part of the roll, compress slightly and enjoy.


Wednesday, December 10, 2014

Lamb Kofta with Yogurt Sauce


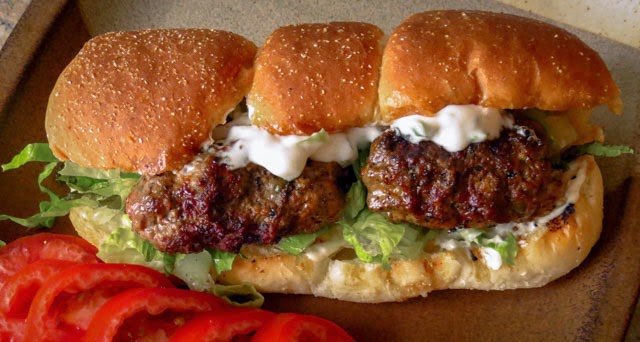
Call it kebab, kabob, kofta, brochette or satay, "food on a stick is just plain fun." I read that somewhere, probably online, and can't help but agree. Today's lamb kofta on a roll might have would have tasted the same if prepared as a flat lamb slider on a burger bun, but the skewer and grilling approach added an indescribable special something to the end result. 

The succulent, tender lamb available today is a much improved product over the disagreeable, strong-tasting, tough-chewing meat (mutton?) of my childhood memories. Now I love sizzling lamb chops, herb-crusted rack of lamb, butterflied and grilled leg of lamb, well-seasoned lamb burgers... and spicy lamb kabobs. 

I don't spend too many moments thinking about the U.S. meat industry in general, but did page through the American Lamb Council's website. Here are a few fast facts about our American lamb:

  • There are over 82,000 sheep operations in the U.S. and a majority are family owned.
  • The top 5 sheep producing states are Texas, California, Colorado, Wyoming and South Dakota, though sheep are produced in nearly every state.
  • 80% of U.S. sheep are raised for meat, with wool being a byproduct.
  • A 3-oz serving of lamb has only 175 calories, meeting the FDA's definition for lean meat.
  • In addition to protein, lamb is an excellent source of vitamin B12, niacin, zinc, selenium, iron and riboflavin. 

Interesting factoids, and it surprised me to think of lamb as a lean meat, but really it's all about flavor.  Today's lightly-spiced lamb kofta were delicious... food on a stick that was just plain fun. 


Lamb Kofta
Yields 8 kofta or 4 skewers

1 pound ground lamb
2 heaping tablespoons fresh mint, minced
2 heaping tablespoons Italian parsley, minced
2 teaspoons garlic paste
3 tablespoons grated onion
1 tablespoon pimenton (smoky Spanish paprika)
1 scant teaspoon ground chili pepper (ancho or cayenne)
1 tablespoon ground cumin
2 tablespoons za’atar (or sumac plus thyme)
1 tablespoon capers, drained & rinsed
Kosher salt & freshly ground pepper

Yogurt sauce (recipe below)
  1. You will need a grill or cast iron grill pan and 4 long metal skewers.
  2. Mix the ingredients thoroughly by hand. Divide into 8 equal portions. With damp hands shape each portion of meat into a smallish cylinder. Slide two meat rolls onto a metal skewer, not touching but separated from each other, and set aside; repeat with remaining meat and skewers.
  3. Heat a ridged, cast iron grill pan over medium heat. Brush the pan lightly with olive oil.
  4. Grill the skewered meat, turning frequently, until a golden brown crust develops and the meat is still slightly pink but cooked nearly through. Careful, don’t overcook the lamb!
  5. Remove the kofte from the skewers and serve with warmed flatbread, pita or buns. Offer bowls of shredded greens and herbs, plus yogurt sauce on the side.


Yogurt Sauce:
2 cups plain Greek yogurt
1 teaspoon garlic paste
1 tablespoon fresh mint, minced
1 tablespoon Italian parsley, minced
1 teaspoon lemon juice
grated lemon zest
2 green onions, finely sliced
Pinch of salt

Stir all of the sauce ingredients together, mixing thoroughly. Refrigerate for an hour before serving.


Saturday, April 6, 2013

Kale and Artichoke Grilled Cheese Sandwich


April is National Grilled Cheese Sandwich Month. An entire month honoring grilled cheese? Well,let the celebration begin, as though grilled cheese sandwiches needed any excuse to appear in my galley. Just thinking of that ooey, gooey goodness melted between crunchy layers of grilled, buttered bread brought on hunger pangs. The cravings got serious when I spotted Joy the Bakers's post for a Spinach and Artichoke Grilled Cheese Sandwich. Her filling ingredients were a riff on a favorite appetizer, Spinach and Artichoke Dip. Just one look at the photo of  stacked sandwiches and I knew I had to grill up my own version. 

Similar ingredients lurked in my refrigerator, though I had to get creative with a few items. Kale substituted for spinach, the heat from Crimson Fire (WSU's version of pepper jack) replaced the sriracha's kick, and I skipped completely forgot to add the sour cream. Deli-sliced turkey was a last-minute addition, a spur of the moment inspiration, but was totally unnecessary. Any trace of turkey flavor disappeared as though it wasn't part of the cast of players; it's mild flavor couldn't stand up to the bolder tastes of cheese and peppers. 

I built one sandwich on a jalapeno & cheese-topped mini baguette and a second one on multigrain sandwich bread.  


Grilling the baguette was little tricky. The rounded top tried to roll over on the grill pan and a sandwich weight (aka bacon press) slid right off. No matter, the cheese melted and the filling ingredients blended together into a delicious cohesive mass. Tangy yet mellow, smooth and crunchy in every bite, this was comfort food at its best.


RL joined in the taste test and added more salt and some green tabasco to his sandwich segments. I was happy with the flavors as cooked, or hungry enough to be non-critical. Later on I spotted a package of frozen salad shrimp in the freezer and considered another round of sandwiches incorporating shrimp instead of turkey... or maybe not. I know for sure that we will celebrate National Grilled Cheese Sandwich Month again and again this month.


Kale and Artichoke Grilled Cheese Sandwich 
a description rather than a recipe

inspired by a recipe from Joy the Baker (original recipe)
  1. Saute chopped onion and minced garlic in a lightly oiled pan over medium-low heat until softened. Add chopped kale and cook until wilted. Transfer to a bowl and set aside to cool. 
  2. Add shredded pepper jack cheese, a pinch of salt, and a handful of drained, chopped artichoke hearts to the bowl. Mix with a fork until well combined. Taste and adjust as needed - this is your chance to get creative with other ingredients. (Sour cream? crema? mayonnaise? lemon pepper or lemon zest? hot sauce?)
  3. Use two slices of bread or one split roll for each sandwich. Spread one side of each slice with cream cheesePile some filling onto the bottom slice of bread. Top with another slice, cream cheese side down, and press together lightly. 
  4. Lightly butter the top side of a sandwich and lay, butter side down, on a preheated heavy grill pan, OR melt a dab of butter in a heavy-bottomed skillet and add the sandwich(es). Toast on each side until the cheese melts and the bread is golden brown.
  5. Don't wait, slice and enjoy this treat right away.
Update: April 7, 2013
Check out the menu (link) at Monte Cristo, a Seattle food truck that specializes in gourmet grilled cheese sandwiches. Browse the site, you'll enjoy it and wish you lived in Seattle. 
More ideas for creative and tasty grilled cheese sandwiches (and a contest) can be found at FoodieCrush (link)
You could look for healthier grilled cheese makeovers at CookingLight (link).

Monday, January 14, 2013

Soft Pretzel Bites, Buns and Sausage Rolls


Game Day Pretzel Treats


Pretzels have been floating through my brain lately, real homemade soft pretzels, not the find-in-the-mall kind of pretzels. Plain pretzels, pretzel buns, pretzel bites, pretzel sausages - they all sounded tantalizingly delicious. Naturally I did the happy dance when I was assigned Growing up Gabel as my Secret Recipe Club blog for January, and found Camille's recipe for Homemade Boiled Pretzels. I added a touch of onion powder and garlic powder to the dough for extra flavor, and set to work with those recent, recurring pretzel notions.

An upcoming Super Bowl game called for easy-to-eat finger food and some substantial snacks ready for the half-time feast or any time-out nibble. Chili, gumbo or hearty soups are traditional game day fare, but mini pretzel bites, pretzel-wrapped sausages or even pretzel bun sandwiches would be a great addition to the menu. This called for some pre-game practice. That was a good call; a few adjustments were necessary.  

I began with precooked chorizo sausages, rolled out a few 18 to 24-inch wands of dough, and wrapped these very long strands around whole sausages and a few shorter sausage chunks as well. These meaty packages were boiled in soda-water, drained, egg-washed, salted and baked. Mmmmm, good! really good, though the oil from the chorizo soaked into the inner surface of the pretzel wrapping. It was tasty, but a little heavy. This was more evident with whole sausages than with the shorter sausage chunks. There were no leftovers, but I will choose a less oily sausage for the next batch. 


Next came tightly-twisted pretzels and a few rounds of dough which baked into puffy buns. Split in half with the tops slightly scooped out to accommodate fillings, these buns made terrific sandwiches. On game day I'll set out platters of cured meats, cheeses, lettuce, onion rounds and tomatoes with a variety of mustards and horseradish spreads. Pulled pork or BBQ chicken would be other delicious choices as well as cream cheese, lox, capers and pickled red onions. Pretzel buns are such versatile bases, pairing well with almost any filling, though maybe a bit too firm for a perfect ground meat slider. Changes? no changes required, just more practice twisting the pretzels into a more uniform shape.


I'm ready to enjoy Super Bowl noshing, even though the Seahawks lost the division match-up to Atlanta. Today's various pretzel snacks were all winners; Homemade Boiled Pretzels are super snack champions. 

Pretzel Treats
Recipe from Camille at GrowingUpGabel, with a few additions

Ingredients
  • 1 cup warm water
  • 1 Tablespoon active dry yeast
  • 1 Tablespoon sugar
  • 2 Tablespoons oil
  • 1 teaspoon salt
  • 1/2 teaspoon each, garlic powder & onion powder
  • 2¾ cups all-purpose flour
  • 12 cups water
  • ¼ cup baking soda
  • 1 egg yolk, lightly beaten
  • 1 Tablespoon water
  • Coarse salt, to taste
Fully cooked sausages, spicy or bland, to wrap in dough for pretzel sausages or pretzel bites
OR meat & cheese sandwich fillings for pretzel buns
Mustards and spreads to accompany 
Instructions
  1. In a large bowl, combine water, yeast, and sugar.
  2. Add 1 cup flour.
  3. Add in oil and salt and 1 more cup of flour. Stir to combine.
  4. Add enough flour to make a smooth, elastic dough (slightly tacky is fine). Knead dough a few times in the bowl.
  5. Cover bowl and let dough rise until doubled (about 1 hour).
  6. Pre-heat oven to 475 degrees. Grease baking sheets.
  7. Bring the 12 cups of water to a boil in a large stock pot. SLOWLY add in baking soda (it will foam so go slow!!). Keep water simmering.
  8. Gently punch down dough and divide in to 6 or 12 pieces (depending on size of pretzel you want).
  9. Roll each piece of dough out to an 12-18″ rope. Shape in to pretzel shape and pinch ends to close up. OR, use a dough rope to wrap up a link or smaller piece of sausage, encasing it completely and pinching the ends to secure. Repeat with remaining dough and sausages.
  10. Boil each pretzel for 10-15 seconds, making sure all sides are boiled.
  11. Place pretzels on greased baking sheets, 1 inch apart.
  12. Cover pretzels and let rest for 5 minutes.
  13. Whisk together egg yolk and water and then brush on top of pretzels. Sprinkle salt on pretzels.
  14. Bake for 10-12 minutes until golden brown.

...now check out more SRC recipes from Group B


Related Posts Plugin for WordPress, Blogger...