Tuesday, August 27, 2013

Jalapeño Three-Cheese Swirls - #Twelve Loaves


#TwelveLoaves August: Savory... our August baking mission is taking on a savory side. Think breads with cheeses and spices, garlic and onion, oh my! I am SO ready to participate this month; delighted to be back in wi-fi range again, and have an official excuse to bake something savory. Since the galley cooktop just went wonky I have very strong motivation to bake often!

My usual pizza dough recipe produces a generous quantity of dough ready to flavor with herbs and spices, enough dough for two pizzas or one pizza and "something else". Today that "something else" was a trial batch of swirly buns filled with some favorite ingredients: fresh jalapeno bits, sliced green onions, slivered basil and a mix of freshly-grated Parmesan, cheddar and mozzarella cheeses, with a dash of cumin and a sprinkle of salt and white pepper. Not a calzone, not a meat and cheese stromboli, this was more like un-sauced pizza pretending to be a savory sticky-bun style roll. Mmmm, yum, that filling looked pretty tempting even before it was rolled up into a log, ready for slicing and baking.


The dough cooperated and rolled out into a thin near-rectangle without giving me any grief, a welcome change after my recent sourdough cracker fiasco (link). The filling quantity seemed overly generous when scattered on top of the raw dough, but the proportions were perfect in the final product.


The large 6-hole muffin tins I had hoped to use were hiding out, nowhere to be found, probably stored at home in the shoreside kitchen, so this muffin-top pan substituted instead. Next time I might slice the roll into 8 or 9 pieces for thinner, less hearty servings, and skip the guilt when I proceed to eat two or three swirls at one sitting.


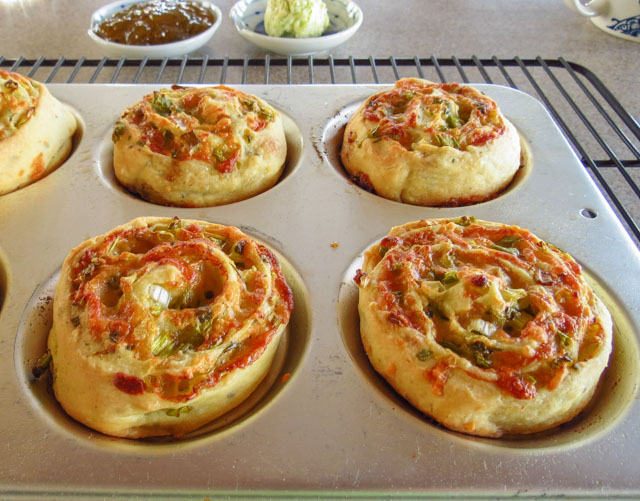
I enjoyed these buns plain, fresh from the oven at breakfast when the melting gooeyness of soft, subtle cheeses offered a mellow contrast to the zip and bite of green onions and jalapeños. Yum! RL preferred his with a slather of lime butter, and then another with a smear of lime kiwi jam (thank you, Jean L, for the delicious homemade jam). 


Like any leftover pizza slice, these swirls lost some of their appeal later in the afternoon when I tried one as a snack. Reheating briefly in the microwave took care of that. (Disclaimer: I swear cold pizza tastes best straight from the fridge, after midnight or at least before dawn.) The following morning two swirls remained, waiting for their turn at the table. Wow! those jalapenos had some kick by day two! Plain or with spreads, these were a pretty tasty experiment. RL prefers a softer, airy bread dough for rolled buns, but that's a lot to ask of a pizza dough. I might have to freeze the next batch to enjoy singly by myself at breakfast. Wait, here's a thought... how about reheated and sliced in half for a bacon and avocado sandwich? That has possibilities for another time... maybe not heart-healthy, but oh! so tasty.


Jalapeño Three-Cheese Swirls

Pizza Dough
1/2 recipe of Basic Pizza Dough (linkwith 1 teaspoon of dried basil and oregano and 1/4 teaspoon garlic powder added and kneaded into the dough

Filling
1/4 cup each shredded Parmesan, mozzarella and cheddar cheeses
6 small green onions, white and green portions, sliced
1 fat jalapeño pepper, deseeded, in small dice (maybe poblano next time)
2 tablespoons basil, julienned
1/4 teaspoon cumin
salt and white pepper, to taste

Cooking spray or shortening to oil the baking tins

Directions
  1. Prepare the pizza dough with the added herbs and garlic powder. Cover and let rest while you prepare the filling.
  2. Place the remaining ingredients in a small bowl and toss to mix. Set aside.
  3. Roll the dough out thin into a rectangle on a lightly floured surface.
  4. Scatter the cheese mixture evenly over the top, leaving a thin empty border along each short edge. 
  5. Begin with a short edge and roll up the dough, jellyroll fashion, into a log.
  6. Use a sharp knife or waxed twine to cut into 6 (or more) slices. Place each slice with a cut side up, into a prepared muffin tin or greased iron skillet.
  7. Rest, covered, while you preheat the oven to 375 F.
  8. Bake on the center rack of the 375 F oven for 30 minutes, or until tops (and bottoms) are lightly browned. 
  9. Serve immediately, or remove to a baking rack to cool and freeze.

Monday, August 26, 2013

Wilted Cabbage Coleslaw

aka Betsy's Coleslaw

This dish is a five-star, two-thumbs-up favorite for its taste and simple preparation and more importantly for the memories it holds for me. The recipe came years ago, from a special friend and super cook Betsy D. My files hold a generous scattering of recipes labeled Betsy's This and Betsy's That, every one of them a winner


Betsy's Coleslaw has been a reliable go-to dish when we've grown tired of green, leafy salads or when it's been too many weeks between grocery stops on a cruise. Whole heads of cabbage keep well on board, though I will often stock packages of pre-shredded coleslaw mix instead. These handy packages take up less room, store easily in a boat fridge and are even easier to use. 

This Wilted Cabbage Salad will hold in the fridge for days, it travels well and has been popular for ages at dock parties, picnics, potlucks and at home ashore. Add any number of other vegetables for variety; try shreds of raw fennel for an unusual licorice bite, or just enjoy the original.


RL loves this slaw as a salad or side dish and will often fill a small bowl for a snack "just because it's there". While the coleslaw is terrific by itself, I think it is even better when topping a Reuben sandwich or a fish taco. Betsy's Coleslaw is an essential recipe in my galley, I can't believe I haven't posted it before. 


Wilted Cabbage Coleslaw

Coleslaw mix:
1 large cabbage, finely sliced
1 med. sweet green pepper, chopped                              
   (or a mix of sweet green, orange yellow and/or red)
1 med. sweet onion, small dice

Dressing:
1/2 cup sugar
1 tsp. salt
1+ tsp. dry mustard (Coleman's recommended)
1+ tsp. celery seeds
1 cup vinegar
2 TBS oil

Mix sugar, salt, mustard and celery seeds in a small saucepan, add vinegar and oil and bring to a low boil over moderate heat, stirring until the sugar dissolves. (Or use a 2 or 4 cup glass measuring cup and microwave until the mixture comes to a boil and the sugar dissolves.) 

Pour over the cabbage mix and toss well.  After it has cooled slightly, pour the dressing off the salad back into the saucepan, reheat and pour back on the cabbage. (Slightly wilted coleslaw is tastier and easier to eat and digest!) 

Cool to room temperature, then cover and refrigerate until ready to serve. 


Friday, August 23, 2013

Sauced Apples and Granola for Breakfast


It had been three weeks since the last grocery stop and I was running out of some favorite foodstuffs, important things like milk, good bread and fresh produce. Now I wish I had run up to the makeshift Band store when we were in Bella Bella. The morning breakfast choices were limited to sourdough pancakes or waffles… again. I would have settled for an egg dish, any eggy creation, but that’s never a popular choice with the Capt. so forget eggs. Apples to the rescue! Some Granny Smith apples remained in good condition, unrefrigerated but outlasting any other fruit purchased so long ago in Campbell River.

A dish of microwaved apple slices with a lemony syrup sauce and granola for crunch was a welcome breakfast treat guaranteed to keep hunger at bay while we waited for the sourdough bread to finish its second rise and bake off in time for lunch. This impromptu creation was good enough to repeat again and again.

The galley pantry always holds packaged powdered milk, shelf-stable cartons of milk (Tetra-paks), dried fruit, canned fruit, etc. for emergencies, but fresh is always better. We’re due for a grocery run soon, hoping for fresh dairy and produce… and more apples, of course.


Hot Sliced Apples with Maple Syrup, Lemon and Granola
 Serves 2

2 extra large Granny Smith apples, cored,and sliced, peeled or not
¼ cup (2 oz) Maple Syrup
sprinkle or two of cinnamon (optional)
Zest and juice of 1 small lemon (approx. 2 Tablespoons)
Generous ½ cup Granola
  1. Cut the apple slices in half (bite size is good) and arrange in circles in a large glass pie plate.
  2. Combine the syrup, cinnamon, lemon zest and lemon juice and drizzle evenly over the top of the apples.
  3. Scatter the Granola over the top.
  4. Cover with plastic wrap and microwave for 3 minutes. Test for tenderness with the tip of a knife or a fork, the apples should be soft but not mushy. Add additional time as needed.
  5. Serve immediately, or cool and enjoy chilled or at room temperature. Add a dollop of honey Greek yogurt and this breakfast dish will taste like a dessert, in case you really want dessert instead of breakfast.


Tuesday, August 20, 2013

Sourdough Sesame Crackers for Salmon Burger Sliders


(Warning - don’t try these at home)

We cruise in remote areas along the Pacific Northwest coast, so I often miss joining the monthly baking activity with SourdoughSurprises. Last month we were anchored in Kisameet Bay in the Central Coast region of B.C. on July 20, completely out of cellphone or wi-fi range, and since we don’t have a firm float plan our August 20 whereabouts are uncertain. No matter, I decided to bake away, pre-schedule a post when I found an unexpected wi-fi connection in Ocean Falls, and hope someone can help with a linkup when the time comes.

Oh my yes, this was an interesting sourdough cracker misadventure. Grin. “Interesting” is a useful adjective, it can mean so many things. Read on, shake your head and laugh along with me.

Instead of modifying one of my existing, non-sourdough cracker recipes, I based these crackers on a recipe published in a small 32-page pamphlet I found in a Ketchikan bookstore years ago. Two assumptions led me down a frustrating path. 1. Thinking an Alaskan bookstore would stock only the best in sourdough recipes, I didn’t question the ingredients or ratios. 2. Reasoning that a publisher with a 50-year history and over 200 titles in their Country Wisdom Bulletin series must have solid content. Hmmmm, "maybe" on both counts. Of course, it could have been the cook; another "maybe" on that thought.

Moving on to the actual crackers. These were seriously salty little suckers, tough rather than crisp, more firm like hardtack than brittle like a cracker. Nope, not at all what I expected from a cracker recipe. The dough was stiff, resisted rolling out in one tidy piece, and threw off a lot of sesame seeds as it was rolled. What bad manners from my usually agreeable sourdough starter.


Initial response? Meh. Better taste another one… or two… and soon we noticed that two dozen sesame crackers were gone. There was something about these one-bite nibbles that kept both of us coming back for “just one more.” Something, but certainly not texture.

The sesame seeds gave the recipe a faintly Asian tilt, so I paired the crackers with Asian Salmon Burger Sliders for an unusual appetizer. Slather on some wasabi-flavored cream cheese, add a dollop of Thai sweet chili sauce and top with a tiny salmon burger, done. Each cracker was sturdy enough to support a moist, mini salmon patty and the sesame flavor played well with the ginger, garlic, green onions and Ponzu sauce in the burger for a satisfying mouthful.


The crackers were merely tough on the first day, on day two you had to work hard to nibble away a corner, and I’ll bet by day three you could chip a tooth trying to gnaw a bite. We didn't try any to find out; I fed the few remaining to the seagulls. The recipe below is for information only, not recommended by this galley cook. I still need a good sourdough cracker recipe, so I’m extra eager to see the successes shared by the other SourdoughSurprises bakers.

(Note: we enjoyed a pan of sourdough sticky buns that same morning, the July challenge topic from SourdoughSurprises. They were incredibly tasty, saving the day and my reputation!)


Sourdough Sesame Crackers
Recipe from Baking with Sourdough by Sara Pitzer

Makes 4 dozen bite-sized crackers

½ cup refreshed and active sourdough starter
2 tablespoons butter, melted
2 teaspoons salt (I’d use much less next time, if there is a next time)
about 1 cup unbleached AP flour (amount depends on the consistency of your starter)
¼ cup white sesame seeds

Melt the butter and set aside to cool.
Add the salt to the flour and whisk to combine.
Add the cooled butter and as much flour as you can work in.
When the dough is very stiff, turn it out onto a floured surface and knead in the sesame seeds, adding more flour as needed to achieve a stiff dough. (Pitzer suggests resting the dough for a few minutes, covered with a damp tea towel, to make it easier to knead.)
When the dough is very stiff, use a rolling pin to roll it out very very thin, 1/16 inch or less.
Cut the crackers with a sharp knife or a sharp, round cutter. Place on an ungreased cookie sheet, separated slightly. Use a fork to poke holes in the tops so they don’t puff up as they cook.
Bake in a preheated 400 F oven until the tops brown slightly, roughly 7 to 10 minutes.
Cool the crackers on a wire baking rack. Store them in an airtight container.


Related Posts Plugin for WordPress, Blogger...