Tuesday, March 20, 2018

Sourdough Cinnamon Raisin Bread with Walnuts


This is not your old school, sweet and soft-textured raisin bread. As a kid I loved an occasional raisin bread treat, a toasted thin slice swirled with barely a hint of sweet cinnamon and raisins. That loaf was fluffy, a close cousin to Wonder bread in taste and texture, and rare enough in our household to be a special treat. This sourdough version isn't even remotely relately to that insipid bread of my childhood. Ahhhh, this raisin bread from Emilie Raffa's book Artisan Sourdough Made Simple offers texture and crunch along with a distinct cinnamon flavor in every bite.

Raisin bread is not a new idea, 
Wikipedia notes "there have been published recipes for bread with raisins since 1671. Since the 15th century, breads made with raisins were made in Europe. In Germany stollen was a Christmas bread. Kulich was an Easter bread made in Russia and panettone was made in Italy. The earliest citation for "raisin bread" in the Oxford English Dictionary is dated to an 1845 article in Blackwood's Edinburgh Magazine."
Raffa's sourdough version changed my view of what raisin bread could be. I took a few liberties with her recipe on my first attempt and still ended up with good results. We are already anticipating the next loaves for breakfast slices and snacks.

Results from the first bake:

Crust: I'll admit that first crunchy bite was a bit of a shock when my food memory anticipated the squishy-soft bread of childhood. RL and I quickly adjusted our expectations and reveled in this altogether new slice. Yes, the crust was crackling hard on day one, but thin enough so no tooth was endangered. After overnighting in a plastic bag, the crust softened somewhat, but remained fairly firm on day two. There was no bread left for further comment, we ate it all quite happily.

Crumb: the interior was soft but not sandwich-bread soft. My first loaves were not as airy as those pictured in Raffa's photo; an issue for this cook to work on. Now that my sourdough Old Faithful is back in active form any missteps are definitely mine.

Filling: the ratio of cinnamon mix, raisins and walnuts was ample, providing a treat to savor in each bite.   

Taste: cool or toasted and spread with just a slather of butter, the bread seemed undersalted. A sprinkle of sea salt on top made a difference. Spread with cream cheese or berry preserves, salt was not an issue. 

Baker's Notes
  • I do not own the long rectangular proofing basket or baking pot specified so formed two smaller loaves instead. One loaf baked in a round cast-iron dutch oven with lid, preheated at 400 F, and the second loaf baked uncovered in a glass loaf pan that was not preheated. The results were remarkably similar.
  • When/if the cinnamon and sugar mix leaks out it will caramelize in spots on the bottom crust to form a rock-hard lava-like blob. Cut that mess away and toss - burnt sugar adds nothing to the bread experience!
  • Soaking the raisins and walnuts did not keep the exposed bits from scorching on my loaves. Next time I will carefully poke them back in before baking. This round I just popped those few bits off before slicing.
With only two of us to indulge in a freshly baked loaf I'll put off a second round of baking for another week or two, but there will be more sourdough cinnamon raisin bread with walnuts in my kitchen soon. Sooner if I decide to share more loaves - anyone nearby want to share?


 Sourdough Cinnamon Raisin Bread with Walnuts

slightly adapted from Emilie Raffa's Artisan Sourdough Made Simple.

makes 2 standard loaves

1/4 cup active sourdough starter
1/4 tsp rapid rise yeast (optional, added for insurance only)
generous 12 oz warm water
rounded 4+ 1/4 cups bread flour (Raffa used bread flour & whole wheat flour)
1+ 1/2 tsp fine sea salt

1/3 cup raisins, soaked to plump
1/2 cup walnuts, chopped large & soaked to soften

1/4 cup granulated sugar
2 rounded tsp cinnamon

Day 1:
Whisk the starter and water together in a large bowl. Add the flour and salt; stir to incorporate. Cover with plastic wrap or a damp tea towel and rest for an hour. While the dough is resting soak the raisins and walnuts in warm water. Note: drain well before using!

Add drained raisins and nuts to the rested dough; knead briefly & gently to incorporate. Add a sprinkle or two of flour to adjust the consistency, as needed. Note: avoid adding too much flour.

Cover the bowl with plastic wrap or a damp tea towel and let rise overnight until doubled in size (or 8 to 10 hours).

Day 2:
Place the dough on a lightly floured board & let rest for 15 minutes or more. Line proofing vessels with flour-dusted towels or sprayed parchment paper. Mix the sugar and cinnamon in a small bowl & set aside.

Flour your hands and stretch half of the dough into a long rectangle. Brush the surface with water & sprinkle the sugar/cinnamon mix evenly over the top. Leave a clean border around the rim for a better seal after rolling. Begin with a short side and roll the dough into a log. Pinch the ends to seal. Move to the proofing vessel with seam side up. Repeat with the remaining dough.

Cover the dough logs and let them rest and rise again, 30 to 60 minutes. They will not double in size. Preheat the oven to 425 while the dough rests. Cut parchment paper to generously fit the baking pots if you used proofing baskets. Put the paper over the baskets, invert and remove baskets. Otherwise gently roll your loaves over, seam side down on their parchment bases. Gently poke any exposed nuts and raisins back under the surface to prevent scorching.

Dust the surface with flour; make 2 or 3 shallow diagonal slashes (shallow to avoid exposing the filling). Use the paper & lift the loaves into their baking pots.

Bake covered 20 minutes on the center oven rack. Remove lid and bake uncovered for an additional 30 to 40 minutes (aim for 190 to 200 degrees F at the center). Remove to a wire baking rack and cool for at least one hour before slicing.
   

Thursday, March 15, 2018

Pressure Cooker Pork Chili Verde


My pressure cooker is seriously underutilized, a handy, timesaving device that stores out of sight and evidently out of mind. It proved its usefulness again recently when I wanted a quick, tasty bowl of chili in under an hour, not several hours from now. Too many of my chili recipes call for browning the meat, then cooking slowly for 2 to 3 hours on the stovetop (or 6 to 8 hours in a slow cooker). Not so this pressure cooker version; after browning the meat, it took just 20 minutes under high pressure to develop both taste and texture. 

RL noted the chili heat needed taming on day one, and unusual response from him, but the bite had mellowed significantly by day two. It took a few tablespoons of sour cream to tame the chile bite for me on both days, but I am an admitted chili heat wimp.


A recipe for Abilene Beef and Bean Chili from a Rick Rodgers cookbook, Pressure Cooking for Everyone, provided guidance as I changed up the ingredients. I substituted pork shoulder for the specified beef bottom round, used 2 Hatch chiles instead of 1 jalapeno and a single tablespoon of Penzeys' awesome Chili 3000 blend rather than 2 tablespoons of anyone else's chili powder, then added tomatillos and fresh orange quarters for a hint more flavor.

The results? Mmmm, that was some tasty peppy chili. The Rogers cookbook is noted for requiring multiple steps, pre-browning or adding ingredients requiring additional after-pressure cooking, but if this chili is any guide then a few extra steps are worth it. Now it's time to try a few more quick pressure cooker recipes. 


Pressure Cooker Peppy Pork Chili Verde

Adapted from Pressure Cooking for Everyone by Rick Rodgers

2 TBS olive oil, divided (more as needed)
2 LBS pork shoulder, cut into 2” chunks
3 cups yellow onion, chopped (roughly 1 large yellow onion)
1 cup sweet bell peppers (not green), seeded & chopped
6 large tomatillos, quartered
2 Hatch chiles, roasted, skinned, deseeded, chopped (or 1 jalapeno)
1 TBS minced garlic
1 TBS Penzeys 3000 chili mix (or ½ TBS ancho chili powder plus 1 tsp each cumin, smoky paprika, dried Mexican oregano, cilantro and lemon peel)
½ tsp salt, more according to taste
2 cups low-sodium beef broth
1 orange, unpeeled and quartered (or 4 mini oranges, halved)
¼ cup masa or yellow cornmeal
2 cans (15-oz each) black beans, rinsed & drained

Suggested optional toppings: fresh tomatilla salsa, sour cream, lime wedges, tortilla chips, fresh cilantro, crumbled queso fresco, red onion, avocado…

Heat 1 tablespoon of the oil over medium-high heat and brown the pork chunks in several batches. Don’t crowd the meat or it will stew instead of searing. Remove to a plate and set aside. Add more oil as needed for subsequent batches.

Discard the excess fat, but leave the browned bits on the bottom of the pan. Heat the remaining tablespoon oil and add the onion, peppers, tomatillos, chiles, and garlic. Cook to soften, stirring often.

Return the pork to the pot along with any juices that accumulated on the plate. Sprinkle with the spices and salt; stir and toss to mix well. Add in the stock; stir and scrape up the browned bits from the bottom. Add the oranges.

Cover, lock the lid in place and bring to high pressure over high heat. Adjust the heat as needed to maintain high pressure and cook for 20 minutes (I used a flame tamer under the pot on my electric element). Do a quick-release, open the lid and let stand for 5 minutes. Remove and discard the orange halves; skim excess fat.

Note: I often use some bone-in pieces and pull the meat out at this point to debone, defat and shred.

Use a small bowl and make a masa slurry, whisking the masa into a generous cup of the cooking liquid. Stir this slurry into the pot and add the beans. Cook over medium heat until the juices thicken a bit; stir frequently to prevent scorching the bottom of the pot. Return the meat chunks or shreds to the cooker; taste and adjust seasonings.

Serve in bowls with optional toppings alongside, or use to fill tortillas.


Sunday, March 11, 2018

Thai-Style Chicken Soup


Chicken soup comforts both body and soul. So it is no surprise that many cultures around the world have their own version; unique with the varying preparations, ingredients and seasonings to account for the world of difference. In my kitchen you'll often find one of these chicken soup recipes simmering away on the stove:


Avgolemono - Greek Lemon Soup

Green Posole with Chicken

Coconut Green Curry Soup

plus an Indian-style Chicken Coconut Curry Soup, and our all-time favorite Mexican Chicken Taco Soup (I can't believe I haven't posted a recipe for this one yet). This month's interest in ginger nudged me toward a Thai-style version of chicken soup with coconut milk. This chicken soup was fast, flavorful and carried enough of a "zip" from the Tom Yum  sauce to keep RL smiling. 

My fridge and freezer usually hold a few containers of cooked chicken, left after roasting a whole bird, pulled from a purchased deli chicken or after I precook a batch of chicken thighs. Chicken soups and chicken enchiladas benefit from this versatile ready-to-use ingredient. 

What's your favorite use of already cooked chicken?  


Thai-Style Chicken Soup
yields 4 servings

2 fat cloves garlic, peeled & minced
2-inch piece ginger root, peeled & minced or shredded
2 TBS canola oil
1 TBS brown sugar
1 tsp Tom Yum sauce or a Thai curry paste (adjust for your level of spicy heat)
1 TBS Thai fish sauce 
1 TBS Gourmet Garden Thai seasoning paste (or 1 tsp each dried cilantro & basil)
1 small onion, peeled & chopped
1 cup red pepper, cored & chopped
1 fat carrot, peeled & sliced thin into rounds
2 ribs celery, strings discarded and stalks chopped
2 cups cooked chicken, chopped
1 can (15-oz) low-sodium chicken broth 
1 can (15-oz) coconut milk (NOT coconut cream!)
2 to 3 heads baby bok choy, cleaned & chopped
salt and pepper to taste
lime wedges for serving

Use a wide-bladed knife or bench scraper to mash the garlic and ginger together into a paste. Heat the canola oil in a medium, heavy-bottomed pot and saute the ginger-garlic mash for a minute or two until aromatic. 

Stir in the brown sugar, Tom Yum sauce, fish sauce and Thai seasoning paste.

Add the chopped onions, red pepper, carrot & celery. Stir to coat and saute for another minute. Add the chicken and stir some more to coat.

Add the chicken broth and coconut milk and bring to a barely bubbling simmer. Taste and adjust seasonings as necessary. Add the baby bok choy and cook for a minute or two until just tender. Ladle into bowls and enjoy at once.

Notes: 
1. Offer lime or lemon wedges to add a citrus pop to each bowl.
2. For hungry appetites, offer a small bowl of rice alongside. The solids are always finished first and the remaining soup liquid works well as a sauce for the rice.   


Wednesday, March 7, 2018

Lemon Ginger Shrimp in Parchment Paper


US wild jumbo shrimp frolicked in my dreams last night. Oh yes, not only in costume but performing silly dances and unbelievable acrobatic feats. Better than a nightmare, this exhibition just might have been inspired by a package of Gulf shrimp that should have been last night's dinner. But the cook was lazy, reheated some spicy soup, and went to bed quite early. Hmmm, maybe I should blame the evening's entertainment on that spicy soup. Today those frisky crustaceans shared the spotlight with some Asian flavors and starred in Shrimp en Papillote... aka Lemon Ginger Shrimp in Parchment Paper.


Local groceries and big box stores offer frozen shrimp sourced from a variety of countries, but I know very little about these other fisheries. Lacking specific knowledge of or confidence in foreign catch and processing methods, I choose US wild seafood, especially Pacific Northwest products, whenever possible. Lucky for me, Seattle holds several quality fish markets with impeccable fresh and frozen seafood. I have previously used this simple method with fish fillets, but admittedly not often. Surprising, since the results were so popular. 


Sturgeon in Parchment

Why not cook shrimp en papillote? Somehow other favorite shrimp and prawn dishes tend to muscle parchment pouchs out of the limelight.


No more understudy role for shrimp in parchment; this dish is ready for star billing.    


Shrimp en Papillote

for 2 servings

1/2 cup Napa cabbage, julienned (or substitute baby bok choy)
1/2 cup cooked rice
1/4 cup green or white onion, sliced thin
1/4 cup carrots, julienned
2" fresh ginger, peeled & cut into 8 coins
10-12 wild jumbo shrimp (size 16-20/lb), shelled & cleaned
salt and white pepper
1/2 lemon, sliced into thin rounds
2 TBS mirin
2 TBS sesame oil
1 TBS ponzu sauce (or use lemon or lime juice plus soy sauce)
2 pieces of parchment paper, roughly 15"x24"

Preheat the oven to 425 F. Set out a baking sheet, ready to transfer the parchment packets to the oven. Fold each parchment sheet in half (now 15x12) and cut a large, fat heart shape.

Spread half of the cabbage shreds on one open sheet of heart-shaped parchment close to the fold line. Spread it out, but leave an inch or two bare along the cut outside edge. Top with half of the rice, onion, carrots and coins of ginger. Add half of the shrimp on top, sprinkle with salt and pepper and arrange half of the lemon rounds over the shrimp. Sprinkle with half of the mirin, sesame oil and ponzu sauce. (Short version: layer half of the ingredients on the paper and sprinkle half of the liquids evenly over the top.)

Fold the other half of the heart over the top, lining up the edges. Begin with the top of the heart (the fat part) at the fold; fold over a short section, pleat and pinch together, press down to seal and repeat the fold/pleat/pinch/press as you work around the edge to the bottom point. Twist the final section to seal and tuck under the pouch to secure it. 

Repeat with the remaining ingredients to create a second packet.

Move the packets onto a baking sheet and place in the center of the preheated oven. Reduce the oven temp to 400 F and bake for 15 minutes (only 10-12 minutes for smaller shrimp). The packets should puff slightly as they cook. (I suggest opening one packet a few minutes early to check for doneness - you don't ever want to overcook shrimp!

To serve, transfer each packet to a dinner plate; use kitchen shears to cut an X on top to fold open. The aroma is tantalizing. Serve with lemon slices and/or Sweet Thai Chile Sauce to drizzle over the packet contents if you like. (I prefer mine plain.


Saturday, March 3, 2018

Lemon Ginger Cookies


...think snickerdoodles, with an attitude.


Continuing on this week with some lemon and gingery things, these cookies were delicious, exceeding all expectations. Slightly chewy golden brown edges... light puffy centers... and a subtle tangyness of lemon and ginger that almost made my tongue tingle. Mmmm, yes! The first dozen disappeared quickly as my favorite taste tester helped me assess the results. We both awarded top honors with two thumbs up.


The recipe should have tipped me off that these little puffs were close to the classic snickerdoodle cookie, but I don't remember ever eating one. Nope, not ever; snickerdoodles were not present in my childhood. I've heard of them since, but never sought them out. A traditional snickerdoodle relies on cream of tartar for additional lift and lightness, and typically calls for chilling the dough before baking for maximum height and minimum spread. I might adjust my approach for the next batch, or not. These little cuties were winners as is.

Random thought: where did that strange name come from? "Snickerdoodle;" it sounds like it might have a Deutsch history... schnecken and knodel? Mmmm, no, not when a schnecken is a snail or rolled bun. I'll stick with calling them Lemon Ginger Cookies.


Lemon Ginger Cookies
adapted from a recipe in Cookie Classics Made Easy

makes approx 4 dozen

Step 1. Preheat the oven to 355 degrees F. Line 2 cookie sheets with a silicone baking pad or parchment paper. Have wire baking racks available. Use a small bowl and mix the optional topping to roll each cookie before baking.
1 TBS ground ginger
1 TBS lemon powder
1 TBS granulated sugar

Step 2. Use a stand mixer, combine the following and mix well, scraping down the sides of the bowl as necessary:
1 cup (2 sticks) softened, unsalted butter
1 cup granulated sugar
2 large eggs at room temperature
2 TBS Greek yogurt (not low fat) 
2 tsp lemon extract
1 tsp vanilla extract
3 tsp ground ginger
1-1/2 tsp baking powder
1 tsp baking soda
1 TBS lemon juice
1/2 tsp salt

Step 3. Add and mix thoroughly to incorporate:
3 cups all-purpose flour

Step 4. Scoop out 1-inch balls of the dough and roll between your fingers to shape and firm. Optional step: roll each dough ball in the flavored sugar topping mix listed in Step 1. Place on cookie sheet with an inch or two between cookies.

Step 5. Bake for approx 15 minutes in preheated 355 F oven until the edges are golden brown. Remove from the oven and let sit undisturbed for a few minutes. Move to a wire rack to cool completely. Store in a covered container.


Note: Unnecessary but tasty finish: drizzle cooled cookies with thin ribbons of a loose 3:1 or 4:1 mix of powdered sugar and lemon juice. 


Thursday, March 1, 2018

Some Lemon and Gingery Things


 What's New In My Feb/Mar 2018 Kitchen


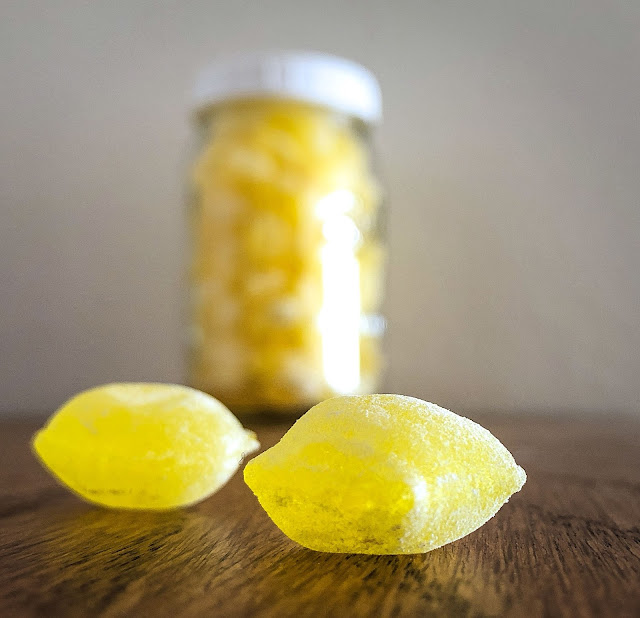
Lemon Drops, a classic hard candy, are reputed to offer some health benefits by stimulating the salivary glands to combat dry mouth, and in minimizing nausea. Medicinal? perhaps, but in February these sugar coated, puckery lemon-flavored candies were an overly tempting snack. I had to order a second bag quickly.  


It's routine to find fresh ginger root plus some sliced, pickled ginger in my fridge, and a jar of powdered ginger in the spice cabinet, but now these standard items have a lot more company in the pantry as I explore ginger's digestive and anti-nausea attributes. I might have been a bit over-enthusiastic in adding more ginger to the kitchen.   


Lemon and ginger cookies and tea breaks have been almost as popular as afternoon naps this month.


Not one of my favorite spices, ginger has always seemed far too pungent, a bully battling to take center stage and overpower other more subtle flavors. That said, I was surprised to find ginger listed in more than a handful of my recipes on the blog. Evidently I enjoy ginger in Asian dishes, in desserts, quick breads, and sauces and more. Note to self: toss those tired old attitudes and embrace new flavors.


I have no clue how Rose Flower Water and Orange Flower Water will work in my kitchen, but I couldn't resist ordering them both when placing an order with a new-to-me spice company. Mmmm, the aroma alone was worth the purchase price. This duo will hang out in the pantry, waiting for a time when I have the energy to search for appropriate recipes and experiment. Madeleines come to mind, but I'm hoping for something more adventurous. Uses/recipe suggestions anyone?


Dark chocolate and nuts - oh my, need I say more?! Who would guess that we first tasted them at a medical clinic? These amazingly delicious bars could become addictive if more than a few ever made it into my kitchen. We currently share a bar, divided carefully in half, and leave no stray bits on the plate. It takes considerable willpower to ignore their large-quantity availability at Costco. Check out the package statement "Ingredients you can see & pronounce" - that's a good thing, but should be the standard for more food items.

That's it for new things in my kitchen lately, it has been a quiet, eat comfort food, snuggle up with a book and a blanket kind of month. Finally the days are growing longer and official Spring is only 20 days away. Bring it on! Now, click over to the monthly IMK roundup at Sherry's Pickings to see what's happening in other kitchens around the globe. You will enjoy the people you meet there. 


Related Posts Plugin for WordPress, Blogger...