Wednesday, June 29, 2011

Crab Pizza


Friends shared some of their crab catch with us recently. (link) What do you do with a big batch of Dungeness crab? It’s surprising how much meat one large crab yields. Multiply that by several critters, and you have crab for a crowd, or several meals for two. There was no question about where to begin. Our first meal was fresh cracked crab, still warm from the steamer, with some melted butter and lemon. The next day we dined on crab Louis salads and crab quesadillas. Faced with one remaining cup of perfect, unbroken leg chunks, I was torn between grabbing a fork to munch my way through the entire pile, or being generous and sharing. I shared.

Crisped bread, crab and cheese are the basics for any crab melt sandwich, but they're also the elements of a crab pizza. This was an opportunity to try using a cast iron skillet to bake two small, individual-sized pizzas. I changed the method slightly for each one. 

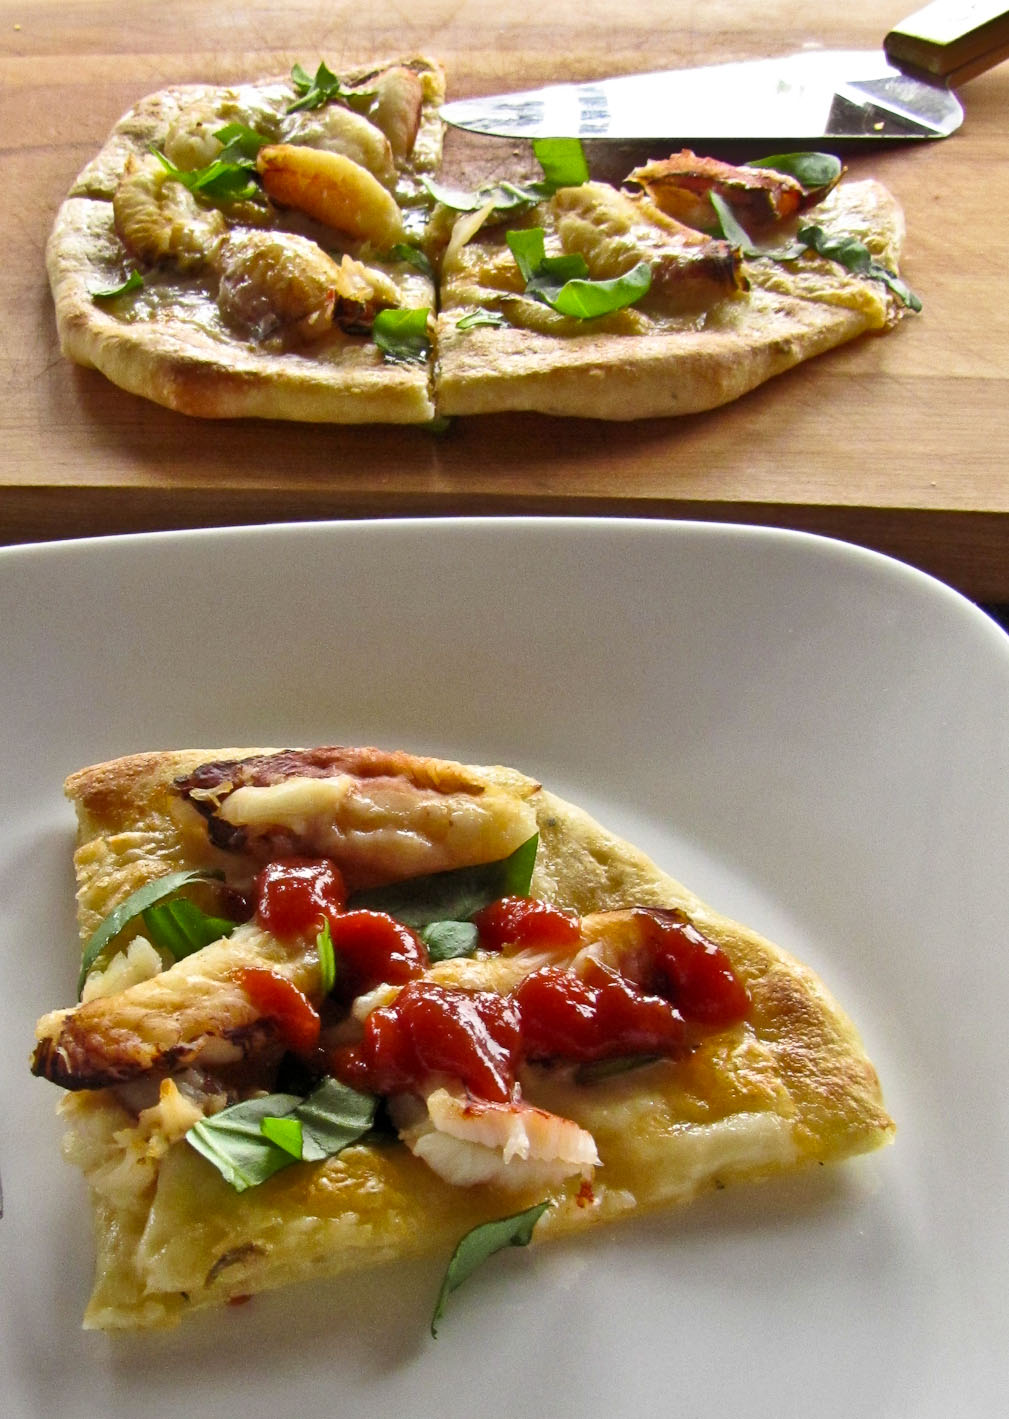
Initially I preheated the skillet in the oven, and then slid the assembled pizza into the oiled pan. Well, that was the plan. The dough didn’t slide well off the board and the crab and cheese tumbled around. I plopped the dough into the pan, put the scrambled toppings back on top and baked the pie for ten minutes at 400F. The top crust needed additional browning, so it went under the broiler for two minutes. Topped with some shreds of fresh basil it was pretty tasty. The dough was tender with a crispy bottom, and the flavors of both cheese and crab were discernible. The Capt. topped his with bottled cocktail sauce and pronounced it “surprisingly good”.  High praise since he’s not usually a fan of crab + anything else. 


For version two I put the same preheated and oiled cast iron skillet on a heated stovetop burner. I cooked one side of the dough until it browned slightly, about two minutes, and then flipped it over. The crab and cheese went on top and the skillet went into the oven for five minutes. One minute under the broiler to brown the crust and bubble the cheese and it was done. Topped with basil this version was good, but not quite as good as version one. I thought the crust was different, more cracker-like, a little tougher, more brittle than chewy. The Capt. said I was being picky and this version was just fine. He did suggest that in the future I apply cocktail sauce, similar to a tomato sauce on a meat pizza. (I don’t think so, not on my crab pizza anyway.)


I will keep tweaking the ingredients and playing with the method, perhaps try grilling it on the barbecue too. Crab pizza is here to stay, whenever there is extra crab meat in the refrigerator.


Crab Pizza version one
2 mini pizzas

One small grapefruit-sized ball of pizza dough (link)
Olive oil (Garlic and herb infused preferred)
Red pepper flakes (optional)
1 cup fresh crab, picked over for shells
1 cup torn pieces of mozzarella (or fontina, provolone or jack cheese)
A small handful of fresh basil leaves, torn or sliced

Cast iron skillet, 8 to 10-inch recommended
  1. Place the cast iron skillet in the oven and preheat to 400F.
  2. Split the dough into two equal chunks and roll each into a ball.
  3. Place the dough on a board lightly sprinkled with cornmeal. Press or roll out into rounds or squares that will fit into your skillet.
  4. Lightly oil the top of the disk of dough.
  5. Scatter a pinch of red pepper flakes across the top. Distribute half of the crab acrosss the top, shred as needed. Distribute half of the torn pieces of cheese across the top.
  6. Remove the preheated skillet from the oven and coat the inside very lightly with olive oil. Quickly and carefully slide the loaded pizza dough into the pan; return the pan to the oven.
  7. Bake at 400 F for 10 minutes, or until browned. Check the bottom crust for color; add additional minutes as needed.
  8. If the top crust is pale, place under a broiler for 1 or 2 minutes until the edges are lightly browned and the cheese is bubbly.
  9. Remove from the oven and transfer to a cutting board. Sprinkle some basil on top; slice into wedges and serve with cocktail sauce alongside. Enjoy.
Note:  
*I use a Bonita Atkins pizza dough recipe (link), but you can use your favorite, or purchase some premade at TJs, a grocery, a deli or an Italian restaurant. 

Saturday, June 25, 2011

Crepes Milanese


Doesn’t this dish just sing out “Spring”? Well, the recipe grabbed my attention when I skimmed an old Sunset 2002 Recipe Annual. I’m a lover of crepes in all presentations; flat stacks of crepes, folded dessert crepes, rolled savory crepes, simple crepes, elegant sauced crepes, filled crepe purses… they are all good.

Then there’s the attraction of vegetables and eggs paired for breakfast or brunch, or lunch, or a light, late supper. I’ve already carried on about breakfast hash with eggs and braised kale with eggs, so it’s no surprise that asparagus and eggs would appeal as well.

This might be a girlie thing, or maybe it’s just me. RL would rather have oatmeal or cold cereal instead of eggs-plus-anything for breakfast, so this isn’t a regular item in my galley. That’s too bad, because it is delicious and looks so scrumptious on the plate. Crepes Milanese must wait for guests, or my solo dining pleasure.

Crepes are simple to make, and make the cook look so accomplished. They freeze and hold well, so I make a large batch for spur-of-the-moment use. Flambe some fruit for a quick crepe dessert. Saute wild mushrooms to fill crepe purses for an appetizer. Fill one with brie and fig jam for a heavenly snack. The list goes on.  


   Crepes Milanese
based on a paperback, Sunset Recipe Annual 2002
Yields: 2 individual servings

Ingredients:
2 large crepes or 4 small crepes**
2 thin slices prosciutto (about 1/4-oz each)
2 large eggs
6 to 8 asparagus spears, rinsed and tough ends removed
3 Tablespoons shredded parmesan or asiago cheese
Salt and pepper to taste

Method:
Butter 2 shallow ramekins (4x6 inch ovals or 4 to 5 inch rounds). Gently fit 1 large or 2 small crepes,dark side up, into each ramekin; the edges will extend over the rim.
Lay a slice of prosciutto smoothly over each crepe.
Crack an egg into a small bowl; then being careful not to break the yolk, slide the egg onto the prosciutto. Repeat for the second ramekin.
Set the ramekins in a 10x15 inch baking pan for easier handling. Bake in a preheated 375 degree oven just until egg yolk is softly set, about 10 minutes.
Meanwhile in a large frying pan, heat 1 inch of water over high heat until it boils. Add asparagus and cook until barely tender when pierced, about 4 minutes depending on thickness of the stalks. Drain.
Divide the cooked asparagus equally between the two ramekins, placing spears beside the eggs. Sprinkle with the cheese, add salt and pepper to taste, and serve immediately.

To take this dish over the top, ladle on a splash of hot pepper hollandaise before serving.


Crepes, a Basic Recipe
Yields: 15 6-inch, 12 7-inch, 8 8-inch crepes

Ingredients:
3 large eggs
2/3 cup all-purpose flour
1 cup milk
About 2 Tablespoons melted butter

Method:
1.  Use a blender or food processor to whirl the eggs, flour and milk until smooth. Scrape down the sides as necessary. You can whisk it by hand, but it is very  tedious that way.
2.  Choose a crepe pan or flat-bottomed frying pan and prewarm it over medium-high heat. When the pan is hot brush the bottom lightly with melted butter.
3.  Before the butter browns pour a premeasured amount of batter into the hot pan; quickly tilt and swirl to coat the bottom. A crepe spreader works wonders here, but I don’t own one. For smaller 6-inch or 7-inch crepes, use about 2 1/2 to 3 tablespoons of batter for each crepe. An 8-inch pan will handle 3 1/2 to 4 tablespoons of batter per crepe.
4.  Cook until the edge is lightly browned and the surface looks dry, usually 30 to 60 seconds.
5.  Run a wide metal spatula under the crepe’s edge and shake the pan a bit to make sure that the crepe is loose. Use the spatula to turn the crepe over and brown it lightly on the second side, about 5 to 10 seconds. Slide the crepe onto a flat plate, or tip the pan to release the crepe.
6.  Repeat with the remaining batter, stacking crepes on top of each other as you finish each.

Notes:
1.  If the pan temperature is just right, the crepes will set up at once, forming tiny bubbles on the surface. If the pan is too cool, there won’t be any bubbles; increase the heat slightly.
2.  Tradition has it that the first crepe will be a throwaway, so don’t panic if it tears.
3.  The batter for thin crepes has the consistency of whipping cream. For thicker, puffier crepe whip the egg whites and fold them into the batter.
4.  Place a sheet of waxed paper between each crepe as you stack if you are cooking crepes ahead of time. This will make them easier to separate later on. They will hold in the refrigerator for up to 3 days.
5.  Wrap a stack of cooled crepes with plastic wrap or store in a ziploc bag to freeze. Be sure to bring crepes back to room temperature before separating and using.

Sunday, June 19, 2011

Almond Sourdough Waffles


What do you serve guests on board for breakfast or brunch? Granola with yogurt works fine for me, but it isn’t special enough for company. Sticky buns are always popular, but pancakes or waffles are favorites as well.


The sourdough pot travels with us on the boat, allotted its own special corner in the refrigerator. It might as well be part of the family, or even a loyal but needy pet. It does require some tending, feeding, occasional TLC and regular workouts, etc. If you aren’t into sourdough that sounds a little weird, right? No matter, it's worth it.

Sourdough bread, pancakes, English muffins, pizza and biscuits are all standard fare in the galley, but lately we have worked on some new waffle variations. We hit on a winner in Almond Sourdough Waffles with Bananas and Syrup. The Capt. requested a scoop of ice cream on top, but he will have to wait until we’re in a town again. Jean's kiwi jam might work here. I maintain the waffles were so tasty they didn’t need whipped cream or ice cream - honest.


 Sourdough Almond Waffles
Based on  Alaska Sourdough,  Ruth Allman

Ingredients:
1 cup Sourdough Starter
1 Tablespoon sugar
2 Tablespoons oil
1/4 teaspoon almond extract      
1 egg
1/8 teaspoon salt
scant 1/2 teaspoon baking soda
1/4 cup slivered almonds
1 sliced banana
pats of butter and warm maple syrup

Directions:
1.  Put the starter in mixing bowl; add sugar, egg, oil and almond extract. Mix well with wood or plastic spoon. (Ms. Allman cautions that sourdough doesn't like metal bowls and utensils) Thin with water as needed.
2.  Dilute the soda in a tablespoon of warm water. Add the baking soda at the last minute, when you’re almost ready for the batter to hit the iron. Fold the soda water gently into the sourdough batter. Do not beat it in heavily, you want to encourage the bubble formation, not defeat it. The batter will fill with bubbles and increase in bulk. It's ready when it is fluffier.
3.  Ladle batter onto a preheated, well-oiled Belgian waffle iron and sprinkle some almonds on top; cover quickly and bake until done. For me that means crispy brown on the outside and soft in the middle.
4.  Serve on a  hot plate; accompany with sliced banana, butter and warmed syrup. Repeat with the remaining batter.
Note: a Belgian style waffle iron isn’t essential, you can use another style, but we love the deep holes that hold extra butter and syrup.


Wednesday, June 15, 2011

Alaska Blogging Note


Hooray! We crossed the border and have arrived in Ketchikan... and do I have some stories, recipes, and photos to share. We're not in any port on a regular schedule this year, and our mobile Verizon HotSpot is not connecting to the internet so posting is sporadic at best. 


I have prescheduled a few posts to publish for the next few weeks, while we are out cruising and having fun. The fun will increase when we start fishing, crabbing and prawning in between kayaking and looking for wildlife. 


I haven't a clue who reads this blog besides some friends and family members, so today's statistic of 5153 views was a huge surprise. Hey, I was surprised when the number reached 500! So, whoever you are, thanks for the visit and please, leave a comment or two sometime.


Tuesday, June 14, 2011

Greens with Potatoes Salad


The Daring Cooks Potato Salad Challenge

Potatoes, MMMMMMMMM, mmmmmmmm. I love them roasted, baked, twice-baked, boiled, steamed, fried, peeled, unpeeled, mashed, smashed, chunked or whole. But I can pass up potatoes wearing a heavy blanket of mayonnaise dressing. Too often that’s the case with potato salads - very heavy with too much goop that overwhelms the flavor balance.

Even warm German potato salad, a tasty no-mayo favorite with its tangy vinegary coating, is a weighty dish. Green salad with dressed potatoes is a solution better suited to my palate. It’s a personal preference. RL requests that his sauced potatoes not touch any leafy greens, so his would be the deconstructed version, plated with a mound of greens and a mound of potatoes and space in between.

Our basic house recipe calls for a simple vinaigrette flavored with tarragon, garlic, fresh parsley and chives and a smidgin of dijon mustard. Use the dressing with the greens, and to lightly coat thin slices or small chunks of warm, cooked potatoes. Add some sliced green onions and a bit more parsley and presto! it’s heavenly. We love it… and then I found the following recipe in my Yummy Potatoes cookbook by Marlena Spieler.

Oh my, here’s a new contender for number one greens with ‘tater salad honors. The DaringCooks Challenge for June pushed me into experimenting with a Salade Tiede recipe, messing around with ingredients and taste testing with enthusiasm. Blue cheese? OK, but I prefer a mild feta or no cheese at all. Crispy bacon chunks? Terrific, of course, if used with restraint. Roasted garlic mashed with some butter? Wow! really good as a substitute for the bacon. Coarse-ground Plochman’s mustard or light honey-Dijon? They both work, just don’t use yellow hot dog mustard. Frisee, mixed greens or romaine? Use whatever’s available, though frisee has a nice bite and it is the most attractive, holding up well with the potatoes and dressing. The DC Challenge is for a healthy potato salad, so my use of bacon or butter is problematic. Too bad. It's my galley so I'm working with boat rules.

Here is the latest version, though it is still a recipe under development (depending on what's in the pantry). Don't be confused by the choice of bacon or butter and garlic. Try it both ways and see which you prefer. Either choice yields a delicious potato salad.


 Greens with Potatoes Salad 
Inspired by Salade Tiede from Yummy Potatoes by Marlena Spieler
"Browned nuggets of bacon, tender bites of potato, crunchy bitter greens, and tangy, very tangy warm dressing..."

Serves 4

12 ounces small red potatoes
1 head frisee or other lettuce, cut into bite-size pieces (I used romaine)
2 green onions, thinly sliced, green and white parts
a scattering of feta or blue cheese, cut into small half-bite morsels (optional)
2 tablespoons extra-virgin olive oil, divided
1 tablespoon mild German or Dijon mustard (I used both grainy German and honey-Dijon)
3 tablespoons white wine vinegar (or seasoned rice vinegar)
1 tablespoon chopped fresh tarragon, or 1/2 teaspoon dried (dried)
4 slices lean diced bacon (or skip the bacon and go with 1/2 bulb roasted garlic mashed into 2 tablespoons butter)
Salt and freshly ground pepper
Fresh parsley, roughly chopped 
Lemon zest and lemon juice to top

1.  Parboil the potatoes until almost cooked through. Drain and set aside.
2.  Spread the greens on a serving platter. Sprinkle with the green oniions, cheese if used, and 1 tablespoon of the olive oil.
3.  Combine the mustard, vinegar and tarragon; set aside.
4.  When the potatoes are cooler but still warm, cut into 1/2 inch slices.
5.  Heat the remaining olive oil in a large, nonstick heavy skillet over medium-high heat. Add the garlicky butter and let it melt 
(OR  skip the garlic and butter, add the bacon pieces and crisp them up a bit),
then push to the side. Add the potatoes in a thin layer and brown over medium-high heat, turning a few times to brown evenly.
6.  Meanwhile drizzle half the mustard vinegar over the salad.
7.  Push the potatoes (and bacon) to one side of the pan, and add the remaining mustard vinegar. Reduce by half over high heat, turning the potatoes once or twice.
8.  Pour the potatoes with the bit of reduced dressing left in the pan over the salad. Sprinkle with salt and pepper to taste, top with parsley, lemon zest and a squeeze of lemon juice if desired. Serve immediately, while the potatoes and dressing are still warm. 
Then sit back and wait for the raves! Let me know the variations you come up with.


Note: I'll be cruising somewhere in Alaska when this post is due to be published. Internet access is scarce in between towns, so I cooked ahead for this DC Challenge. Check out our cruising adventures on the other blog, CruiseNews.

Blog checking note: Jami Sorrento was our June Daring Cooks hostess and she chose to challenge us to celebrate the humble spud by making a delicious and healthy potato salad. The Daring Cooks Potato Salad Challenge was sponsored by the nice people at the United States Potato Board, who awarded prizes to the top 3 most creative and healthy potato salads. A medium-size (5.3 ounce) potato has 110 calories, no fat, no cholesterol, no sodium and includes nearly half your daily value of vitamin C and has more potassium than a banana!

Friday, June 3, 2011

We're Cruising! See you soon.


We're off on another adventure, leaving the dock tomorrow morning at 0700 and heading north... finally. It may be a while between wi-fi links as we cruise the waters between Campbell River, B.C. and Ketchikan, Alaska. So check back in a week or ten days to catch up on what's cooking in the galley.  

Wednesday, June 1, 2011

Blueberry Almond Biscotti


I needed an antidote to the dreary weather we've had this year. What do you do when Spring is cool, gray and damp? day after day? week after week? I know, I know - "ignore the weather" is the recommended Pacific Northwest option. Go outside and do something fun or useful. But my inner California Girl core yearns for sunny Spring weather that lasts longer than one day in a row.


The Capt. put on his rain gear and installed a new bilge pump in the dinghy, but I chose to remain inside, busy in the galley where I could bask in the warmth of the oven. I thought the bright flavor of lemony blueberry biscotti might boost my spirits. Baking could add a little cheer to the day, while I waited for Mother Nature to take the hint. 

Surprise! it almost worked! The clouds lifted after lunch, spots of blue sky appeared (overhead at least) and the rain stopped. It was a temporary, but a very welcome occurrence. Hmmm, these could be awesomely powerful cookies. Maybe I should bake more often.


Blueberry Almond Biscotti
adapted from a Giada De Laurentiis recipe for Holiday Biscotti
Yield: 2 dozen cookies
Prep Time: 25 minutes                         Cooking Time: 55 minutes (split)

2 cups all-purpose flour
1 1/2 teaspoons baking powder
3/4 cup sugar
1/2 cup (1 stick) unsalted butter, room temperature
1 teaspoon grated lemon zest (or 1 tsp lemon extract)
1/4 teaspoon salt
2 large eggs
3/4 cup almonds, thinly sliced or coarsely chopped
2/3 cup dried blueberries (I love the Costco packages)
1 tablespoon granulated sugar to sprinkle top (optional) 


  1. Preheat the oven to 350 degrees F. Line a baking sheet with parchment paper or use a silpat. 
  2. Whisk the flour and baking powder together in a medium-sized bowl: set aside. Using an electric mixer, beat the sugar, butter, lemon zest or extract, and salt in a large bowl until well-blended. Beat in the eggs one at a time. 
  3. Add the flour mixture and beat just until blended. Fold in the almonds and blueberries.
  4. Wet your hands slightly (to keep the dough from sticking) and form the dough into a log, about 13-inch long, 3-inch wide, on the prepared baking sheet. Sprinkle lightly with sugar, if you choose. 
  5. Bake until light golden, about 40 minutes. Cool for 30 minutes.
  6. Place the log on the cutting board. Using a very sharp serrated knife, cut the log on a diagonal into 1/2 to 3/4-inch-thick slices. 
  7. Arrange the slices, cut side down, on the baking sheet. Bake the biscotti until they are pale golden, about 15 minutes. Transfer the cookies to a rack and cool completely.
The biscotti hold well. Store them in an airtight container for up to 4 days, or wrap them in foil and freeze in resealable plastic bags up to 3 weeks... but only if you have strong willpower and no one else finds the secret stash.


Notes: the original recipe called for... 
   - dipping one end of each biscotti into melted white chocolate. I skip that part since we prefer them undipped, but a stiff frostinglike lemon juice and powdered sugar mix for dipping would be quite tasty. 
   - adding dried cranberries and pistachios instead of blueberries and almonds. We enjoy that version equally as well. 

Related Posts Plugin for WordPress, Blogger...