Showing posts with label pizza. Show all posts

Sunday, September 7, 2014

Ship-to-Shore Stromboli


I arrived back in town just in time to add my post to The Secret Recipe Club linkup for September. Luckily I had already bookmarked and tried a handful of recipes from my assigned blog, A Spoonful of Thyme. What a fun blog to browse! It's obvious that blog author Kate enjoys good food, family and travel, totally loves cooking and has a varied palate. Minted Watermelon Granita hit the right note on a warm summer day. Just thinking about Chicken and Grilled Peaches with Chipotle Peach Dressing makes my taste buds sing. Crab, Avocado and Mango Towers stack three of my favorite foods for an impressive presentation. Stromboli elbowed its way to the top of the must-share list, a comfort-food kind of recipe to prepare for family and friends. As Kate notes:  
Cooking is a wonderful way to bring family and friends together to enjoy food and each other. With a good recipe and "a spoonful of thyme" wonderful things can happen! 
I made a few changes to Kate's recipe, working with ingredients already on board in the boat fridge and pantry, but versatility is one of the great features of stromboli. Think rolled pizza and the possibilities seem endless. My version used homemade pizza dough rather than the recommended Pillsbury pizza dough in a tube,  and I added a handful of fresh basil and a bit of olive tapenade to the filling. We skipped the optional marinara dip and didn't miss it. The stromboli was terrific, impressively flavorful without additional saucing.  


Make your favorite herb-flavored pizza dough, or work with a tube of prepared dough.

While the dough is resting, caramelize a sweet onion.

Chop up some fresh herbs; basil, parsley and thyme are my favorites.

Roll out the dough into a rectangle and scatter olives and onions on top, leaving a 1-inch border on all sides. 

Add salami and capicola, provolone or other soft  cheeses.

Toss on a handful of fresh herbs and roll into a cylinder, sealing all edges firmly.

Brush lightly with flavored olive oil and sprinkle with fresh shredded Parmesan cheese.

Bake until the crust is golden, then remove to a baking rack to cool before slicing.


Struggling to let the stromboli rest long enough for the cheese to tighten up and the crust to firm enough to slice, I just had to sneak the first piece... and blistered my mouth. Beware of hot, melted cheese! The two of us enjoyed half of the still-warm loaf at dinner, with a side of Greek Salad. Slices from the remaining half provided a ferryboat lunch the following day. This sandwich roll will be a popular snack for game day this Fall, a delicious, filling and easy-to-handle tailgate item. (Go Hawks!) (Go Dawgs!) Check out Kate's recipe for "Queen B. Stromboli" (the original recipe), use the recipe below, or get creative with a selection of different fillings. Whichever you choose, enjoy! Mangia! Mangia!


Ship-to-Shore Stromboli

For the stromboli:
pizza dough, recipe below
2 Tablespoons tapenade (olive spread)
1 onion, sliced & cooked till golden
Provolone, deli sliced
Genoa salami
Capicola
Fresh basil, shredded 
2 Tablespoons herb and garlic flavored olive oil
2 Tablespoons grated fresh Parmigiano
marinara sauce for dipping, optional

Roll the dough into a rectangle 1/8 - 1/4 inch thick. Leaving a one inch border, spread the tapenade and cooked onion over the dough. Layer the cheese, salami, capicola and basil evenly over the tapenade.

Starting at the long end, roll up the dough into a cylinder, pinching the ends and edges to seal; place on a parchment-lined baking sheet.

Brush the top lightly with herb and garlic flavored olive oil. Sprinkle with grated parmesan cheese.


Bake in a preheated 425 degree F oven until fragrant and evenly golden, 12 to 15 minutes. Transfer to a baking rack to rest until the cheese sets up a bit. Slice and serve with warm marinara sauce for dipping if desired.


For the pizza dough:
2 Tablespoons active dry yeast
1 ½ cups warm water (abut 110-115 F)
1 Tablespoon honey
2 cups AP white flour (more as required)
1 cups semolina flour
1 tsp salt
2 Tablespoons mixed Italian herbs 
2 TB extra virgin olive oil
Additional all-purpose flour as needed

In a mixing bowl, dissolve the yeast in the warm water. Add the honey and the AP flour. Beat vigorously for 1 minute. Dough should be the consistency of a thick cake batter. 

Place a cup of water in the microwave and heat it for 3-4 minutes. Place the bowl of dough in the warm oven, close the door quickly, and let rise. (OR just let the dough bubble and rise, covered lightly, in a warm spot in your kitchen.)

At the end of 30 minutes, stir down the dough and add the semolina flour, salt, olive oil and herbs. Mix well. Place dough on a floured surface and knead well for about 8 minutes, adding additional AP flour only as needed to keep dough from sticking. Form dough into two balls. At this point, freeze the dough for later use or make it into pizzas or stromboli immediately.

Each ball should make one long, thin-crust stromboli, about the size of a baguette, or 2-4 smaller, individual loaves. Knead each ball into a ½-inch-thick disk. (if you are making smaller stromboli, cut each ball in half before kneading). 


Thursday, May 30, 2013

Sourdough Crust Pizza


We had a near tragedy earlier this month when the refrigerated sourdough starter was too long ignored. That all-important mass of flavorful dough threw off liquid (hooch) and sat sulking, inert and non-bubbling, for hours after being fed. So I fed it again... and again... and eventually it responded with some enthusiasm. Disaster averted, but the whole exercise left me with a lot of sourdough starter hanging out in the kitchen. 

A serendipitous wander through the internet led me to Sourdough Surprises," a fun monthly baking group who strive to use sourdough starters for things besides bread". Well now, count me in on the fun. One portion of that extra starter led to amazingly good chile-enhanced Mexican Sourdough Chocolate Brownies for the group's May linkup. Next came inspiration from the Sourdough Surprises archives for a savory dish, Sourdough Pizza. This was an opportunity to try a sourdough pizza crust without adding any commercial yeast. 


The base recipe came from Sourdough Home, an incredible resource for all things sourdough. I added some herbs and seasonings to the dough, and then followed two different methods suggested for baking. 

Method A: Roll out dough and rebake a naked crust for five minutes at 450 - 500 degrees F. Add toppings immediately or at some later time and bake again.
Method B: Roll out dough, add toppings and bake immediately until crust browns and the cheese melts.


Photo: Sourdough patted into a 10-inch round
Photo: Prebaked sourdough crust with red sauce added
Photo: Coins of Basque chorizo sausage are a favorite pizza topping
Photo: Both baking methods produced a too-puffy edge
The resulting pizzas were both tasty, but differed somewhat in texture. For me pizza success is all about the crust. Method A produced an irregular puffy crust that was a bit challenging to sauce. The super-puffy edge held a slightly undercooked core after baking while the bottom crust was well-browned and crisp. That didn't stop me from cutting a few slices to devour sample and enjoy. Method B produced a flatter center with an airy, puffy edge. RL raised his eyebrows, shook his head, and announced I had imagined any textural difference. He focuses on the toppings, preferring a much thicker base of red sauce, but judged both pizzas to be equally good. Next time I will roll out a flat base and skip the raised edge.This was a fun experiment, altogether surprising in how much oven spring occurred. Sourdough pizza crust could become a regular go-to item in this household.

Too much starter turned out to be a very good thing.


Sourdough Crust Pizza  
recipe adapted from Sourdough Home

1.5 cups sourdough starter, well-fed and rested

1 tablespoon olive oil + a bit more to rub onto the shaped crust
1 teaspoon salt
1 teaspoon each dried basil and oregano
1/4 teaspoon garlic salt
1.5 cups AP flour

  1. Mix the first 5 ingredients together, starter through garlic salt, blending thoroughly. Add the flour by half cups, working it in until incorporated and you have a soft dough. Quantities will vary depending on the consistency of your starter, so adjust as needed. If  too dry, add some more starter or a little water, but avoid adding too much more flour. You want a soft, slightly tacky dough. (I like to knead the dough at this point until I feel the texture change, roughly 5 minutes for this batch.)
  2. Let the dough rest for 30 minutes, covered loosely with plastic; it may lighten but don't expect it to raise much. (60 minutes in my cool kitchen)
  3. Preheat the oven to 450 - 500 F, depending on your ovens capabilities.
  4. Roll or pat the dough out into a round shape, thin or slightly thick depending on your preferences. (I patted the dough into two 10-inch pizzas with a slightly raised rims.) Cover loosely with plastic and let rest for 30 minutes.
  5. Optional: Prebake the crust by sliding the shaped dough onto a heated stone in the oven for about 5 minutes. Remove the pizza crust from the oven and rub a bit of olive oil on top of the crust to keep it from getting soggy. (OR skip step 5 and move on to step 6.)
  6. Top with whatever toppings you like and (return to the oven to) bake for about 12-15 minutes, or until the crust is golden and the cheese is melted.

Tonight's Toppings, per each 10" pizza
1/2 cup thick red sauce, homemade or commercial
1 Basque chorizo sausage, sliced in thin coins, precooked & drained
1/4 cup red onions, caramelized
3 yellow mini sweet peppers, sliced in thin rings
kalamata olives, sliced
1/2 cup shredded mozzarella
handful of fresh basil leaves, julienned

Wednesday, June 29, 2011

Crab Pizza


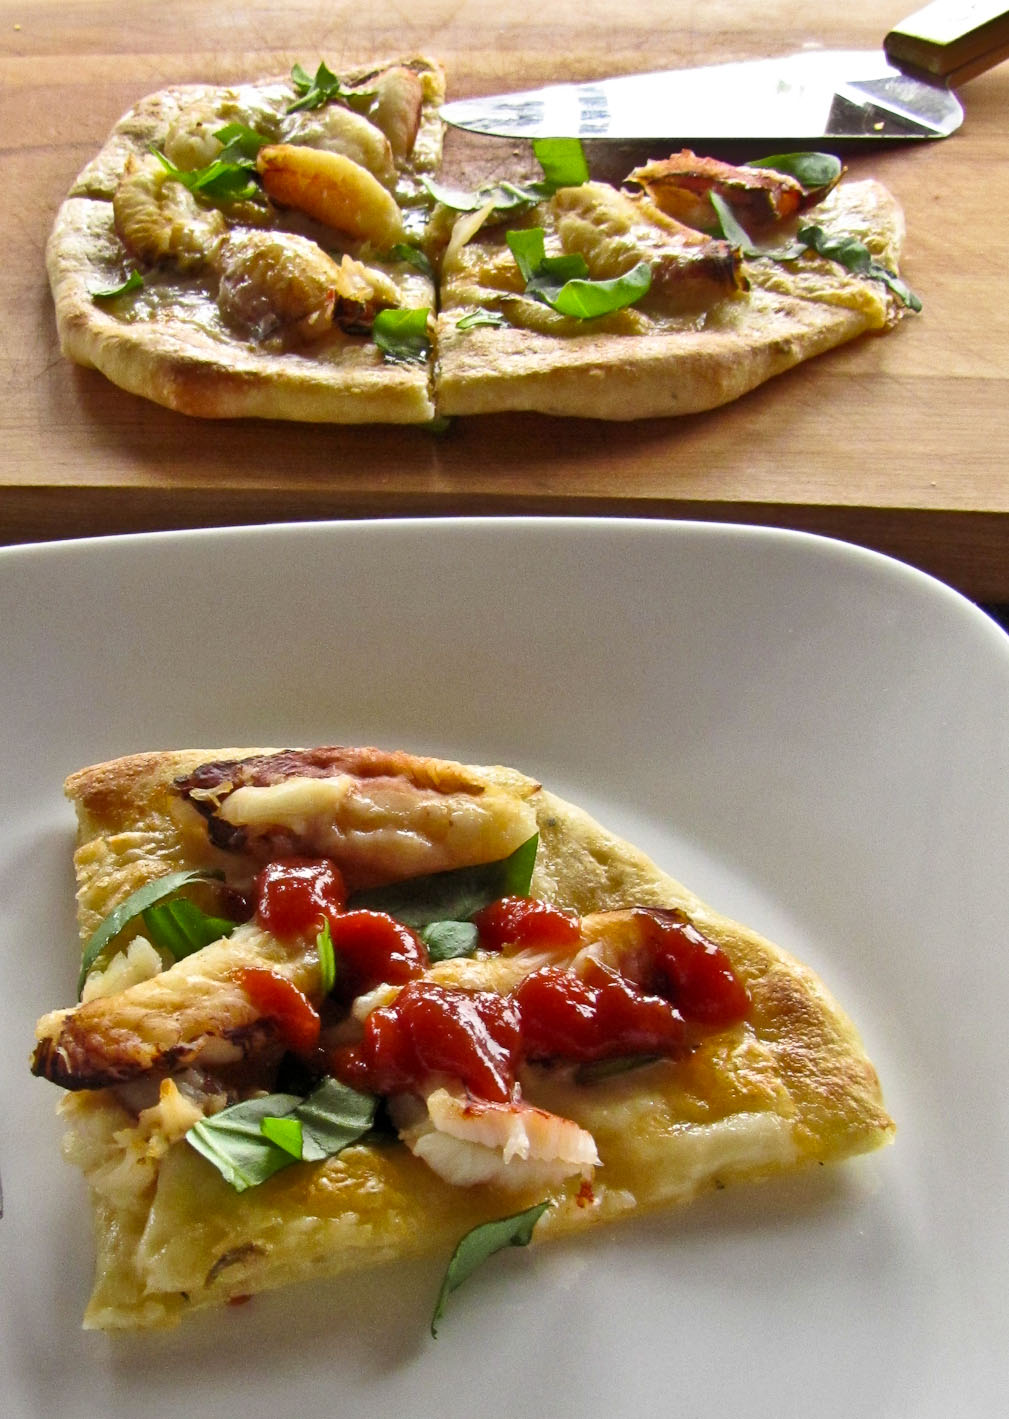
Friends shared some of their crab catch with us recently. (link) What do you do with a big batch of Dungeness crab? It’s surprising how much meat one large crab yields. Multiply that by several critters, and you have crab for a crowd, or several meals for two. There was no question about where to begin. Our first meal was fresh cracked crab, still warm from the steamer, with some melted butter and lemon. The next day we dined on crab Louis salads and crab quesadillas. Faced with one remaining cup of perfect, unbroken leg chunks, I was torn between grabbing a fork to munch my way through the entire pile, or being generous and sharing. I shared.

Crisped bread, crab and cheese are the basics for any crab melt sandwich, but they're also the elements of a crab pizza. This was an opportunity to try using a cast iron skillet to bake two small, individual-sized pizzas. I changed the method slightly for each one. 

Initially I preheated the skillet in the oven, and then slid the assembled pizza into the oiled pan. Well, that was the plan. The dough didn’t slide well off the board and the crab and cheese tumbled around. I plopped the dough into the pan, put the scrambled toppings back on top and baked the pie for ten minutes at 400F. The top crust needed additional browning, so it went under the broiler for two minutes. Topped with some shreds of fresh basil it was pretty tasty. The dough was tender with a crispy bottom, and the flavors of both cheese and crab were discernible. The Capt. topped his with bottled cocktail sauce and pronounced it “surprisingly good”.  High praise since he’s not usually a fan of crab + anything else. 


For version two I put the same preheated and oiled cast iron skillet on a heated stovetop burner. I cooked one side of the dough until it browned slightly, about two minutes, and then flipped it over. The crab and cheese went on top and the skillet went into the oven for five minutes. One minute under the broiler to brown the crust and bubble the cheese and it was done. Topped with basil this version was good, but not quite as good as version one. I thought the crust was different, more cracker-like, a little tougher, more brittle than chewy. The Capt. said I was being picky and this version was just fine. He did suggest that in the future I apply cocktail sauce, similar to a tomato sauce on a meat pizza. (I don’t think so, not on my crab pizza anyway.)


I will keep tweaking the ingredients and playing with the method, perhaps try grilling it on the barbecue too. Crab pizza is here to stay, whenever there is extra crab meat in the refrigerator.


Crab Pizza version one
2 mini pizzas

One small grapefruit-sized ball of pizza dough (link)
Olive oil (Garlic and herb infused preferred)
Red pepper flakes (optional)
1 cup fresh crab, picked over for shells
1 cup torn pieces of mozzarella (or fontina, provolone or jack cheese)
A small handful of fresh basil leaves, torn or sliced

Cast iron skillet, 8 to 10-inch recommended
  1. Place the cast iron skillet in the oven and preheat to 400F.
  2. Split the dough into two equal chunks and roll each into a ball.
  3. Place the dough on a board lightly sprinkled with cornmeal. Press or roll out into rounds or squares that will fit into your skillet.
  4. Lightly oil the top of the disk of dough.
  5. Scatter a pinch of red pepper flakes across the top. Distribute half of the crab acrosss the top, shred as needed. Distribute half of the torn pieces of cheese across the top.
  6. Remove the preheated skillet from the oven and coat the inside very lightly with olive oil. Quickly and carefully slide the loaded pizza dough into the pan; return the pan to the oven.
  7. Bake at 400 F for 10 minutes, or until browned. Check the bottom crust for color; add additional minutes as needed.
  8. If the top crust is pale, place under a broiler for 1 or 2 minutes until the edges are lightly browned and the cheese is bubbly.
  9. Remove from the oven and transfer to a cutting board. Sprinkle some basil on top; slice into wedges and serve with cocktail sauce alongside. Enjoy.
Note:  
*I use a Bonita Atkins pizza dough recipe (link), but you can use your favorite, or purchase some premade at TJs, a grocery, a deli or an Italian restaurant. 

Friday, October 29, 2010

The Muffuletta Stromboli


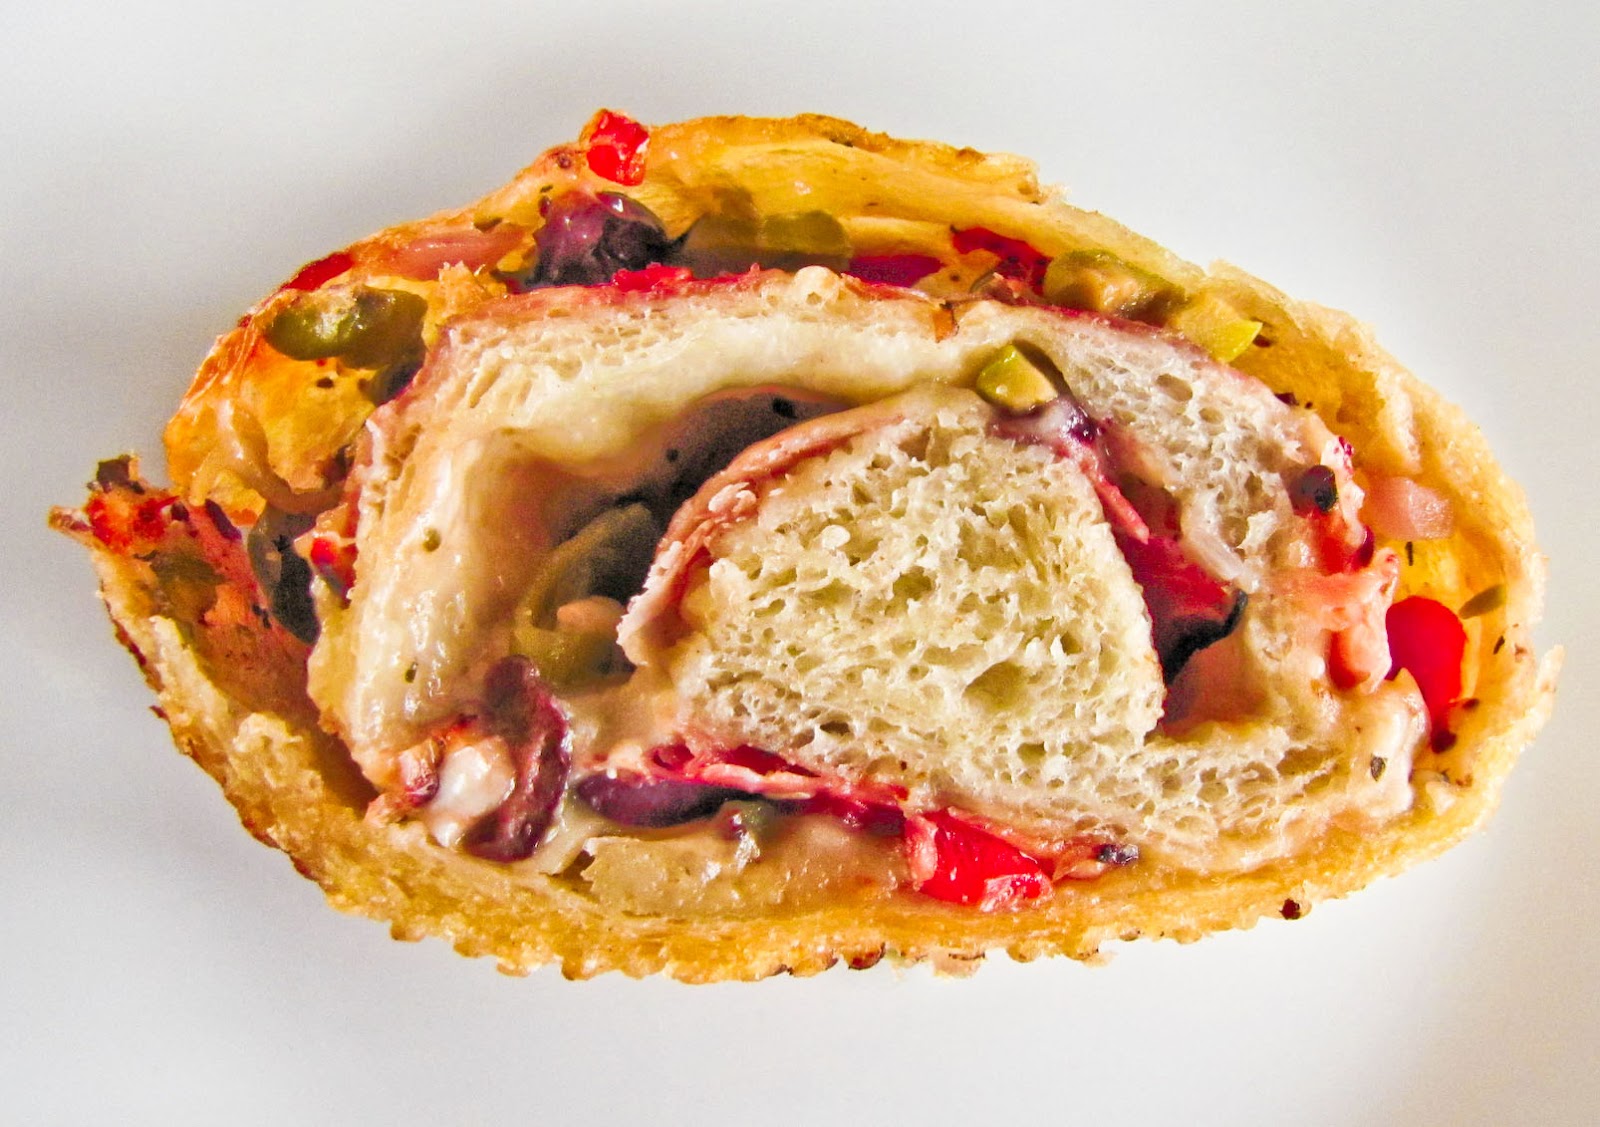
Was it Cajun-Italian fusion confusion? No, more like an off the wall notion that worked, utilizing bread dough and a variety of savory items already in the fridge. Our muffuletta-filled stromboli offered a delicious combination of flavors that played off the contrast between a tangy, salty olive salad and the mellow richness of cheese; all that layered with a smokey, cured meat and snuggled in a roll of fresh bread. The results were even better than anticipated.

Earlier this week I made a full recipe of French bread instead of the usual half-batch. What was I thinking? all that bread for two people! After the dough’s first rise I formed two baguettes for immediate use and put the rest of the dough, almost half a batch, into a covered plastic tub. I popped that container into the refrigerator … and promptly forgot about it.


Three days later I pulled the dough out and wondered,” now what?”. We didn’t need any more bread in the galley, but it seemed a shame to waste it. While the dough came to room temperature, I scanned the contents of the refrigerator. How did so many partially filled jars and bottles accumulate in just five months? And how many could I use up this week, before clearing the fridge for winter?

I grabbed that tub of bubbly bread dough, jars of black olives, green olives, capers, garlic, pepperocini, and roasted red peppers, plus some red onions, sliced meat, assorted cheeses - hmmmmmm. Muffuletta sandwiches came to mind, and so did Italian Stromboli. All right! a combination of chopped savory filling rolled up inside a bread wrapping might work. It would be a muffuletta sandwich baked Stromboli style. Fast forward to the taste test - it was a hugely popular success, with us and our neighbor Trish who was a willing volunteer.


How did it all come together? 


1. The first step was to mix up an olive salad using only the ingredients on hand. I didn’t need any more half-full jars to add to the existing collection, and anyway it was too stormy outside to walk to the store. It would have been nice to have some fresh Italian parsley, carrots and celery to add to the mix, but it tasted just fine without them.

2. Next I patted and rolled out the dough into a rectangle, it’s long side a few inches shorter than my baguette pan.


3. Using a slotted spoon and about half of the olive salad, I spread a thin layer over most of the dough leaving an empty one-inch border all around.

4. Then paper-thin slices of Bauernschinken, a German prosciutto-like cured meat with smokey edges, topped the olive salad. Two rows of cheese, thin slices of mozzarella and provolone, reached across from side to side, looking like pair of fat, yellow suspenders.

5. I had stretched the dough a little too thin, so rolling was a challenge. It took two hands and some coaching from the Capt. to form a firm cylinder, rolled from long side to long side. (Next time I’ll make several smaller rolls) The naked borders were pinched together to seal the roll at each end and along the long seam; my attempt to minimize the leakage of filling and oils.

6. The filled dough rested, covered, in an oiled baguette pan for about an hour, plumping up nicely. Sliced on top like any other baguette and brushed with beaten egg white, it was ready to bake in a preheated 400 F oven for 35-40 minutes.

Notes to self: 
  1. Roll the dough out a bit thicker and create a vent or two to avoid blowouts. 
  2. Make the rolling process easier by creating several individual-sized sandwiches.
  3. Don't ignore the dough for three days. 


Olive Salad Recipe

1 cup pimento stuffed green olives, roughly chopped
1 cup black olives, kalamata or Nicoise or a mix, pitted and roughly chopped
2 Tbs capers, chunked
1/2 cup roasted red peppers, roughly chopped
1/2 cup red onion, scallions or a mix, roughly chopped
6 pepperocini, stemmed, seeded, drained and roughly chopped
1 Tbs garlic, minced
1/2 Tbs dried oregano or basil or a blend of both
a sprinkle of celery seed
a pinch of red pepper flakes
a handful of fresh Italian parsley, chopped, if you have some (I didn’t)
1/4 cup olive oil
1/4 cup canola oil
freshly ground black pepper, to taste

Add all ingredients to a large bowl and mix well. Refrigerate for several hours to blend the flavors. Resist the temptation to nibble, if you can.


What did I do with the rest of the olive salad? 


It could have been a terrific addition to pasta or even topped a pizza, but instead we made mufuletta sandwiches. 


Photo: Guess who ate the open-faced appetizer sandwich...


Photo: ... and guess who went for the fully-loaded, heated muffuletta.


Last minute thoughts:
  1. Slices are best eaten warm, but they were still tasty when covered and heated briefly in the microwave.
  2. This was easy using my bread dough, but it would work using a tube of packaged dough - in case of an appetite emergency, you understand. 

Saturday, May 29, 2010

Thin Crust Pizza


Sauteed red pepper, carmelized onion, sausage, and olive pizza


We eat a lot of seafood while we cruise - I mean a LOT of seafood, just-caught and fresh from the saltwater seafood. We catch enough to eat, but don't can or even freeze any to keep long-term. Nothing beats really fresh fish (or crab or shrimp), so we rarely eat any seafood during the winter.  


Ah, but it's a different story with a few other food items, like pizza. Pizza is essential, and I crave it year round - on the boat, at the house, on a trip, it doesn't matter where. But bad pizza is worse than no pizza, so we dine most often on homemade pizza. While afloat we've enjoyed crab pizza, smoked salmon pizza, halibut pizza and of course, the usual vegie, cheese and/or meat varieties. (Note to niece Hilary: I'm still working on the sauce for the halibut version.)


We're especially fond of thin-crust pizza, and have an ever-changing list of  favorite toppings. The toppings may change, but the crust rarely varies. Well, except for the herbs I might add to the dough. The basic dough recipe is simple and can handle a few adjustments with no problem. I keep trying new dough recipes, but haven't converted to another one yet. 


The latest tweak to the dough used garlic and rosemary flavored olive oil and a heaping teaspoon of mixed Italian herbs (oregano, basil, etc.). Other batches have substituted 1/4 cup sourdough starter for equal amounts of water and AP flour, and decreased the amount of dry yeast. An overnight rest, followed by a countertop rise made for a terrific variation. 


The Capt. requires red sauce for a pizza to be real. I'm fond of white sauce, or sometimes no sauce. So we compromise, with a half-and-half or two individual pizzas. Pizza dough doesn't care, it adapts. 


Could there be an anchovy lurking in this mix?

Here's my basic pizza dough, slightly adapted from a recipe by Bonita Atkins in Pasta & Co. Encore, a gem of a 1996 cookbook.


Bonita Atkins's Pizza Crust

Ingredients
2 pkg (1/4 oz each) dry yeast
1 ½ cups warm water (abut 115 F)
1 tsp sugar
1 ½ cups AP white flour
1 ½ cups semolina flour
1 tsp salt
2 TB extra virgin olive oil
Additional all-purpose flour as needed
Olive oil, cornmeal or additional semolina flour, and toppings of your choice for baking pizza

In a mixing bowl, dissolve the yeast in the warm water. Add the sugar and the AP flour. Beat vigorously for 1 minute. Dough should be the consistency of a thick cake batter. (A food processor or stand mixer works well here.)

Turn oven to 150 F. Open oven door, pull shelf partway out, and place dough on the shelf to rise for 30 minutes. Do not cover dough. (OR place a cup of water in the microwave and heat it for 3-4 minutes. Place the bowl of dough in the warm oven, close the door quickly, and let rise.)

At the end of 30 minutes, stir down the dough and add the semolina flour, salt, and olive oil (and optional herbs, if used). Mix well. Place dough on a floured surface and knead well for about 8 minutes, adding additional AP flour only as needed to keep dough from sticking (OR use a dough hook and stand mixer). Form dough into two balls. At this point, you can freeze the dough for later use or make it into pizzas immediately.

Each ball should make a thin-crust 13-inch pizza or a thick-crust 7-inch pizza. Knead each ball into a ½-inch-thick (if you are making smaller pizzas, cut each ball in half before kneading).

Makes crust for two 13-inch pizzas.

There's a fork in the photo, but fingers are preferred.

When Ready to Make Pizza:
Peheat oven to 500 F. Lightly brush a heavy-grade baking sheet with olive oil and dust with either cornmeal or semolina flour. (Perforated pans are recommended; lightweight pans won't produce a crispy crust.)

Place dough on prepared baking sheet and press or roll to desired thickness (usually 1/8 to 1/4 inch thick). If dough resists, let it rest for a few seconds, then continue pressing. (If using a pizza stone, place dough on a cornmeal-dusted wooden peel, form dough, add toppings, then slide it onto the preheated stone to bake.)

Add your choice of toppings, spreading evenly and being careful not to overload the center of the pizza. (I typically spread a very light touch of olive oil on the dough, add some meltable cheese like fresh mozzarella, add dabs of red sauce for the Capt, lightly scatter other toppings, and then finish with shreds of Parmesan.

Bake on lowest shelf of preheated oven for 10 minutes, or until toppings are golden and crust is well-browned (be sure to check bottom of crust). Remove to cooling rack, let cool briefly to set up the cheese, slice and enjoy.

Related Posts Plugin for WordPress, Blogger...