Thursday, November 28, 2013

Turkey and Cheese Enchiladas Verde


We mixed it up this year and enjoyed turkey leftovers on Thursday, waiting to officially celebrate Thanksgiving on Friday. Flight schedules and weather get the blame - or credit - for the change this year. It's always worth waiting for family to arrive and join the party, plus this gave me an extra day to get organized.

Leftover turkey before you roast a bird??? It's easy enough when you roast several turkey legs and thighs for gravy stock several days ahead of time. Today we enjoyed turkey and cheese stuffed enchiladas filled with said poultry, three cheeses, onion, poblano chile, mini sweet peppers, cilantro and some heat from ground chipotle chile and green taco sauce. Yes! they were delicious, and hooray! there's still some turkey left to enjoy in turkey posole or gumbo later next week. 


My enchiladas are random creations, never the same twice, but here is a close approximation of today's version. 


Turkey and Cheese Enchiladas Verde

1 Tbs oil
1/2 medium onion, diced
1/2 large poblano chile, seeded and diced, divided
1/2 tsp dried oregano
1/2 tsp dried cilantro
1/4 tsp chipotle chile powder
1/4 cup green taco sauce (La Victoria)
3 cups homemade turkey stock (+ 1/2 additional to mix with cornstarch)
1 heaping tablespoon cornstarch 
salt and pepper (optional)
1 1/2 cups shredded cooked turkey thigh meat 
4 mini sweet peppers, seeded and diced
1 cup kale, destemmed and rough chopped
generous 1/2 cup pepper jack cheese, shredded
generous 1/2 cup cheddar cheese, shredded
3 slices havarti, sliced for topping (or substitute another soft cheese)
5 medium-sized flour tortillas (more or less to fill the baking dish)

  1. Saute the onions in tablespoon of oil until translucent; add half of the poblano and cook to soften. Stir in the seasonings: oregano, cilantro and chipotle. 
  2. Add the taco sauce and turkey stock and simmer a while. Mix cornstarch with the additional 1/2 cup of cool stock and add to the pot to thicken into a thin sauce. Keep simmering (but don't boil or the cornstarch will loose its thickening effect). Taste, add salt and pepper if desired, and adjust seasonings as needed.
  3. Spoon some of the sauce into a baking dish to cover the bottom with a thin coating. (I used an 8x10-inch pan)
  4. In a medium-sized bowl mix combine the shredded turkey, shredded cheeses, remaining poblano, sweet peppers and kale. Add a little of the sauce, just enough to moisten and flavor.
  5. Dip a tortilla into the sauce and place on a dinner plate. Spoon a line of the turkey/cheese mix down the middle and roll up. Place seam side down in the sauced baking dish. Repeat with the remaining tortillas and filling.
  6. Drizzle any remaining sauce over the top of the enchiladas (optional). Cover with remaining cheese.
  7. Tent the baking dish with foil and bake for 30 minutes at 325 F. Uncover and bake an additional 20-30 minutes or until the top crisps up a bit and the cheese turns golden brown. Let the dish stand for several minutes until the sauce and cheese firm up a bit. 
  8. Serve with additional taco sauce, sour cream, avocado slices or guacamole. 

Monday, November 25, 2013

Microwave Risotto with Lemon and Broccoli


Hilary and Chelsea came by for another cooking session (see previous post) and their requested topic was Side Dishes 101. That covered a huge range of possibilities, so we narrowed it down to a vegetable and a starch. The girls suggested Brussels sprouts and rice, two ingredients that can be prepared in a variety of ways. We began with the sprouts, first Roasted Brussels Sprouts with Potatoes and Bacon and then Sprout Chips with a honey and Sriracha sauce. Next came a traditional stovetop Risotto with Mushrooms, Lemon and Basil followed by a Rice Pilaf with Nuts and Dried Fruits. The girls measured, chopped, stirred and tasted, and we filled the afternoon with good eats and laughing conversation. I organized, and they did all of the work cooking and cleaning up. Lucky me!


Evidently the leftovers were popular the following day as well:

"Thank you, thank you for such a fun cooking lesson yesterday! We could not stop talking about the dishes when we got home. I added some chicken to my rice pilaf and packed it up for lunch today...sure beats a cold turkey sandwich! I wonder if there will be any risotto left when I get home tonight ;)" 
Each dish took 45 minutes or longer in combined preparation and cooking time, an issue when you arrive home super-hungry after work and want something quick to eat, quick like right now. I wondered if risotto in the microwave would (1) speed up the process significantly and (2) produce an acceptable, authentic-tasting risotto. Barbara Kafka's 575-page Microwave Gourmet, a terrific guide to all things microwaveable, provided helpful guidance. This cookbook is so useful that I keep a copy in the kitchen ashore and have another copy onboard in the boat galley (thank you Jean for that second copy).


Kafka's risotto recipe recipe provides variations and directions for portions to serve 6, 2 or 1 as a first course. Single portions are handy when you want to test a new recipe, or to experiment swapping ingredients. I added lemon juice and zest, broccoli florets and parsley to the basic recipe-for-one, and was pleased with the result. The rice kernels finished perfectly, midway between too soft and too toothy, and the dish's overall flavor had a lovely citrusy tang. This was definitely a tasty rice dish worth repeating, but... not quite my usual, creamy risotto. Perhaps a larger 6-person batch, with more liquid and its longer 30-minute cooking time, would better approximate the classic version, but it wouldn't save much time for the cook. 


Final thoughts: microwave risotto is a useful preparation for one or two, but I will continue to use the traditional method for company meals. This is still a work in progress. Now, about risotto in the pressure cooker... there's another quick-cook method to try.


Microwave Risotto with Lemon and Broccoli
based on Barbara Kafka's Microwave Gourmet

Serves 1 as a first course, 2 as a side dish

1/2 Tablespoon butter
1/2 Tablespoon olive oil
1/4 cup Arborio rice
2 green onions, chopped; divided into white and green portions
handful of broccoli florets, chopped; divided into flowers and stems
juice of 1/2 lemon (approx 1 tablespoon)
1 1/4 cups homemade or lo-salt chicken broth, at room temperature
salt and white pepper, to taste
2 Tbs shredded fresh Parmesan
2 Tbs loosely packed, minced, fresh flat-leaf parsley
zest of 1/2 lemon (optional)
  1. Heat the butter and olive oil in a deep pie dish, uncovered, in a full-size microwave at full power for 30 seconds. 
  2. Add the rice, the chopped white portion of the onions and the chopped broccoli stems to the dish and stir to coat. Cook, uncovered, for 2 minutes.
  3. Add the broccoli florets, the lemon juice and all of the broth. Stir to mix and cook, uncovered for 6 minutes.
  4. Stir again and cook, uncovered, for 6 minutes. (Yes, that's a total of 12 minutes with some stirring in the middle.)  
  5. Remove from the microwave and let stand, uncovered, for 3 or 4 minutes. If you want a creamier risotto, this is a good time to add an additional tablespoon of chicken broth. Taste, then add salt and white pepper as needed.
  6. Stir in the Parmesan, green portion of chopped onions, minced parsley and lemon zest if you are using some.
Risotto can be made ahead of time, IF you hold back a portion of the liquid and stop the final cooking 2 minutes early. Cover the partially cooked dish and hold at room temperature. When you are ready to serve, add the remaining liquid and cook, uncovered, for 2 or 3 minutes.

Saturday, November 23, 2013

Fish in Parchment

Fish en Papillote... Take 3


The morning schedule today was chock-a-block full of errands and appointments that had me running all over town, from the south end to downtown and some in-betweens. By lunch time I was ready to either pick up take-out or drive home to pick up the husband and head for the local pub. Food... fast... right now... ran through my mind, repeating over and over like the moving banner on an animated ad. 

STOP! Mutual Fish was on the route home and provided a much healthier solution. I recall that happening once before, when H and I created some delicious variations of fish en papillote (link). My first experience with this technique came in 2012 (link), participating in a cooking challenge with The Daring Cooks, and it has become routine on board the boat. I don't often buy seafood ashore, but when I do it is guaranteed to come from Mutual.

Lunch at home was fast, easy and fabulous, a much better choice today than either take out or eating out... and more affordable even  than splitting a sandwich at our favorite local eatery.


Fish Baked in Parchment

For the fish package:
1 lemon, sliced
1 fat sturgeon steak (or other firm, white fish), roughly 3/4 pound
2 tablespoons tapenade (homemade olive spread)
2 tablespoons chopped fresh herbs (mixed Italian parsley and basil today)
salt and freshly ground pepper
1 scant tablespoon olive oil 
parchment paper to wrap 1 or 2 bundles

Serving suggestions:
cooked spaghetti or other long strand pasta
1 tablespoon olive oil
sprinkle of garlic powder
additional chopped fresh herbs for topping
1/4 cup shredded fresh Parmesan cheese (optional)
2 teaspoons capers, rinsed (optional)
  1. Preheat oven to 425 F.
  2. Layer the first 6 ingredients, lemon through olive oil, in the order listed on 10x12-inch piece of parchment paper.
  3. Double-fold the long edge to seal; double-fold the ends and tuck under.
  4. Place on baking sheet.
  5. Repeat with other fillet. (Refrigerate until ready to bake if you make this ahead).
  6. Place baking sheet on middle oven rack and bake approximately 12 minutes, depending upon thickness of the fish. At this temperature my oven takes 12-15 minutes per inch of thickness. 
  7. Open one parcel to check for doneness; the fish should be opaque and flake easily. Remove the fish from the oven before it is completely done - it will continue to cook for several minutes while out of the oven. Be careful not to overcook your seafood - ever!
  8. Serve parcels immediately, still wrapped so each diner can enjoy the fragrant steamy flavors as they open their individual serving. 
OR serve the contents of each parcel (including the juices) on warm plates atop cooked pasta sauced with olive oil and garlic powder. Sprinkle with fresh herbs (and Parmesan and capers if you choose). Serve immediately.


Notes: 
 * If you serve the packages still wrapped, provide a bowl of cooked rice, quinoa or couscous for diners to spoon inside their opened bundle. The juices are too good to leave behind.
 * RL reports a final squeeze of fresh lemon juice is essential, no matter how you serve the fish! 


Wednesday, November 20, 2013

Cream Cheese Kolacky

for Sourdough Surprises: November 2013


Kolacky, kolachy or kolache mean different baked goods in different cultures. Some are sweet, some savory, some have a yeast-based dough, others feature a cream cheese and butter base. When Sourdough Surprises announced Kolache, a soft pastry that is typically filled with sweetned cheese or fruit, as the November theme, I cheered and turned to a well-worn, 3"x5" card, handwritten by my Austrian-born mother long ago when I was a newlywed. Mom's recipe came from her mother, though it's origin before then is uncertain. 


Some food memories recall special moments and family traditions, and these Kolacky do that for me. Kolacky, along with Apfelstrudel , Kupferlin (Viennese Almond Crescents),fruit and nut-filled Austrian coffee cakes and Mom's secret weapon Applesauce Rum Cake have graced the table at decades of Christmas celebrations and birthday parties, as much a part of the festivities as the people who enjoy them. Four generations of our family have relished these treats over the years, but this was the first batch to alter the traditional recipe and incorporate sourdough starter. I won't tell Mom if you don't. 


This dough holds no salt and no sugar, but they aren't missed. The sweet fillings don't require any flavor boost from the dough. Any hint of the typical sourdough tang was not discernible, but the starter seemed to react with the baking powder and lighten the dough a bit... maybe. Whatever, the end result made it worth all of my fussing and fiddling with the troublesome dough to form each cookie-like pastry  


Troublesome? Oh yes! this dough is notorious for changing from too cold and hard to roll almost instantly into too warm and sticky to handle. Rolling chilled dough between two sheets of plastic wrap solved the rolling problem, but filling and forming called for fast action. Pinching the diagonal corners seemed easy enough, but too many of them unfolded during the final 4 or 5 minutes of baking as the dough puffed. 


Pinching all 4 corners and securing with a toothpick was one solution, though it did produce an unusual-looking kolacky. No matter, sprinkled with powdered sugar these square bundles disappeared as quickly as the others with more traditional shapes.


Kolacky are bite-sized treats, so light it's easy to eat half a dozen or more before you realize what you've done. The plate below holds roughly half of today's single batch - all that I could rescue for a photo before enthusiastic tasters reached for "just one more".


Kolacky with Cream Cheese Dough  
(from the family recipe, today's notes in red)
approx 6 dozen cookies

1 8-ounce package cream cheese, at room temperature
1/2  pound butter (2 sticks), at room temperature
2 generous cups AP flour (rounded to account for the liquid in the starter)
1/4 cup well-fed sourdough starter (not in the traditional recipe)
1/2 teaspoon Baking Powder
plus your favorite fruit filling*
powdered sugar to dust over the baked cookies

Directions
  1. Cream together the cream cheese and butter in the bowl of a stand mixer. (Add the sourdough starter and mix briefly.)
  2. Sift together the flour and baking powder and add to the cream cheese mixture. Mix just until the dough comes together.
  3. Divide the dough into 6 equal portions, form into disks and wrap each separately in plastic wrap. Chill in the refrigerator for several hours or overnight. (Don't skip this step, you'll thank me later.)
  4. Working with one dough disk at a time, keeping the others in the fridge, roll out very thin between two sheets of plastic wrap. Cut into 2-inch squares. Put a small amount of filling in the center of each square. (Don't overfill, it will run out while it bakes.) Press 2 diagonal corners together and place on a silpat or prepared cookie sheet. Repeat for remaining dough.
  5. Bake at 350 degrees F for 10-12 minutes or until lightly browned. Rotate position midway through baking, avoid over-browning. Remove to a baking rack and dust with powdered sugar.
  6. Best eaten the same day, but they will hold for several days stored in the fridge in a covered container. 
*Today's Fillings
 - my homemade Spicy Italian Plum Jam
 - Bonne Maman's Fig Jam, plus a handful of pignoli (pine nuts)
 - Bonne Maman's Apricot Preserve

Mom's fillings
 - canned Solo or Wilderness brand filling (apricot, poppy seed and 
almond are favorites)
 - homegrown apricot jam, whizzed up in the blender
 - storebought apricot or strawberry jam with orange or lemon extract added for extra tartness to tame the sweet


Saturday, November 16, 2013

Sour Cream Cinnamon Twists

#Twelve Loaves: Spice


Sour Cream Cinnamon Twists, warm and smelling like apple pie, were our morning's breakfast treats. They were mixed, baked and on the table in almost no time at all. These sweet little bites came together quickly in the bowl of a stand mixer, took a mere ten minutes to fill and twist, and then sat rising, unattended, for an hour while I made coffee, cut fruit, etc. Baked for 15 minutes at 375 F, the twists filled the kitchen with a heavenly aroma, somewhere between apple pie and cinnamon rolls. We enjoyed ours drizzled with a loose powdered sugar/apple cider frosting. Mmmmmm, good... and so easy on a busy morning. 

I'll reheat some tomorrow on the stovetop, nestled in a steamer above a pan of simmering water to keep them moist. The microwave can dry them out too easily so I find the steamer/bun warmer approach is a better choice.


No matter how tempting, no cinnamon twist will ever replace our favorite Sticky Buns, but these were a hit this morning when we craved something sweetly spiced wrapped in a warm dough. These sour cream cinnamon twists were my response to this month's theme for the #TwelveLoaves bakers. Take a few minutes to investigate some of their spicy baking this month.(link)

 #TwelveLoaves November-Spice. Temperatures are dropping  and it is the right moment to explore bread and SPICE! Share your November Spice Bread (yeast or quick bread). Let's get baking!
 #TwelveLoaves is a monthly bread baking party created by Lora from Cake Duchess.  #TwelveLoaves runs so smoothly thanks to the help of the lovely Paula from Vintage Kitchen Notes and Renee from Magnolia Days.


Sour Cream Cinnamon Twists
Makes 2 dozen twists

For Dough:
1/4 cup warm water (100 to 115 degrees F)
1 package active dry yeast (2 1/4 tsp)
3 Tablespoons granulated sugar
1 large egg
3/4 cup sour cream at room temperature
3 cups AP flour
1 teaspoon salt
1/4 teaspoon apple pie spice 
1/8 taspoon baking soda

For Filling:
2 Tablespoons butter at room temperature
1/3 cup brown sugar, packed
1 teaspoon cinnamon
1/4 teaspoon apple pie spice

Directions:

  1. Use the bowl of a stand mixes and dissolve yeast in the warm water. Add the remaining ingredients, mix and knead.
  2. Turn dough out onto a floured board and knead or fold several times until smooth. Roll into an oblong, 24x6". 
  3. Spread with the soft butter. Sprinkle half of the dough (along the length) with the brown sugar, cinnamon and apple pie spice. Fold the other half of the dough over the sugared half. Cut into 24 strips 1" wide.
  4. Hold each strip at both ends, twist in opposite direction a few times. Place on a silpat or greased baking sheet, about 2" apart, and press down firmly on both ends to hold in place.
  5. Cover and let rise, roughly an hour or so, until somewhat puffy.
  6. Bake in a preheated 375 F oven for 12-15 minutes, or until golden brown. 
  7. To serve: Sprinkle with powdered sugar, frost with a soft powdered sugar icing, or serve with your favorite fruit jam. 

Sunday, November 10, 2013

Pesto Tapenade... or Tapenade Pesto


Artichoke Pesto Tapenade in a Grilled Cheese Sandwich - SRC Reveal


Salty, savory bites are my favorites, no question about that, so those flavors were the drivers in my search for this month's Secret Recipe Club choice. I enjoyed browsing through nearly 4 years worth of Corina's posts at my assigned site, Searching for Spice, a UK blog packed chock full of sweet and savory items. Some sweets, like Rocky Road Squares, did tempt me, and I'll revisit them for the holidays. Corina's Cardamom and Pistachio Ice Cream sounded divine too, but this month I focused on her many savory recipes. Two fish preparations were strong contenders, one a Jamie Oliver recipe for white fish cooked with spinach, olives and tomatoes, and another for fish baked en papillote with olives and lemon. Olives drew my attention again in a tapenade. I sense a pattern there. Unable to decide between recipes for pesto and tapenade, I took the easy route and combined elements of both, adding a few extras along the way. It sounds a bit random, but it worked.   

What's the difference between pesto and tapenade? I Googled both terms and found the following at PoshGourmet:
Pesto [PEH-stoh] — This uncooked, herbal sauce comes from Genoa. Classic method is to combine crushed or chopped fresh basil, pine nuts, parmesan cheese and olive oil. 
Tapenade [TA-puh-nahd; ta-pe-AHD] — This tasty thick paste comes from Provence. The ‘classic’ ingredients are capers, anchovies, ripe olives, olive oil, lemon juice, and seasonings. It is classified as a condiment.
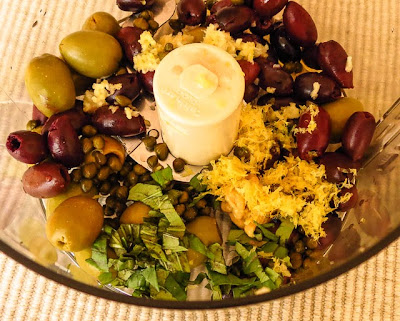
First up was the tapenade, a chunky mix of green and black olives, capers, fresh basil, lemon zest and juice plus a lot of garlic. Anchovies are traditional, and I do love them in dressings and on pizza, but the saltiness of this mix was already over the top. So I skipped the anchovies and added a dollop of Dijon mustard and a sprinkling of dried Italian herbs instead.


After a few quick pulses in a food processor the tapenade was almost what I was looking for - tangy with a bit of a bite. More fresh basil, some toasted pine nuts, a jar of marinated artichoke hearts and a cloud of grated Parmesan cheese joined the party, followed by a few drizzles of olive oil. Mix. Taste. Smile. Adding those traditional pesto ingredients moved the flavors along to a brighter result, less of a one-note, overly-salty, olivey taste. Oh yes, this final combination was seriously delicious!


So what do I call this merging of recipes - pesto or tapenade? Is it a sauce or a condiment? Italian or French? My Artichoke Basil Olive Pesto Tapenade is definitely not a classic...  anything. Who cares?! It is deliciously habit-forming, an assertive, flavorful treat. Yesterday it starred as a quick and easy Pesto Tapenade Sauce for pasta at lunch. Delicioso!


Today it was a Tapenade Pesto Spread that lifted an ordinary grilled cheese sandwich to a whole new level. Scrumptious! 


Use Artichoke Pesto Tapenade to build a muffuletta sandwich, or top a cracker or liven up some crostini. Try it as a pizza topping or ... well, whatever, be adventurous and try it in your galley. 


Artichoke Pesto Tapenade
inspired by 2 recipes from Corina at SearchingforSpice

3 oz pitted green olives
5 oz pitted Kalamata olives
2 Tbs capers, drained & rinsed
2 - 3 cloves garlic, minced or pressed
zest and juice of 1 small lemon 
large handful of fresh basil, roughly torn or chopped
1 Tbs Dijon mustard
1/4 cup pine nuts, toasted in skillet until fragrant
1 small jar marinated artichoke hearts, drained & roughly chopped
a generous pinch of dried Italian Seasoning (blend your favorites)
1/2 cup Parmesan cheese, freshly grated
2 - 3 Tbs olive oil (more or less as needed)

Place all ingredients except cheese and olive oil in the bowl of a food processor. Pulse in short bursts until the pieces are roughly the same size, adding olive oil as needed to hold the mix together. Stir in the cheese with a spoon or spatula. Be careful not to overprocess or you will end up with an olive paste, still tasty but really ugly.

Taste and adjust to suit your palate. 
Note: To sauce pasta you may want to add more olive oil to loosen it up, perhaps add some hot pasta water to the tossed pasta and tapenade if you like it even saucier


Sunday, November 3, 2013

Apple Pie Swedish Pancakes


The word apple goes hand-in-hand with a vivid image of the iconic Red Delicious apple, a shiny, picture-perfect beauty, the poster fruit for Autumn. But true appledom extends far beyond that one variety. Over 7500 different cultivars of apples are now available, with more being developed every year for cooking, eating and making cider. Apples are not native to the New World. They originated in Central Asia and even today China produces roughly half of the world's apple crop. That said, Washington State is justifiably proud of its record of producing more than half of all apples grown in the United States for fresh eating. This week I'm especially fond of Honeycrisp for eating fresh and Granny Smith for baking purposes.    


Apples are an especially welcome Fall treat as local berries and stone fruits disappear from the market. The versatile apple shines whether eaten raw as a snack, added to salads and sandwiches, or used as a main ingredient or a sweet filling in all sorts of baked goods and breakfast foods. 


This week we had our first Apple Pie Swedish Pancakes. Saturday's breakfast celebrated apples, filled the kitchen with the enticing aroma of apple pie, and was on the table in under 30 minutes. Woo Hoo! Think apple pie substitute, incorporating all of the flavors and fragrance without the hassle of preparing a pie crust. Oh yes, that was a very good move before my first cup of coffee. 


We often enjoy apple-filled crepes, but this is the first time that I've seasoned the pancake batter with apple pie spices. Mmmmm, these thin pancakes were light, flavorful and totally applelicious even before I added apple filling. Folded and filled they were even better. This recipe is a keeper.  


Apple Pie Swedish Pancakes
Makes 8 to 10 pancakes in a 9-inch skillet

2 eggs, beaten
1 cup milk, + more as needed to thin batter
1 cup AP flour
1 teaspoon sugar
1/4 teaspoon salt
1 teaspoon vanilla extract
1 teaspoon cinnamon
1/4 teaspoon nutmeg
1/4 teaspoon cardamom
1/2 teaspoon Apple Pie Spice Mix (I use Penzey's)
1/3 cup butter, melted
juice plus the grated zest of 1 small lemon

Apple slices, sprinkled with cinnamon and sugar and warmed in a small, non-stick skillet (optional)

Directions:
Use a blender and combine the first 10 ingredients, eggs through Apple Pie spice. Cover with a lid, but remove the center piece. Run the blender at low speed and slowly add the melted butter, lemon juice and lemon zest. Use a spatula to dislodge any flour pockets and briefly whiz up again. Set aside while you heat a large non-stick skillet over medium-high heat. (Caution: use a pan with a smooth interior; grooved, non-stick pans will grab the batter, causing the pancake to stick... I guarantee it!)

Hold the skillet in your right hand. Use your left hand to ladle a scant 1/4 cup of batter into the bottom of  the heated pan while at the same time turning and tilting the pan to distribute the batter thinly and evenly. (Think crepe.) Cook until done and lightly browned on one side, then flip to finish and brown slightly on the other side. Roll up into a cylinder or fold in half or into quarters; place on a rack and hold in a warm oven (200 degree or less). Repeat with remaining batter.

Fill with warmed cinnamon-sprinkled apple slices and serve.
Or serve with warm sauce, jam or syrup. 
Or dust with powdered sugar and serve with lemon wedges.

Other apple recipes you might enjoy from OnTheMove-In The Galley:
Fresh Apple Quick Bread
Apple Cheese Torte
Apple and Walnut Coffee Cake
Apple Skillet Pancake
Apple Almond Crostata
Tangy Mixed Fruit Chutney

Related Posts Plugin for WordPress, Blogger...